CC BY-NC-SA: This work is licensed under the Creative Commons
Attribution-NonCommercial-ShareAlike 4.0 International License. To view
a copy of this license, visit http://creativecommons.org/licenses/by-nc-sa/4.0/
or send a letter to Creative Commons, PO Box 1866, Mountain View, CA
94042, USA.
To my wife Tarunya, for her support through the ups and downs of
this project. — Adam Stepinski
Annem Lamia Akşimşek ve babam Özgür Akşimşek’e. — Deniz
Akşimşek
Foreword
Contents
Foreword
While there have been many books on the topic of hypermedia, there is
a select number of publications that chronicle important advances in the
field of hypermedia and this book is one of them. Not only does this
book describe the benefits of creating hypermedia-driven applications
(HDAs), it leads the reader through working and practical examples of
how to do just that. And, in doing so, the authors (Gross, Stepinski,
and Akşimşek) call out contributions from important figures in the
history of hypermedia systems. And, as of this writing, that history
spans more than half a century.
In 1974, Ted Nelson’s “Computer Lib/Machine Dreams” marked
the start of the modern hypermedia era with a book that Steven Levy
(author of “Hackers”) described as “the epic of the computer
revolution.” Nelson is credited with coining the terms HyperText,
HyperLink, HyperMedia, and HyperData as well as Intertwingularity; the
notion that all information is connected — both intertwined and
intermingled. Almost half a century ago, he foretold a future where any
person could publish anything anytime without the need for permission
from any central controlling source. And his hyperlinks were the engine
of that future.
It took two decades before Nelson’s idea of intertwingled computing
became widespread. Along the way, Douglas Engelbart created the
oN-Line System or NLS, Wendy Hall built the Microcosm,
and, eventually, in the 1980s, Tim Berners-Lee defined the World Wide
Web (WWW), HTML, and HTTP. It was Berners-Lee’s iteration that has
become the backbone and the standard for the intertwingularity we all
experience today.
By the year 2000, the technical foundations of “the web” were
documented in Roy Fielding’s PhD dissertation “Architectural Styles
and the Design of Network-based Software Architectures”). In that
work, Fielding defined the architectural model of REpresentational
State Transfer or REST. This set of system properties and
implementation constraints have proven — even a quarter-century later —
to be a reliable model for designing and building the intertwingled
machines that today affect billions of people around the globe.
Even though Fielding’s work was important, it wasn’t until Leonard
Richardson and Sam Ruby published “RESTful Web Services” in
2008 that the REST model became well-known to the world of software
architecture and development. Backed by the Ruby programming platform,
the ideas behind Fielding’s REST model became de rigueur for
the creation of web-based services and client applications.
One of the reasons Richardson and Ruby’s work was so important was
that, unlike dissertations and futuristic predictions, the RESTful
Web Services book outlined a practical working framework for
building powerful applications for the Web. It described not only the
power of REST but also provided step-by-step instructions on how to
build them. Richardson and Ruby brought together the hypermedia
scholarship of the previous twenty years all in one place.
And now we can add this book (“Hypermedia Systems”) to that
list of important works. From the book’s introduction through the
step-by-step directions on how to use HTMX for browsers and Hyperview
for mobile devices, the authors describe the benefits of creating
hypermedia-driven applications (HDAs). They also offer dozens of
practical working examples the reader can use right away in building
their own hypermedia solutions.
I’ve been working in the field of hypermedia for close to thirty
years and have seen quite a few books, papers, dissertations, and
programming platforms come and go in that time. Occasionally, one of
these works “nails it” — provides the right mix of theory and practice
delivered in a way that helps readers make a connection between their
own efforts and the activities of the community at large. I am happy to
say that this book is one of those works. The authors have not only
created powerful tooling in HTMX and Hyperview, they have also advanced
the notion of hypermedia systems and hypermedia-driven applications in
ways that a wide audience can understand and apply.
Nelson describes a future where the barriers to publishing and data
sharing are lowered and the creative energies of the world are easily
shared and applied. This is neither a new or unique idea but one that
does need continual renewal and encouragement. Nelson saw his hyperlink
and hypermedia as the driving force for intertwingularity between people
and machines around the world. In this idea alone, hypermedia is a
powerful approach to creating computer systems that enable people to
work together for the common good. As this book’s authors say,
“Hypermedia was a great idea! It still is!”
This is a book about building applications using hypermedia systems.
Hypermedia systems might seem like a strange phrase: how is
hypermedia a system? Isn’t hypermedia just a way to link
documents together?
Like with HTML, on the World Wide Web?
What do you mean hypermedia systems?
Well, yes, HTML is a hypermedia. But there is more to the
way the web works than just HTML: HTTP, the Hyper Text Transfer
Protocol, is what transfers HTML from servers to clients, and there are
many details and features associated with it: caching, various headers,
response codes, and so forth.
And then, of course, there are hypermedia servers, which
present hypermedia APIs (yes, APIs) to clients over
the network.
And, finally, there is the all-important hypermedia client:
a software client that understands how to render a hypermedia
response intelligibly to a human, so that a human can interact with
the remote system. The most widely known and used hypermedia clients
are, of course, web browsers.
Web browsers are perhaps the most sophisticated pieces of software we
use. They not only understand HTML, CSS and many other file formats, but
they also provide a JavaScript runtime and programming environment that
is so powerful that web developers can create entire applications in it
that are nearly as sophisticated as thick clients, that is,
native applications.
This JavaScript runtime is so powerful, in fact, that today many
developers ignore the hypermedia features of the browser, in
favor of building their web applications entirely in JavaScript.
Applications built in this manner have come to be called Single Page
Applications (SPAs). Rather than navigating between pages, these web
applications use JavaScript for updating the user interface directly.
When they communicate with a server, these applications typically use
JSON API calls via AJAX. And they often update the user interface using
a “reactive” style frontend JavaScript library.
In these applications HTML becomes a (somewhat awkward) graphical
interface description language that is used because, for historical
reasons, that’s what happens to be there, in the browser.
Applications built in this style are not hypermedia-driven:
they do not take advantage of the underlying hypermedia system of the
web.
To explain what a hypermedia-driven application looks like, and to
contrast it with the popular SPA approach of today, we need to first
explore the entire hypermedia system of the web, beyond just
discussing HTML. We need to look at the network architecture of
the web, including how a web server delivers a hypermedia API, and how
to effectively use the hypermedia features available in the hypermedia
client (e.g., the browser).
Each of these are important aspects of building an effective
hypermedia-driven application, and it is the entire hypermedia
system that comes together to make hypermedia such a powerful
architecture.
What is a Hypermedia System?
To understand what a hypermedia system is we’ll first take an
in-depth look at the canonical hypermedia system: the World
Wide Web. Roy Fielding, an engineer who helped create specifications and
build the implementations of many early pieces of the web, gave us the
term REpresentational State Transfer, or REST. In his PhD dissertation
he described REST as a network architecture, and he contrasted
it with earlier approaches to building distributed software.
We define a hypermedia system as a system that adheres to
the RESTful network architecture in Fielding’s original sense
of this term.
Unfortunately, today, you probably associate the term “REST” with
JSON APIs, since that is where the term is typically used in industry.
This is a misapplied use of the term REST because JSON is not a
natural hypermedia due to the absence of hypermedia controls.
The exchange of hypermedia is an explicit requirement for a system to be
considered “RESTful.” It is a long story how we got here, using the term
REST so incorrectly, and we will go into the details later in this book.
But, for now, if you think REST implies JSON, please try to set that
understanding aside while reading this book, and come to the concept
with fresh eyes.
It is important to understand that, in his dissertation, Fielding was
describing The World Wide Web as it existed in the late 1990s. The web,
at that point, was simply web browsers exchanging hypermedia. That
system, with its simple links and forms, was what Fielding was calling
RESTful.
JSON APIs were a decade away from becoming a common tool in web
development: REST was about hypermedia and the 1.0 version of
the web.
Hypermedia-Driven Applications
In this book we are going to take a look at hypermedia as a
system architecture and then explore some practical,
modern approaches to building web applications using it. We
will call applications built in this style Hypermedia-Driven
Applications, or HDAs, and we contrast them with a popular style in
use today, the Single Page Application.
A Hypermedia-Driven Application is an application built on top of a
hypermedia system that respects and utilizes the hypermedia
functionality of that underlying system.
Goals
The goal of this book is to give you a strong sense of how the
RESTful, hypermedia system architecture differs from other
client-server systems, and what the strengths (and weaknesses) of the
hypermedia approach are. Further, we hope to convince you that the
hypermedia architecture is relevant to developers building
modern web applications.
We aim to give you the tools to evaluate the requirements for an
application and answer the question:
“Could I build this as a Hypermedia-Driven Application?”
We hope that for many applications the answer to that question will
be “Yes!”
Book Layout
The book is broken into three parts:
An introduction (or re-introduction) to hypermedia, with a
particular focus on HTML and HTTP. We will finish this review of core
hypermedia concepts by creating a simple “Web 1.0“-style application,
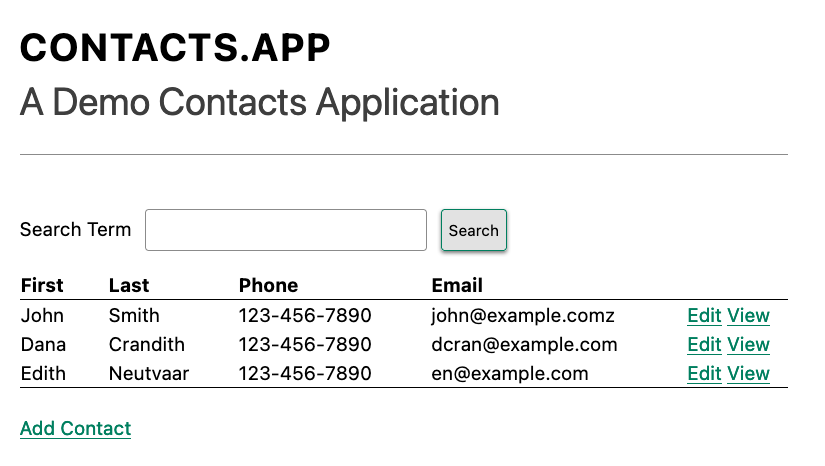
Contact.app, for managing contacts.
Next we will look at how we can use htmx, a hypermedia-oriented JavaScript
library created by the authors of this book, to improve Contact.app. By
using htmx, we will be able to achieve a level of interactivity in our
application that many developers would expect to require a large,
sophisticated front end library, such as React. Thanks to htmx, we will
be able to do this using hypermedia as our system architecture.
Finally, we will look at a completely different hypermedia
system, Hyperview. Hyperview is a mobile hypermedia system,
related to, but distinct from the web and created by one of the authors
of this book – Adam Stepinski. It supports mobile specific
features by providing not only a mobile specific hypermedia, but also a
mobile hypermedia client. These novel components, combined with any HTTP
server, make it possible to build mobile Hypermedia-Driven
Applications.
Note that each section is somewhat independent of the
others. If you already know hypermedia in-depth and how basic Web 1.0
applications function, you may want to skip ahead to the second section
on htmx and how to build modern web applications using hypermedia.
Similarly, if you are well versed in htmx and want to dive into a novel
mobile hypermedia, you can skip ahead to the Hyperview
section.
That being said, the book is designed to be read in order and both
the htmx and Hyperview sections build on the Web 1.0 application
described at the end of the first section. Furthermore, even if you
are well versed in all the concepts of hypermedia and details
of HTML & HTTP, it is likely worth it to at least skim through the
first few chapters for a refresher.
Hypermedia: A New Generation
Hypermedia isn’t a frequent topic of discussion these days. Even many
older programmers who grew up with the web in the late 1990s and early
2000s haven’t thought much about these ideas in years. Many younger web
developers have grown up knowing nothing but Single Page Applications
and the frameworks that are used to build them.
In particular, many young web developers began their careers by
building React.js applications that interact with a Node server using a
JSON API; they may never have learned about hypermedia as a system at
all.
This is a tragedy, and, frankly, a failure on the part of the thought
leaders in the web development community to properly communicate and
advocate for the hypermedia approach.
Hypermedia was a great idea! It still is!
By the end of this book, you will have the tools and the
language to put this great idea to work in your own
applications. And, further, you will be able to bring the ideas and
concepts of hypermedia systems to the broader web development
community.
Hypermedia can compete, hypermedia can win, hypermedia
has won as an architectural choice against the Single Page
Application approach, but only if smart people (like you) learn
about it, build with it and then tell the world about it.
Remember the message? “The future is not set. There is no fate but
what we make for ourselves.”
Kyle Reese, Terminator 2: Judgement Day
HTML Notes: Hypermedia In Practice
Clearly, HTML plays a central role in the story we tell here. At the
end of each chapter we will share what we have learned about writing
HTML for hypermedia-driven web applications.
To start, remember that our web applications are not islands. We’re
writing HTML not just for a particular application, but also to play
along with other members of the web. When we write with the hypermedia
system in mind, we’re better able to tap the range of abilities
available to the web.
HTML is hypermedia-friendly when it is written for the full range of
constituents of the hypermedia system. It conveys the state of an
application to people viewing our sites with a browser, as well as to
people listening to screen readers that read sites aloud. It conveys the
aims of our sites to search engines that scrape sites programmatically.
It also conveys its behavior as clearly as possible to other
developers.
No, we can’t fix every problem with good HTML. The mantra that HTML
is “accessible by default” is misleading. We would miss out on important
opportunities if we shunned other technologies like JavaScript. And we
still need to test, a lot, everywhere, to ensure things work as
expected.
But good HTML lets browsers do a lot of work for us.
Hypermedia is a universal technology today, almost as common as
electricity.
Billions of people use hypermedia-based systems every day, mainly by
interacting with the Hypertext Markup Language (HTML) being
exchanged via the Hypertext Transfer Protocol (HTTP) by using a
web browser connected to the World Wide Web.
People use these systems to get their news, check in on friends, buy
things online, play games, send emails and so forth: the variety and
sheer number of online services being delivered by hypermedia is truly
astonishing.
And yet, despite this ubiquity, the topic of hypermedia itself is a
strangely under-explored concept today, left mainly to specialists. Yes,
you can find a lot of tutorials on how to author HTML, create links and
forms, etc. But it is rare to see a discussion of HTML as a
hypermedia and, more broadly, on how an entire hypermedia
system fits together.
This is in contrast with the early web development era when concepts
like Representational State Transfer (REST) and Hypermedia
As The Engine of Application State (HATEOAS) were discussed
frequently, refined and debated among web developers.
In a sad turn of events, today, the world’s most popular hypermedia,
HTML, is often viewed resentfully: it is an awkward, legacy markup
language that must be grudgingly used to build user interfaces in what
are increasingly entirely JavaScript-based web applications.
HTML happens to be there, in the browser, and so we have to use
it.
This is a shame and we hope to convince you that hypermedia is
not simply a piece of legacy technology that we have to accept
and deal with. Instead, we aim to show you that hypermedia is a
tremendously innovative, simple and flexible way to build
robust applications: Hypermedia-Driven Applications.
We hope that by the end of this book you will feel, as we do, that
the hypermedia approach deserves a seat at the table when you, a web
developer, are considering the architecture of your next application.
Creating a Hypermedia-Driven Application on top of a hypermedia
system like the web is a viable and, indeed, often excellent choice
for modern web applications.
(And, as the section on Hyperview will show, not just web
applications.)
What Is Hypermedia?
Hypertexts: new forms of writing, appearing on computer screens, that
will branch or perform at the reader’s command. A hypertext is a
non-sequential piece of writing; only the computer display makes it
practical.
Let us begin at the beginning: what is hypermedia?
Hypermedia is a media, for example a text, that includes
non-linear branching from one location in the media to another,
via, for example, hyperlinks embedded in the media. The prefix “hyper-”
derives from the Greek prefix “ὑπερ-” which means “beyond” or “over”,
indicating that hypermedia goes beyond normal, passively
consumed media like magazines and newspapers.
Hyperlinks are a canonical example of what is called a hypermedia
control:
Hypermedia Control
A hypermedia control is an element in a hypermedia that describes (or
controls) some sort of interaction, often with a remote server, by
encoding information about that interaction directly and completely
within itself.
Hypermedia controls are what differentiate hypermedia from other
sorts of media.
You may be more familiar with the term hypertext, from whose
Wikipedia page the above quote is taken. Hypertext is a sub-category of
hypermedia and much of this book is going to discuss how to build modern
applications using hypertexts such as HTML, the Hypertext Markup
Language, or HXML, a hypertext used by the Hyperview mobile hypermedia
system.
Hypertexts like HTML function alongside other technologies crucial
for making an entire hypermedia system work: network protocols like
HTTP, other media types such as images and videos, hypermedia servers
(i.e., servers providing hypermedia APIs), sophisticated hypermedia
clients (e.g., web browsers), and so on.
Because of this, we prefer the broader term hypermedia
systems when describing the underlying architecture of applications
built using hypertext, to emphasize the system architecture over the
particular hypermedia being used.
It is the entire hypermedia system architecture that is
underappreciated and ignored by many modern web developers.
A Brief History of
Hypermedia
Where did the idea of hypermedia come from?
While there were many precursors to the modern idea of hypertext and
the more general hypermedia, many people point to the 1945 article
As We May Think written by Vannevar Bush in The
Atlantic as a starting point for looking at what has become modern
hypermedia.
In this article Bush described a device called a Memex, which, using
a complex mechanical system of reels and microfilm, along with an
encoding system, would allow users to jump between related frames of
content. The Memex was never actually implemented, but it was an
inspiration for later work on the idea of hypermedia.
The terms “hypertext” and “hypermedia” were coined in 1963 by Ted
Nelson, who would go on to work on the Hypertext Editing System
at Brown University and who later created the File Retrieval and
Editing System (FRESS), a shockingly advanced hypermedia system for
its time. (This was perhaps the first digital system to have a notion of
“undo”.)
While Nelson was working on his ideas, Douglas Engelbart was busy at
work at the Stanford Research Institute, explicitly attempting to make
Vannevar Bush’s Memex a reality. In 1968, Englebart gave “The Mother of
All Demos” in San Francisco, California.
Englebart demonstrated an unbelievable amount of technology:
Remote, collaborative text editing with his peers in Menlo
Park
Video and audio chat
An integrated windowing system, with window resizing,
etc
A recognizable hypertext, whereby clicking on underlined text
navigated to new content.
Despite receiving a standing ovation from a shocked audience after
his talk, it was decades before the technologies Englebart demonstrated
became mainstream.
Modern Implementation
In 1990, Tim Berners-Lee, working at CERN, published the first
website. He had been working on the idea of hypertext for a decade and
had finally, out of desperation at the fact it was so hard for
researchers to share their research, found the right moment and
institutional support to create the World Wide Web:
Creating the web was really an act of desperation, because the
situation without it was very difficult when I was working at CERN
later. Most of the technology involved in the web, like the hypertext,
like the Internet, multifont text objects, had all been designed
already. I just had to put them together. It was a step of generalising,
going to a higher level of abstraction, thinking about all the
documentation systems out there as being possibly part of a larger
imaginary documentation system.
Tim Berners-Lee,
https://britishheritage.org/tim-berners-lee-the-world-wide-web
By 1994 his creation was taking off so quickly that Berners-Lee
founded the W3C, a working group of companies and researchers tasked
with improving the web. All standards created by the W3C were
royalty-free and could be adopted and implemented by anyone, cementing
the open, collaborative nature of the web.
In 2000, Roy Fielding, then at U.C. Irvine, published a seminal PhD
dissertation on the web: “Architectural Styles and the Design of
Network-based Software Architectures.” Fielding had been working on the
open source Apache HTTP Server and his thesis was a description of what
he felt was a new and distinct networking architecture that had
emerged in the early web. Fielding had worked on the initial HTTP
specifications and, in the paper, defined the web’s hypermedia network
model using the term REpresentational State Transfer
(REST).
Fielding’s work became a major touchstone for early web developers,
giving them a language to discuss the new technical medium they were
building applications in.
We will discuss Fielding’s key ideas in depth in Chapter 2, and try
to correct the record with respect to REST, HATEOAS and hypermedia.
The World’s Most
Successful Hypertext: HTML
In the beginning was the hyperlink, and the hyperlink was with the
web, and the hyperlink was the web. And it was good.
Rescuing REST From the API Winter,
https://intercoolerjs.org/2016/01/18/rescuing-rest.html
The system that Berners-Lee, Fielding and many others had created
revolved around a hypermedia: HTML. HTML started as a read-only
hypermedia, used to publish (at first) academic documents. These
documents were linked together via anchor tags which created
hyperlinks between them, allowing users to quickly navigate
between documents.
When HTML 2.0 was released, it introduced the notion of the
form tag, joining the anchor tag (i.e., hyperlink) as a
second hypermedia control. The introduction of the form tag made
building applications on the web viable by providing a
mechanism for updating resources, rather than just reading
them.
It was at this point that the web transitioned from an interesting
document-oriented system to a compelling application
architecture.
Today HTML is the most widely used hypermedia in existence and this
book naturally assumes that the reader has a reasonable familiarity with
it. You do not need to be an HTML (or CSS) expert to understand the code
in this book, but the better you understand the core tags and concepts
of HTML, the more you will get out of it.
The Essence of HTML as a
Hypermedia
Let us consider these two defining hypermedia elements (that is the
two defining hypermedia controls) of HTML, the anchor tag and
the form tag, in a bit of detail.
Anchor tags
Anchor tags are so familiar as to be boring but, as the original
hypermedia control, it is worth reviewing the mechanics of hyperlinks to
get our minds in the right place for developing a deeper understanding
of hypermedia.
Consider a simple anchor tag, embedded within a larger HTML
document:
An anchor tag consists of the tag itself,
<a></a>, as well as the attributes and content
within the tag. Of particular interest is the href
attribute, which specifies a hypertext reference to another
document or document fragment. It is this attribute that makes the
anchor tag a hypermedia control.
In a typical web browser, this anchor tag would be interpreted to
mean:
Show the text “Hypermedia Systems” in a manner indicating that it
is clickable
When the user clicks on that text, issue an HTTP GET
request to the URL https://hypermedia.systems/
Take the HTML content in the body of the HTTP response to this
request and replace the entire screen in the browser as a new document,
updating the navigation bar to this new URL.
Anchors provide the main mechanism we use to navigate around the web
today, by selecting links to navigate from document to document, or from
resource to resource. [fig-get-in-action] shows what a user interaction with
an anchor tag/hyperlink looks like in visual form.
┌────────────────────────┐      ┌─HTTP REQUEST────────────────┐
│ BROWSER              X │      │                             │
├────────────────────────┤      │ GET /                       │
│                        │      │ Host: hypermedia.systems    │
│ lorem ipsum dolor      │      └─────────────────────────────┘
│                        │
│ Hypermedia Systems ────┼───────────┐
│ ──────────────────     │           │
│ sit amet               │           │
│                        │           │
└────────────────────────┘           │
                              ┌──────▼──────┐
                              │   H T T P   │
                              │ S E R V E R │
                              └──────┬──────┘
┌────────────────────────┐           │
│ BROWSER              X │           │
├────────────────────────┤           │
│                        │           │
│ HYPERMEDIA SYSTEMS     ◀───────────┘
│                        │
│ The revolutionary      │      ┌─HTTP RESPONSE───────────────┐
│                        │      │                             │
│ ideas that empowered...│      │ 200 OK                      │
│                        │      │ ...                         │
└────────────────────────┘      │ <h1>Hypermedia Systems</h1> │
                                │ ...                         │
                                └─────────────────────────────┘
An HTTP GET In Action
When the link is clicked the browser (or, as we sometimes refer to
it, the hypermedia client) initiates an HTTP GET
request to the URL encoded in the link’s href
attribute.
Note that the HTTP request includes additional data (i.e.,
metadata) on what, exactly, the browser wants from the server,
in the form of headers. We will discuss these headers, and HTTP in more
depth in Chapter 2.
The hypermedia server then responds to this request with a
hypermedia response — the HTML — for the new page. This may
seem like a small and obvious point, but it is an absolutely crucial
aspect of a truly RESTful hypermedia system: the client and
server must communicate via hypermedia!
Form tags
Anchor tags provide navigation between documents or
resources, but don’t allow you to update those resources. That
functionality falls to the form tag.
Like an anchor tag, a form tag consists of the tag itself,
<form></form>, combined with the attributes and
content within the tag. Note that the form tag does not have an
href attribute, but rather has an action
attribute that specifies where to issue an HTTP request.
Furthermore, it also has a method attribute, which
specifies exactly which HTTP “method” to use. In this example the form
is asking the browser to issue a POST request.
In contrast with anchor tags, the content and tags within a
form can have an effect on the hypermedia interaction that the form
makes with a server. The values of input tags and
other tags such as select tags will be included with the
HTTP request when the form is submitted, as URL parameters in the case
of a GET and as part of the request body in the case of a
POST. This allows a form to include an arbitrary amount of
information collected from a user in a request, unlike the anchor
tag.
In a typical browser this form tag and its contents would be
interpreted by the browser roughly as follows:
Show a text input and a “Sign Up” button to the user
When the user submits the form by clicking the “Sign Up” button
or by hitting the enter key while the input element is focused, issue an
HTTP POST request to the path /signup on the
“current” server
Take the HTML content in the body of the HTTP response body and
replace the entire screen in the browser as a new document, updating the
navigation bar to this new URL.
This mechanism allows the user to issue requests to update the
state of resources on the server. Note that despite this new type
of request the communication between client and server is still done
entirely with hypermedia.
It is the form tag that makes Hypermedia-Driven Applications
possible.
If you are an experienced web developer you probably recognize that
we are omitting a few details and complications here. For example, the
response to a form submission often redirects the client to a
different URL.
This is true, and we will get down into the muck with forms in more
detail in later chapters but, for now, this simple example suffices to
demonstrate the core mechanism for updating system state purely within
hypermedia. [fig-post-in-action] is a diagram of the
interaction.
┌────────────────────────┐      ┌─HTTP REQUEST────────────────┐
│ BROWSER              X │      │                             │
├────────────────────────┤      │ POST /                      │
│                        │      │ Host: hypermedia.systems    │
│ SIGN UP                │      │ ...                         │
│ ┌────────────────────┐ │      │ email=joe@example.com       │
│ │ joe@example.com    │ │      └─────────────────────────────┘
│ └────────────────────┘ │
│ ┌─────────┐        ────┼───────────┐
│ │ Sign up │            │           │
│ └─────────┘            │           │
└────────────────────────┘           │
                              ┌──────▼──────┐
                              │   H T T P   │
                              │ S E R V E R │
                              └──────┬──────┘
┌────────────────────────┐           │
│ BROWSER              X │           │
├────────────────────────┤           │
│                        │           │
│ THANK YOU FOR SIGNING  ◀───────────┘
│ UP                     │
│                        │      ┌─HTTP RESPONSE───────────────┐
│                        │      │                             │
│                        │      │ 201 Created                 │
│                        │      │ ...                         │
└────────────────────────┘      │ <h1>Thank you for signing   │
                                │ up</h1>                     │
                                └─────────────────────────────┘
An HTTP POST In Action
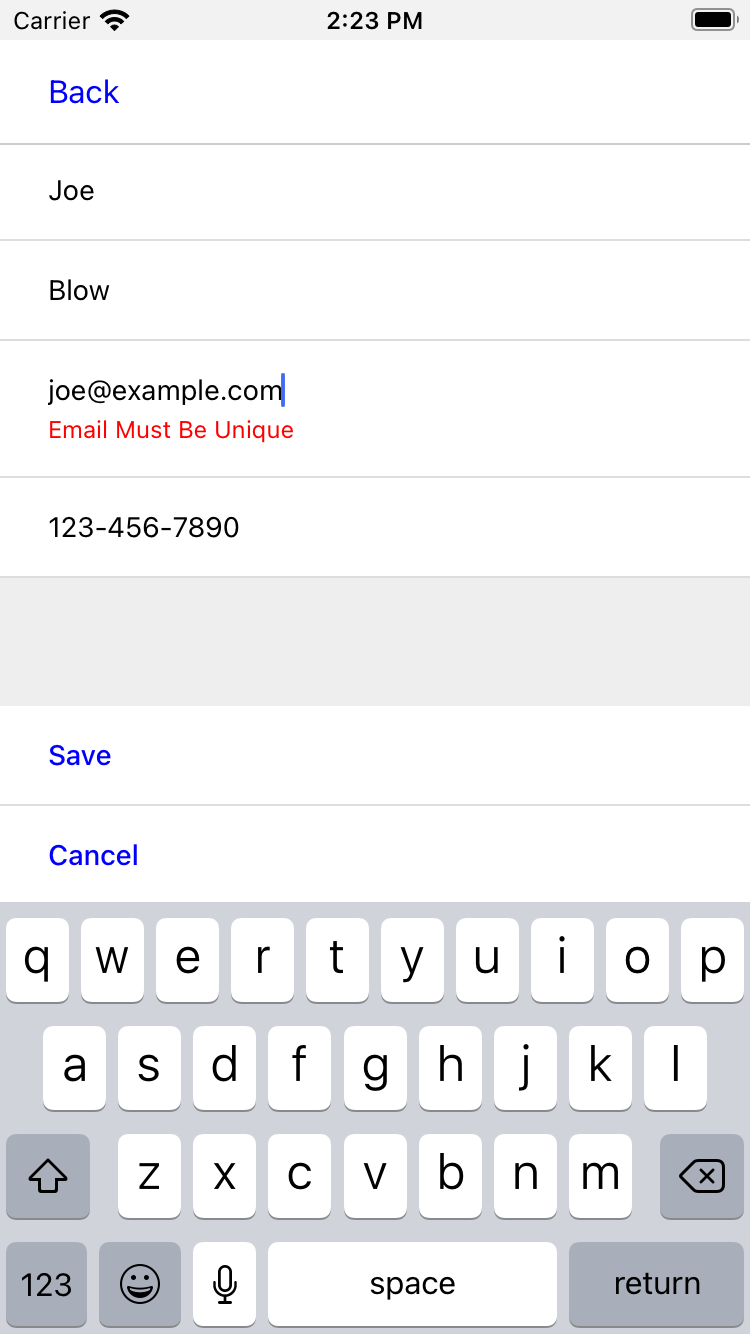
Web 1.0 applications
As someone interested in web development, the above diagrams and
discussion are probably very familiar to you. You may even find this
content boring. But take a step back and consider the fact that these
two hypermedia controls, anchors and forms, are the only native
ways for a user to interact with a server in plain HTML.
Only two tags!
And yet, armed with only these two tags, the early web was able to
grow exponentially and offer a staggeringly large amount of online,
dynamic functionality to billions of people.
This is strong evidence of the power of hypermedia. Even today, in a
web development world increasingly dominated by large JavaScript-centric
front end frameworks, many people choose to use simple vanilla HTML to
achieve their application goals and are often perfectly happy with the
results.
These two tags give a tremendous amount of expressive power to
HTML.
So What Isn’t Hypermedia?
So links and forms are the two main hypermedia-based mechanisms for
interacting with a server available in HTML.
Now let’s consider a different approach: let’s interact with a server
by issuing an HTTP request via JavaScript. To do this, we will use the
fetch()
API, a popular API for issuing an “Asynchronous JavaScript and XML,” or
AJAX request, available in all modern web browsers:
This button has an onclick attribute that specifies some
JavaScript to run when the button is clicked.
The JavaScript will issue an AJAX HTTP GET request to
/api/v1/contacts/1 using fetch(). An AJAX
request is like a “normal” HTTP request, but it is issued “behind the
scenes” by the browser. The user does not see a request indicator from
the browser as they would with normal links and forms. Additionally,
unlike requests issued by those hypermedia controls, it is up to the
JavaScript code to handle the response from the server.
Despite AJAX having XML as part of its acronym, today the HTTP
response to this request would almost certainly be in the JavaScript
Object Notation (JSON) format rather than XML.
An HTTP response to this request might look something like this:
A property, in this case with the name id and the
value 42.
Another property, the email of the contact with this id.
The JavaScript code above converts the JSON text received from the
server into a JavaScript object by calling the json()
method on it. This new JavaScript object is then handed off to the
updateUI() method.
The updateUI() method is responsible for updating the UI
based on the data encoded in the JavaScript Object, perhaps by
displaying the contact in a bit of HTML generated via a client-side
template in the JavaScript application.
The details of exactly what the updateUI() function does
aren’t important for our discussion.
What is important, what is the crucial aspect of
this JSON-based server interaction is that it is not using
hypermedia. The JSON API being used here does not return a hypermedia
response. There are no hyperlinks or other hypermedia-style
controls in it.
This JSON API is, rather, a Data API.
Because the response is in JSON and is not hypermedia, the
JavaScript updateUI() method must understand how to turn
this contact data into HTML.
In particular, the code in updateUI() needs to know
about the internal structure and meaning of the data.
It needs to know:
Exactly how the fields in the JSON data object are structured and
named.
How they relate to one another.
How to update the local data this new data corresponds
with.
How to render this data to the browser.
What additional actions/API end points can be called with this
data.
In short, the logic in updateUI() needs to have intimate
knowledge of the API endpoint at /api/v1/contact/1,
knowledge provided via some side-channel beyond the response itself. As
a result, the updateUI() code and the API have a strong
relationship, known as tight coupling: if the format of the
JSON response changes, then the code for updateUI() will
almost certainly also need to be changed as well.
Single Page Applications
This bit of JavaScript, while very modest, is the organic beginnings
of a much larger conceptual approach to building web applications. This
is the beginning of a Single Page Application (SPA). The web
application is no longer navigating between pages using
hypermedia controls as was the case with links and forms.
Instead, the application is exchanging plain data with the
server and then updating the content within a single page.
When this strategy or architecture is adopted for an entire
application, everything happens on a “Single Page” and, thus the
application becomes a “Single Page Application.”
The Single Page Application architecture is extremely popular today
and has been the dominant approach to building web applications for the
last decade. This can be observed by the high level of mind-share and
discussion it has received in the industry.
Today the vast majority of Single Page Applications adopt far more
sophisticated frameworks for managing their user interface than this
simple example shows. Popular libraries such as React, Angular, Vue.js,
etc. are now the common — indeed, the standard — way to build web
applications.
With these more complex frameworks developers typically work with an
elaborate client-side model — that is, with JavaScript objects stored
locally in the browser’s memory that represent the “model” or “domain”
of your application. These JavaScript objects are updated via JavaScript
code and the framework then “reacts” to these changes, updating the user
interface.
When the user interface is updated by a user these changes also flow
into the model objects, establishing a “two-way” binding
mechanism: the model can update the UI, and the UI can update the
model.
This is a much more sophisticated approach to a web client than
hypermedia, and it typically does away almost entirely with the
underlying hypermedia infrastructure available in the browser.
HTML is still used to build user interfaces, but the
hypermedia aspect of the two major hypermedia controls, anchors
and forms, are unused. Neither tag interacts with a server via their
native hypermedia mechanism. Rather, they become user interface
elements that drive local interactions with the in-memory domain model
via JavaScript, which is then synchronized with the server using plain
data JSON APIs.
So, as with our simple button above, the Single Page Application
approach foregoes the hypermedia architecture. It leaves aside the
advantages of the existing RESTful architecture of the web and the
built-in functionality found in HTML’s native hypermedia controls in
favor of JavaScript driven behaviors.
SPAs are much more like thick client applications, that is,
like the client-server applications of the 1980s — an architecture
popular before the web came along and that the web was, in many
ways, a reaction to.
This approach isn’t necessarily wrong, of course: there are times
when a thick client approach is the appropriate choice for an
application. But it is worth thinking about why web developers
so frequently make this choice without considering other alternatives,
and if there are reasons not to go down this path.
Why Use Hypermedia?
The emerging norm for web development is to build a React single-page
application, with server rendering. The two key elements of this
architecture are something like:
The main UI is built & updated in JavaScript using React or
something similar.
The backend is an API that that application makes requests
against.
This idea has really swept the internet. It started with a few major
popular websites and has crept into corners like marketing sites and
blogs.
The JavaScript-based Single Page Application approach has taken the
web development world by storm, and if there was one single reason for
its wild success it was this: The Single Page Application offers a far
more interactive and immersive experience than the old, gronky, Web 1.0
hypermedia-based applications could. SPAs had the ability to smoothly
update elements inline on a page without a dramatic reload of the entire
document, they had the ability to use CSS transitions to create nice
visual effects, and the ability to hook into arbitrary events like mouse
movements.
All of these abilities give JavaScript-based applications a huge
advantage in building sophisticated user experiences.
Given the popularity, power and success of this modern approach to
building web applications, why on earth would you consider an older,
clunkier and less popular approach like hypermedia?
JavaScript Fatigue
We are glad you asked!
It turns out that the hypermedia architecture, even in its original
Web 1.0 form, has a number of advantages when compared with the Single
Page Application + JSON Data API approach. Three of the biggest are:
It is an extremely simple approach to building web
applications.
It is extremely tolerant of content and API changes. In fact, it
thrives on them!
It leverages tried and true features of web browsers, such as
caching.
The first two advantages, in particular, address major pain points in
modern web development:
Single Page Application infrastructure has become extremely
complex, often requiring an entire team to manage.
JSON API churn — constant changes made to JSON APIs to support
application needs — has become a major pain point for many application
teams.
The combination of these two problems, along with other issues such
as JavaScript library churn, has led to a phenomenon known as
“JavaScript Fatigue.” This refers to a general sense of exhaustion with
all the hoops that are necessary to jump through to get anything done in
modern-day web applications.
We believe that a hypermedia architecture can help cure JavaScript
Fatigue for many developers and teams.
But if hypermedia is so great, and if it addresses so many of the
problems that beset the web development industry, why was it set aside
in the first place? After all, hypermedia was there first. Why didn’t
web developers just stick with it?
There are two major reasons hypermedia hasn’t made a comeback in web
development.
The first is this: the expressiveness of HTML as a
hypermedia hasn’t changed much, if at all, since HTML 2.0, which
was released in the mid 1990s. Many new features have
been added to HTML, of course, but there haven’t been any major
new ways to interact with a server in HTML in almost three decades.
HTML developers still only have anchor tags and forms available as
hypermedia controls, and those hypermedia controls can still only issue
GET and POST requests.
This baffling lack of progress by HTML leads immediately to the
second, and perhaps more practical reason that HTML-as-hypermedia has
fallen on hard times: as the interactivity and expressiveness of HTML
has remained frozen, the demands of web users have continued to
increase, calling for more and more interactive web applications.
JavaScript-based applications coupled to data-oriented JSON APIs have
stepped in as a way to provide these more sophisticated user interfaces.
It was the user experience that you could achieve in
JavaScript, and that you couldn’t achieve in plain HTML, that drove the
web development community to the JavaScript-based Single Page
Application approach. The shift was not driven by any inherent
superiority of the Single Page Application as a system architecture.
It didn’t have to be this way. There is nothing intrinsic to
the idea of hypermedia that prevents it from having a richer, more
expressive interactivity model than vanilla HTML. Rather than moving
away from a hypermedia-based approach, the industry could have demanded
more interactivity from HTML.
Instead, building thick-client style applications within web browsers
became the standard, in an understandable move to a more familiar model
for building rich applications.
Not everyone set aside hypermedia, of course. There have been heroic
efforts to continue to advance hypermedia outside of HTML, efforts like
HyTime, VoiceXML, and HAL.
But HTML, the most widely used hypermedia in the world, stopped
making progress as a hypermedia. The web development world moved on,
solving the interactivity problems with HTML by adopting
JavaScript-based SPAs and, mostly inadvertently, a completely different
system architecture.
A Hypermedia Resurgence?
It is interesting to think about how HTML could have
advanced. Instead of stalling as a hypermedia, how could HTML have
continued to develop? Could it have kept adding new hypermedia controls
and increasing the expressiveness of existing ones? Would it have been
possible to build modern web applications within this original,
hypermedia-oriented and RESTful model that made the early web so
powerful, so flexible, so much fun?
This might seem like idle speculation, but we have some good news on
this score: in the last decade a few idiosyncratic, alternative front
end libraries have arisen that attempt to get HTML moving again.
Ironically, these libraries are written in JavaScript, the technology
that supplanted HTML as the center of web development.
However, these libraries use JavaScript not as a replacement
for the fundamental hypermedia system of the web.
Instead, they use JavaScript to augment HTML itself as a
hypermedia.
These hypermedia-oriented libraries re-center hypermedia as
the core technology in web applications.
Hypermedia-Oriented
JavaScript Libraries
In the web development world there is an ongoing debate between the
Single Page Application (SPA) approach and what is now being called the
“Multi-Page Application” (MPA) approach. MPA is a modern name for the
old, Web 1.0 way of building web applications, using links and forms
located on multiple web pages, submitting HTTP requests and getting HTML
responses.
MPA applications, by their nature, are Hypermedia-Driven
Applications: after all, they are exactly what Roy Fielding was
describing in his dissertation.
These applications tend to be clunky, but they work reasonably well.
Many web developers and teams choose to accept the limitations of plain
HTML in the interest of simplicity and reliability.
Rich Harris, creator of Svelte.js, a popular SPA library, and a
thought-leader on the SPA side of the debate, has proposed a mix of this
older MPA style and the newer SPA style. Harris calls this approach to
building web applications “transitional,” in that it attempts to blend
the MPA approach and the newer SPA approach into a coherent whole. (This
is somewhat similar to the “transitional” trend in architecture, which
combines traditional and modern architectural styles.)
“Transitional” is a fitting term for mixed-style applications, and it
offers a reasonable compromise between the two approaches, using either
one as appropriate on a case-by-case basis.
But this compromise still feels unsatisfactory.
Must we default to having these two very different architectural
models in our applications?
Recall that the crux of the trade-off between SPAs and MPAs is the
user experience, or interactivity of the application. This
typically drives the decision to choose one approach versus the other
for an application or — in the case of a “transitional” application —
for a particular feature.
It turns out that by adopting a hypermedia-oriented library, the
interactivity gap between the MPA and the SPA approach closes
dramatically. You can use the MPA approach, that is, the hypermedia
approach, for much more of your application without compromising your
user interface. You might even be able to use the hypermedia approach
for all your application needs.
Rather than having an SPA with a bit of hypermedia around the edges,
or some mix of the two approaches, you can often create a web
application that is primarily or entirely
hypermedia-driven, and that still satisfies the interactivity that your
users require.
This can tremendously simplify your web application and
produce a much more coherent and understandable piece of software. While
there are still times and places for the more complex SPA approach,
which we will discuss later in the book, by adopting a hypermedia-first
approach and using a hypermedia-oriented library to push HTML as far as
possible, your web application can be powerful, interactive and
simple.
One such hypermedia oriented library is htmx. Htmx will be the focus of Part Two of
this book. We show that you can, in fact, create many common “modern” UI
features found in sophisticated Single Page Applications by instead
using the hypermedia model.
And, it is refreshingly fun and simple to do so.
Hypermedia-Driven
Applications
When building a web application with htmx the term Multi-Page
Application applies roughly, but it doesn’t fully characterize
the core of the application architecture. As you will see, htmx doesn’t
need to replace entire pages, and, in fact, an htmx-based
application can reside entirely within a single page. We don’t recommend
this practice, but it is possible!
So it isn’t quite right to call web applications built with htmx
“Multi-Page Applications.” What the older Web 1.0 MPA approach and the
newer hypermedia-oriented library powered applications have in common is
their use of hypermedia as their core technology and
architecture.
Therefore, we use the term Hypermedia-Driven Applications
(HDAs) to describe both.
This clarifies that the core distinction between these two approaches
and the SPA approach isn’t the number of pages in the
application, but rather the underlying system architecture.
Hypermedia-Driven Application (HDA)
A web application that uses hypermedia and hypermedia
exchanges as its primary mechanism for communicating with a
server.
So, what does an HDA look like up close?
Let’s look at an htmx-powered implementation of the simple
JavaScript-powered button above:
issues a GET request to /contacts/1,
replacing the contact-ui.
As with the JavaScript powered button, this button has been annotated
with some attributes. However, in this case we do not have any
(explicit) JavaScript scripting.
Instead, we have declarative attributes much like the
href attribute on anchor tags and the action
attribute on form tags. The hx-get attribute tells htmx:
“When the user clicks this button, issue a GET request to
/contacts/1.” The hx-target attribute tells
htmx: “When the response returns, take the resulting HTML and place it
into the element with the id contact-ui.”
Here we get to the crux of htmx and how it allows you to build
Hypermedia-Driven Applications:
The HTTP response from the server is expected to be in HTML
format, not JSON.
An HTTP response to this htmx-driven request might look something
like this:
<details><div> Contact: HTML Example</div><div><a href="mailto:html-example@example.com">Email</a></div></details>
HTML
This small bit of HTML would be placed into the element in the DOM
with the id contact-ui.
Thus, this htmx-powered button is exchanging hypermedia with
the server, just like an anchor tag or form might, and thus the
interaction is still using the basic hypermedia model of the web. Htmx
is adding functionality to this button (via JavaScript), but
that functionality is augmenting HTML as a hypermedia. Htmx
extends the hypermedia system of the web, rather than replacing
that hypermedia system with a totally different architecture.
Despite looking superficially similar to one another it turns out
that this htmx-powered button and the JavaScript-based button are using
extremely different system architectures and, thus, approaches to web
development.
As we walk through building a Hypermedia-Driven Application in this
book, the differences between the two approaches will become more and
more apparent.
When Should You Use
Hypermedia?
Hypermedia is often, though not always, a great choice for a
web application.
Perhaps you are building a website or application that simply doesn’t
need a huge amount of user-interactivity. There are many useful
web applications like this, and there is no shame in it! Applications
like Amazon, eBay, any number of news sites, shopping sites, message
boards and so on don’t need a massive amount of interactivity to be
effective: they are mainly text and images, which is exactly what the
web was designed for.
Perhaps your application adds most of its value on the server
side, by coordinating users or by applying sophisticated data
analysis and then presenting it to a user. Perhaps your application adds
value by simply sitting in front of a well-designed database, with
simple Create-Read-Update-Delete (CRUD) operations. Again, there is no
shame in this!
In any of these cases, using a hypermedia approach would likely be a
great choice: the interactivity needs of these applications are not
dramatic, and much of the value of these applications lives on the
server side, rather than on the client side.
All of these applications are amenable to what Roy Fielding called
“large-grain hypermedia data transfers”: you can simply use anchor tags
and forms, with responses that return entire HTML documents from
requests, and things will work just fine. This is exactly what the web
was designed to do!
By adopting the hypermedia approach for these applications, you will
save yourself a huge amount of client-side complexity that comes with
adopting the Single Page Application approach: there is no need for
client-side routing, for managing a client-side model, for hand-wiring
in JavaScript logic, and so forth. The back button will “just work.”
Deep linking will “just work.” You will be able to focus your efforts on
your server, where your application is actually adding value.
And, by layering htmx or another hypermedia-oriented library on top
of this approach, you can address many of the usability issues that come
with vanilla HTML and take advantage of finer-grained hypermedia
transfers. This opens up a whole slew of new user interface and
experience possibilities, making the set of applications that can be
built using hypermedia much larger.
But more on that later.
When Shouldn’t You Use
Hypermedia?
So, what about that not always? When isn’t hypermedia going
to work well for an application?
One example that springs immediately to mind is an online spreadsheet
application. In the case of a spreadsheet, updating one cell could have
a large number of cascading changes that need to be made across the
entire sheet. Worse, this might need to happen on every
keystroke.
In this case we have a highly dynamic user interface without clear
boundaries as to what might need to be updated given a particular
change. Introducing a hypermedia-style server round-trip on every cell
change would hurt performance tremendously.
This is simply not a situation amenable to the “large-grain
hypermedia data transfer” approach of the web. For an application like
this we would certainly recommend looking into using a sophisticated
client-side JavaScript approach.
However even in the case of an online spreadsheet there are
likely areas where the hypermedia approach might help.
The spreadsheet application likely also has a settings page. And
perhaps that settings page is amenable to the hypermedia
approach. If it is simply a set of relatively straight-forward forms
that need to be persisted to the server, the chances are good that
hypermedia would, in fact, work great for this part of the app.
And, by adopting hypermedia for that part of your application, you
might be able to simplify that part of the application quite a bit. You
could then save more of your application’s complexity budget
for the core, complicated spreadsheet logic, keeping the simple stuff
simple.
Why waste all the complexity associated with a heavy JavaScript
framework on something as simple as a settings page?
A Complexity Budget
Any software project has a complexity budget, explicit or not: there
is only so much complexity a given development team can tolerate and
every new feature and implementation choice adds at least a bit more to
the overall complexity of the system.
What is particularly nasty about complexity is that it tends to grow
exponentially: one day you can keep the entire system in your head and
understand the ramifications of a particular change, and a week later
the whole system seems intractable. Even worse, efforts to help control
complexity, such as introducing abstractions or infrastructure to manage
the complexity, often end up making things even more complex. Truly, the
job of the good software engineer is to keep complexity under
control.
The sure-fire way to keep complexity down is also the hardest: say
no. Pushing back on feature requests is an art and, if you can learn to
do it well, making people feel like they said no, you will go
far.
Sadly this is not always possible: some features will need to be
built. At this point the question becomes: “what is the simplest thing
that could possibly work?” Understanding the possibilities available in
the hypermedia approach will give you another tool in your “simplest
thing” tool chest.
Hypermedia:
A Sophisticated, Modern System Architecture
Hypermedia is often regarded as an old and antiquated technology in
web development circles, useful perhaps for static websites but
certainly not a realistic choice for modern, sophisticated web
applications.
Seriously? Are we claiming that modern web applications can be built
using it?
Yes, seriously.
Contrary to current popular opinion, hypermedia is an
innovative and modern system architecture for building
applications, in some ways more modern than the prevailing
Single Page Application approaches. In the remainder of this book we
will reintroduce you to the core, practical concepts of hypermedia and
then demonstrate exactly how you can take advantage of this system
architecture in your own software.
In the coming chapters you will develop a firm understanding of all
the benefits and techniques enabled by this approach. We hope that, in
addition, you will also become as passionate about it as we are.
HTML Notes: <div> Soup
The best-known kind of messy HTML is <div>
soup.
When developers fall back on the generic <div> and
<span> elements instead of more meaningful tags, we
either degrade the quality of our websites or create more work for
ourselves — probably both.
For example, instead of adding a button using the dedicated
<button> element, a <div> element
might have a click event listener added to it.
<div class="bg-accent padding-4 rounded-2" onclick="doStuff()"> Do stuff</div>
There are two main issues with this button:
It’s not focusable — the Tab key won’t get you to it.
There’s no way for assistive tools to tell that it’s a
button.
Yes, we can fix that by adding role="button" and
tabindex="0":
These are easy fixes, but they’re things you have to
remember. It’s also not obvious from the HTML source that this
is a button, making the source harder to read and the absence of these
attributes harder to spot. The source code of pages with div soup is
difficult to edit and debug.
To avoid div soup, become friendly with the HTML spec of available
tags, and consider each tag another tool in your tool chest. There might
be things there you don’t remember from before! (With the 113 elements
currently defined in the spec, it’s more of a tool shed).
Of course, not every UI pattern has a designated HTML element. We
often need to compose elements and augment them with attributes. Before
you do, though, rummage through the HTML tool chest. Sometimes you might
be surprised by how much is available.
A hypermedia system consists of a number of components,
including:
A hypermedia, such as HTML.
A network protocol, such as HTTP.
A server that presents a hypermedia API responding to network
requests with hypermedia responses.
A client that properly interprets those responses.
In this chapter we will look at these components and their
implementation in the context of the web.
Once we have reviewed the major components of the web as a hypermedia
system, we will look at some key ideas behind this system — especially
as developed by Roy Fielding in his dissertation, “Architectural Styles
and the Design of Network-based Software Architectures.” We will see
where the terms REpresentational State Transfer (REST), RESTful and
Hypermedia As The Engine Of Application State (HATEOAS) come from, and
we will analyze these terms in the context of the web.
This should give you a stronger understanding of the theoretical
basis of the web as a hypermedia system, how it is supposed to fit
together, and why Hypermedia-Driven Applications are RESTful, whereas
JSON APIs — despite the way the term REST is currently used in the
industry — are not.
Components Of A Hypermedia
System
The Hypermedia
The fundamental technology of a hypermedia system is a hypermedia
that allows a client and server to communicate with one another in a
dynamic, non-linear fashion. Again, what makes a hypermedia a hypermedia
is the presence of hypermedia controls: elements that allow
users to select non-linear actions within the hypermedia. Users can
interact with the media in a manner beyond simply reading from
start to end.
We have already mentioned the two primary hypermedia controls in
HTML, anchors and forms, which allow a browser to present links and
operations to a user through a browser.
In the case of HTML, these links and forms typically specify the
target of their operations using Uniform Resource Locators
(URLs):
Uniform Resource Locator
A uniform resource locator is a textual string that refers to, or
points to a location on a network where a resource can
be retrieved from, as well as the mechanism by which the resource can be
retrieved.
A URL is a string consisting of various subcomponents:
Many of these subcomponents are not required, and are often
omitted.
A typical URL might look like this:
https://hypermedia.systems/book/contents/
A simple URL
This particular URL is made up of the following components:
A protocol or scheme (in this case, https)
A domain (e.g., hypermedia.systems)
A path (e.g., /book/contents)
This URL uniquely identifies a retrievable resource on the
internet, to which an HTTP Request can be issued by a
hypermedia client that “speaks” HTTPS, such as a web browser. If this
URL is found as the reference of a hypermedia control within an HTML
document, it implies that there is a hypermedia server on the
other side of the network that understands HTTPS as well, and that can
respond to this request with a representation of the given
resource (or redirect you to another location, etc.)
Note that URLs are often not written out entirely within HTML. It is
very common to see anchor tags that look like this, for example:
<a href="/book/contents/">Table Of Contents</a>
A Simple Link
Here we have a relative hypermedia reference, where the
protocol, host and port are implied to be that of the “current
document,” that is, the same as whatever the protocol and server were to
retrieve the current HTML page. So, if this link was found in an HTML
document retrieved from https://hypermedia.systems/, then
the implied URL for this anchor would be
https://hypermedia.systems/book/contents/.
Hypermedia Protocols
The hypermedia control (link) above tells a browser: “When a user
clicks on this text, issue a request to
https://hypermedia.systems/book/contents/ using the
Hypertext Transfer Protocol,” or HTTP.
HTTP is the protocol used to transfer HTML (hypermedia)
between browsers (hypermedia clients) and servers (hypermedia servers)
and, as such, is the key network technology that binds the distributed
hypermedia system of the web together.
HTTP version 1.1 is a relatively simple network protocol, so lets
take a look at what the GET request triggered by the anchor
tag would look like. This is the request that would be sent to the
server found at hypermedia.systems, on port 80
by default:
GET /book/contents/ HTTP/1.1
Accept: text/html,*/*
Host: hypermedia.systems
The first line specifies that this is an HTTP GET
request. It then specifies the path of the resource being requested.
Finally, it contains the HTTP version for this request.
After that are a series of HTTP request headers: individual
lines of name/value pairs separated by a colon. The request headers
provide metadata that can be used by the server to determine
exactly how to respond to the client request. In this case, with the
Accept header, the browser is saying it would prefer HTML
as a response format, but will accept any server response.
Next, it has a Host header that specifies which server
the request has been sent to. This is useful when multiple domains are
hosted on the same host.
An HTTP response from a server to this request might look something
like this:
In the first line, the HTTP Response specifies the HTTP version being
used, followed by a response code of 200,
indicating that the given resource was found and that the request
succeeded. This is followed by a string, OK that
corresponds to the response code. (The actual string doesn’t matter, it
is the response code that tells the client the result of a request, as
we will discuss in more detail below.)
After the first line of the response, as with the HTTP Request, we
see a series of response headers that provide metadata to the
client to assist in displaying the representation of the
resource correctly.
Finally, we see some new HTML content. This content is the HTML
representation of the requested resource, in this case a table
of contents of a book. The browser will use this HTML to replace the
entire content in its display window, showing the user this new page,
and updating the address bar to reflect the new URL.
HTTP methods
The anchor tag above issued an HTTP GET, where
GET is the method of the request. The particular
method being used in an HTTP request is perhaps the most important piece
of information about it, after the actual resource that the request is
directed at.
There are many methods available in HTTP; the ones of most practical
importance to developers are the following:
GET
A GET request retrieves the representation of the specified resource.
GET requests should not mutate data.
POST
A POST request submits data to the specified resource. This will
often result in a mutation of state on the server.
PUT
A PUT request replaces the data of the specified resource. This
results in a mutation of state on the server.
PATCH
A PATCH request replaces the data of the specified resource. This
results in a mutation of state on the server.
DELETE
A DELETE request deletes the specified resource. This results in a
mutation of state on the server.
These methods roughly line up with the
“Create/Read/Update/Delete” or CRUD pattern found in many
applications:
POST corresponds with Creating a resource.
GET corresponds with Reading a resource.
PUT and PATCH correspond with Updating
a resource.
DELETE corresponds, well, with Deleting a
resource.
Put vs. Post
While HTTP Actions correspond roughly to CRUD, they are not the same.
The technical specifications for these methods make no such connection,
and are often somewhat difficult to read. Here, for example, is the
documentation on the distinction between a POST and a
PUT from RFC-9110.
The target resource in a POST request is intended to handle the
enclosed representation according to the resource’s own semantics,
whereas the enclosed representation in a PUT request is defined as
replacing the state of the target resource. Hence, the intent of PUT is
idempotent and visible to intermediaries, even though the exact effect
is only known by the origin server.
In plain terms, a POST can be handled by a server pretty
much however it likes, whereas a PUT should be handled as a
“replacement” of the resource, although the language, once again allows
the server to do pretty much whatever it would like within the
constraint of being idempotent.
In a properly structured HTML-based hypermedia system you would use
an appropriate HTTP method for the operation a particular hypermedia
control performs. For example, if a hypermedia control such as a button
deletes a resource, ideally it should issue an HTTP
DELETE request to do so.
A strange thing about HTML, though, is that the native hypermedia
controls can only issue HTTP GET and POST
requests.
Anchor tags always issue a GET request.
Forms can issue either a GET or POST using
the method attribute.
Despite the fact that HTML — the world’s most popular hypermedia —
has been designed alongside HTTP (which is the Hypertext Transfer
Protocol, after all!): if you wish to issue PUT,
PATCH or DELETE requests you currently
have to resort to JavaScript to do so. Since a
POST can do almost anything, it ends up being used for any
mutation on the server, and PUT, PATCH and
DELETE are left aside in plain HTML-based applications.
This is an obvious shortcoming of HTML as a hypermedia; it would be
wonderful to see this fixed in the HTML specification. For now, in
Chapter 4, we’ll discuss ways to get around this.
HTTP response codes
HTTP request methods allow a client to tell a server what to
do to a given resource. HTTP responses contain response codes,
which tell a client what the result of the request was. HTTP response
codes are numeric values that are embedded in the HTTP response, as we
saw above.
The most familiar response code for web developers is probably
404, which stands for “Not Found.” This is the response
code that is returned by web servers when a resource that does not exist
is requested from them.
HTTP breaks response codes up into various categories:
100-199
Informational responses that provide information about how the server
is processing the response.
200-299
Successful responses indicating that the request succeeded.
300-399
Redirection responses indicating that the request should be sent to
some other URL.
400-499
Client error responses indicating that the client made some sort of
bad request (e.g., asking for something that didn’t exist in the case of
404 errors).
500-599
Server error responses indicating that the server encountered an
error internally as it attempted to respond to the request.
Within each of these categories there are multiple response codes for
specific situations.
Here are some of the more common or interesting ones:
200 OK
The HTTP request succeeded.
301 Moved Permanently
The URL for the requested resource has moved to a new location
permanently, and the new URL will be provided in the
Location response header.
302 Found
The URL for the requested resource has moved to a new location
temporarily, and the new URL will be provided in the
Location response header.
303 See Other
The URL for the requested resource has moved to a new location, and
the new URL will be provided in the Location response
header. Additionally, this new URL should be retrieved with a
GET request.
401 Unauthorized
The client is not yet authenticated (yes, authenticated, despite the
name) and must be authenticated to retrieve the given resource.
403 Forbidden
The client does not have access to this resource.
404 Not Found
The server cannot find the requested resource.
500 Internal Server Error
The server encountered an error when attempting to process the
response.
There are some fairly subtle differences between HTTP response codes
(and, to be honest, some ambiguities between them). The difference
between a 302 redirect and a 303 redirect, for
example, is that the former will issue the request to the new URL using
the same HTTP method as the initial request, whereas the latter will
always use a GET. This is a small but often crucial
difference, as we will see later in the book.
A well crafted Hypermedia-Driven Application will take advantage of
both HTTP methods and HTTP response codes to create a sensible
hypermedia API. You do not want to build a Hypermedia-Driven Application
that uses a POST method for all requests and responds with
200 OK for every response, for example. (Some JSON Data
APIs built on top of HTTP do exactly this!)
When building a Hypermedia-Driven Application, you want, instead, to
go “with the grain” of the web and use HTTP methods and response codes
as they were designed to be used.
Caching HTTP responses
A constraint of REST (and, therefore, a feature of HTTP) is the
notion of caching responses: a server can indicate to a client (as well
as intermediary HTTP servers) that a given response can be cached for
future requests to the same URL.
The cache behavior of an HTTP response from a server can be indicated
with the Cache-Control response header. This header can
have a number of different values indicating the cacheability of a given
response. If, for example, the header contains the value
max-age=60, this indicates that a client may cache this
response for 60 seconds, and need not issue another HTTP request for
that resource until that time limit has expired.
Another important caching-related response header is
Vary. This response header can be used to indicate exactly
what headers in an HTTP Request form the unique identifier for a cached
result. This becomes important to allow the browser to correctly cache
content in situations where a particular header affects the form of the
server response.
A common pattern in htmx-powered applications, for example, is to use
a custom header set by htmx, HX-Request, to differentiate
between “normal” web requests and requests submitted by htmx. To
properly cache the response to these requests, the
HX-Request request header must be indicated by the
Vary response header.
A full discussion of caching HTTP responses is beyond the scope of
this chapter; see the MDN
Article on HTTP Caching if you would like to know more on the
topic.
Hypermedia Servers
Hypermedia servers are any server that can respond to an HTTP request
with an HTTP response. Because HTTP is so simple, this means that nearly
any programming language can be used to build a hypermedia server. There
are a vast number of libraries available for building HTTP-based
hypermedia servers in nearly every programming language imaginable.
This turns out to be one of the best aspects of adopting hypermedia
as your primary technology for building a web application: it removes
the pressure to adopt JavaScript as a backend technology. If you use a
JavaScript-heavy Single Page Application-based front end, and you use
JSON Data APIs, you are going to feel significant pressure to deploy
JavaScript on the back end as well.
In this latter situation, you already have a ton of code written in
JavaScript. Why maintain two separate code bases in two different
languages? Why not create reusable domain logic on the client-side as
well as the server-side? Now that JavaScript has excellent server-side
technologies available like Node and Deno, why not just use a single
language for everything?
In contrast, building a Hypermedia-Driven Application gives you a lot
more freedom in picking the back end technology you want to use. Your
decision can be based on the domain of your application, what languages
and server software you are familiar with or are passionate about, or
just what you feel like trying out.
You certainly aren’t writing your server-side logic in HTML! And
every major programming language has at least one good web framework and
templating library that can be used to handle HTTP requests cleanly.
If you are doing something in big data, perhaps you’d like to use
Python, which has tremendous support for that domain.
If you are doing AI work, perhaps you’d like to use Lisp, leaning on
a language with a long history in that area of research.
Maybe you are a functional programming enthusiast and want to use
OCaml or Haskell. Perhaps you just really like Julia or Nim.
These are all perfectly valid reasons for choosing a particular
server-side technology!
By using hypermedia as your system architecture, you are freed up to
adopt any of these choices. There simply isn’t a large JavaScript code
base on the front end pressuring you to adopt JavaScript on the back
end.
Hypermedia On Whatever you’d Like (HOWL)
In the htmx community we call this (with tongue in cheek) the HOWL
stack: Hypermedia On Whatever you’d Like. The htmx community is
multi-language and multi-framework, there are rubyists as well as
pythonistas, lispers as well as haskellers. There are even JavaScript
enthusiasts! All these languages and frameworks are able to adopt
hypermedia, and are able to still share techniques and offer support to
one another because they share a common underlying architecture: they
are all using the web as a hypermedia system.
Hypermedia, in this sense, provides a “universal language” for the
web that we can all use.
Hypermedia Clients
We now come to the final major component in a hypermedia system: the
hypermedia client. Hypermedia clients are software that
understand how to interpret a particular hypermedia, and the hypermedia
controls within it, properly. The canonical example, of course, is the
web browser, which understands HTML and can present it to a user to
interact with. Web browsers are incredibly sophisticated pieces of
software. (So sophisticated, in fact, that they are often re-purposed
away from being a hypermedia client, to being a sort of cross-platform
virtual machine for launching Single Page Applications.)
Browsers aren’t the only hypermedia clients out there, however. In
the last section of this book we will look at Hyperview, a
mobile-oriented hypermedia. One of the outstanding features of Hyperview
is that it doesn’t simply provide a hypermedia, HXML, but also provides
a working hypermedia client for that hypermedia. This makes
building a proper Hypermedia-Driven Application with Hyperview extremely
easy.
A crucial feature of a hypermedia system is what is known as the
uniform interface. We discuss this concept in depth in the next
section on REST. What is often ignored in discussions about hypermedia
is how important the hypermedia client is in taking advantage of this
uniform interface. A hypermedia client must know how to properly
interpret and present hypermedia controls found in a hypermedia response
from a hypermedia server for the whole hypermedia system to hang
together. Without a sophisticated client that can do this, hypermedia
controls and a hypermedia-based API are much less useful.
This is one reason why JSON APIs have rarely adopted hypermedia
controls successfully: JSON APIs are typically consumed by code that is
expecting a fixed format and that isn’t designed to be a hypermedia
client. This is totally understandable: building a good hypermedia
client is hard! For JSON API clients like this, the power of hypermedia
controls embedded within an API response is irrelevant and often simply
annoying:
The short answer to this question is that HATEOAS isn’t a good fit
for most modern use cases for APIs. That is why after almost 20 years,
HATEOAS still hasn’t gained wide adoption among developers. GraphQL on
the other hand is spreading like wildfire because it solves real-world
problems.
HATEOAS will be described in more detail below, but the takeaway here
is that a good hypermedia client is a necessary component within a
larger hypermedia system.
REST
Now that we have reviewed the major components of a hypermedia
system, it’s time to look more deeply into the concept of REST. The term
“REST” comes from Roy Fielding’s PhD dissertation on the architecture of
the web. Fielding wrote his dissertation at U.C. Irvine, after having
helped build much of the infrastructure of the early web, including the
Apache web server. Roy was attempting to formalize and describe the
novel distributed computing system that he had helped to build.
We are going to focus on what we feel is the most important section
of Fielding’s writing, from a web development perspective: Section 5.1.
This section contains the core concepts (Fielding calls them
constraints) of Representational State Transfer, or REST.
Before we get into the muck, however, it is important to understand
that Fielding discusses REST as a network architecture, that
is, as an entirely different way to architect a distributed system. And,
further, as a novel network architecture that should be
contrasted with earlier approaches to distributed systems.
It is also important to emphasize that, at the time Fielding wrote
his dissertation, JSON APIs and AJAX did not exist. He was describing
the early web, with HTML being transferred over HTTP by early browsers,
as a hypermedia system.
Today, in a strange turn of events, the term “REST” is mainly
associated with JSON Data APIs, rather than with HTML and hypermedia.
This is extremely funny once you realize that the vast majority of JSON
Data APIs aren’t RESTful, in the original sense, and, in fact,
can’t be RESTful, since they aren’t using a natural hypermedia
format.
To re-emphasize: REST, as coined by Fielding, describes the
pre-API web, and letting go of the current, common usage of the
term REST to simply mean “a JSON API” is necessary to develop a proper
understanding of the idea.
The “Constraints” of REST
In his dissertation, Fielding defines various “constraints” to
describe how a RESTful system must behave. This approach can feel a
little round-about and difficult to follow for many people, but it is an
appropriate approach for an academic document. Given a bit of time
thinking about the constraints he outlines and some concrete examples of
those constraints it will become easy to assess whether a given system
actually satisfies the architectural requirements of REST or not.
Here are the constraints of REST Fielding outlines:
It is a client-server architecture (section 5.1.2).
It must be stateless; (section 5.1.3) that is, every request
contains all information necessary to respond to that request.
It must allow for caching (section 5.1.4).
It must have a uniform interface (section
5.1.5).
It is a layered system (section 5.1.6).
Optionally, it can allow for Code-On-Demand (section 5.1.7), that
is, scripting.
Let’s go through each of these constraints in turn and discuss them
in detail, looking at how (and to what extent) the web satisfies each of
them.
The REST model Fielding was describing involved both clients
(browsers, in the case of the web) and servers (such as the
Apache Web Server he had been working on) communicating via a network
connection. This was the context of his work: he was describing the
network architecture of the World Wide Web, and contrasting it with
earlier architectures, notably thick-client networking models such as
the Common Object Request Broker Architecture (CORBA).
It should be obvious that any web application, regardless of how it
is designed, will satisfy this requirement.
As described by Fielding, a RESTful system is stateless: every
request should encapsulate all information necessary to respond to that
request, with no side state or context stored on either the client or
the server.
In practice, for many web applications today, we actually violate
this constraint: it is common to establish a session cookie
that acts as a unique identifier for a given user and that is sent along
with every request. While this session cookie is, by itself, not
stateful (it is sent with every request), it is typically used as a key
to look up information stored on the server, in what is usually termed
“the session.”
This session information is typically stored in some sort of shared
storage across multiple web servers, holding things like the current
user’s email or id, their roles, partially created domain objects,
caches, and so forth.
This violation of the Statelessness REST architectural constraint has
proven to be useful for building web applications and does not appear to
have had a major impact on the overall flexibility of the web. But it is
worth bearing in mind that even Web 1.0 applications often violate the
purity of REST in the interest of pragmatic trade-offs.
And it must be said that sessions do cause additional
operational complexity headaches when deploying hypermedia servers;
these may need shared access to session state information stored across
an entire cluster. So Fielding was correct in pointing out that an ideal
RESTful system, one that did not violate this constraint, would be
simpler and therefore more robust.
This constraint states that a RESTful system should support the
notion of caching, with explicit information on the cache-ability of
responses for future requests of the same resource. This allows both
clients as well as intermediary servers between a given client and final
server to cache the results of a given request.
As we discussed earlier, HTTP has a sophisticated caching mechanism
via response headers that is often overlooked or underutilized when
building hypermedia applications. Given the existence of this
functionality, however, it is easy to see how this constraint is
satisfied by the web.
The Uniform Interface
Constraint
Now we come to the most interesting and, in our opinion, most
innovative constraint in REST: that of the uniform
interface.
This constraint is the source of much of the flexibility and
simplicity of a hypermedia system, so we are going to spend
some time on it.
See Section
5.1.5 for the Uniform Interface constraint.
In this section, Fielding says:
The central feature that distinguishes the REST architectural style
from other network-based styles is its emphasis on a uniform interface
between components… In order to obtain a uniform interface, multiple
architectural constraints are needed to guide the behavior of
components. REST is defined by four interface constraints:
identification of resources; manipulation of resources through
representations; self-descriptive messages; and, hypermedia as the
engine of application state
Roy Fielding, Architectural Styles and the Design of Network-based
Software Architectures
So we have four sub-constraints that, taken together, form the
Uniform Interface constraint.
Identification of resources
In a RESTful system, resources should have a unique identifier. Today
the concept of Universal Resource Locators (URLs) is common, but at the
time of Fielding’s writing they were still relatively new and novel.
What might be more interesting today is the notion of a
resource, thus being identified: in a RESTful system,
any sort of data that can be referenced, that is, the target of
a hypermedia reference, is considered a resource. URLs, though common
enough today, end up solving the very complex problem of uniquely
identifying any and every resource on the internet.
Manipulation
of resources through representations
In a RESTful system, representations of the resource are
transferred between clients and servers. These representations can
contain both data and metadata about the request (such as “control data”
like an HTTP method or response code). A particular data format or
media type may be used to present a given resource to a client,
and that media type can be negotiated between the client and the
server.
We saw this latter aspect of the uniform interface in the
Accept header in the requests above.
Self-descriptive messages
The Self-Descriptive Messages constraint, combined with the next one,
HATEOAS, form what we consider to be the core of the Uniform Interface,
of REST and why hypermedia provides such a powerful system
architecture.
The Self-Descriptive Messages constraint requires that, in a RESTful
system, messages must be self-describing.
This means that all information necessary to both display
and also operate on the data being represented must be present
in the response. In a properly RESTful system, there can be no
additional “side” information necessary for a client to transform a
response from a server into a useful user interface. Everything must “be
in” the message itself, in the form of hypermedia controls.
This might sound a little abstract so let’s look at a concrete
example.
Consider two different potential responses from an HTTP server for
the URL https://example.com/contacts/42.
Both responses will return information about a contact, but each
response will take very different forms.
The first implementation returns an HTML representation:
What can we say about the differences between these two
responses?
One thing that may initially jump out at you is that the JSON
representation is smaller than the HTML representation. Fielding notes
exactly this trade-off when using a RESTful architecture:
The trade-off, though, is that a uniform interface degrades
efficiency, since information is transferred in a standardized form
rather than one which is specific to an application’s needs.
Roy Fielding, Architectural Styles and the Design of Network-based
Software Architectures
So REST trades off representational efficiency for other
goals.
To understand these other goals, first notice that the HTML
representation has a hyperlink in it to navigate to a page to archive
the contact. The JSON representation, in contrast, does not have this
link.
What are the ramifications of this fact for a client of the
JSON API?
What this means is that the JSON API client must know in
advance exactly what other URLs (and request methods) are available
for working with the contact information. If the JSON client is able to
update this contact in some way, it must know how to do so from some
source of information external to the JSON message. If the
contact has a different status, say “Archived”, does this change the
allowable actions? If so, what are the new allowable actions?
The source of all this information might be API documentation, word
of mouth or, if the developer controls both the server and the client,
internal knowledge. But this information is implicit and
outside the response.
Contrast this with the hypermedia (HTML) response. In this case, the
hypermedia client (that is, the browser) needs only to know how to
render the given HTML. It doesn’t need to understand what actions are
available for this contact: they are simply encoded within the
HTML response itself as hypermedia controls. It doesn’t need to
understand what the status field means. In fact, the client doesn’t even
know what a contact is!
The browser, our hypermedia client, simply renders the HTML and
allows the user, who presumably understands the concept of a Contact, to
make a decision on what action to pursue from the actions made available
in the representation.
This difference between the two responses demonstrates the crux of
REST and hypermedia, what makes them so powerful and flexible: clients
(again, web browsers) don’t need to understand anything about
the underlying resources being represented.
Browsers only (only! As if it is easy!) need to understand how to
interpret and display hypermedia, in this case HTML. This gives
hypermedia-based systems unprecedented flexibility in dealing with
changes to both the backing representations and to the system
itself.
Hypermedia
As The Engine of Application State (HATEOAS)
The final sub-constraint on the Uniform Interface is that, in a
RESTful system, hypermedia should be “the engine of application state.”
This is sometimes abbreviated as “HATEOAS”, although Fielding prefers to
use the terminology “the hypermedia constraint” when discussing it.
This constraint is closely related to the previous self-describing
message constraint. Let us consider again the two different
implementations of the endpoint /contacts/42, one returning
HTML and one returning JSON. Let’s update the situation such that the
contact identified by this URL has now been archived.
What do our responses look like?
The first implementation returns the following HTML:
The important point to notice here is that, by virtue of being a
self-describing message, the HTML response now shows that the “Archive”
operation is no longer available, and a new “Unarchive” operation has
become available. The HTML representation of the contact
encodes the state of the application; it encodes exactly what
can and cannot be done with this particular representation, in a way
that the JSON representation does not.
A client interpreting the JSON response must, again, understand not
only the general concept of a Contact, but also specifically what the
“status” field with the value “Archived” means. It must know exactly
what operations are available on an “Archived” contact, to appropriately
display them to an end user. The state of the application is not encoded
in the response, but rather conveyed through a mix of raw data and side
channel information such as API documentation.
Furthermore, in the majority of front end SPA frameworks today, this
contact information would live in memory in a JavaScript object
representing a model of the contact, while the page data is held in the
browser’s Document
Object Model (DOM). The DOM would be updated based on changes to
this model, that is, the DOM would “react” to changes to this backing
JavaScript model.
This approach is certainly not using Hypermedia As The
Engine Of Application State: rather, it is using a JavaScript model as
the engine of application state, and synchronizing that model with a
server and with the browser.
With the HTML approach, the Hypermedia is, indeed, The Engine Of
Application State: there is no additional model on the client side, and
all state is expressed directly in the hypermedia, in this case HTML. As
state changes on the server, it is reflected in the representation (that
is, HTML) sent back to the client. The hypermedia client (a browser)
doesn’t know anything about contacts, what the concept of “Archiving”
is, or anything else about the particular domain model for this
response: it simply knows how to render HTML.
Because a hypermedia client doesn’t need to know anything about the
server model beyond how to render hypermedia to a client, it is
incredibly flexible with respect to the representations it receives and
displays to users.
HATEOAS & API churn
This last point is critical to understanding the flexibility of
hypermedia, so let’s look at a practical example of it in action.
Consider a situation where a new feature has been added to the web
application with these two end points. This feature allows you to send a
message to a given Contact.
How would this change each of the two responses—HTML and JSON—from
the server?
Note that, once again, the JSON representation is unchanged. There is
no indication of this new functionality. Instead, a client must
know about this change, presumably via some shared
documentation between the client and the server.
Contrast this with the HTML response. Because of the uniform
interface of the RESTful model and, in particular, because we are using
Hypermedia As The Engine of Application State, no such exchange of
documentation is necessary! Instead, the client (a browser) simply
renders the new HTML with this operation in it, making this operation
available for the end user without any additional coding changes.
A pretty neat trick!
Now, in this case, if the JSON client is not properly updated, the
error state is relatively benign: a new bit of functionality is simply
not made available to users. But consider a more severe change to the
API: what if the archive functionality was removed? Or what if the URLs
or the HTTP methods for these operations changed in some way?
In this case, the JSON client may be broken in a much more serious
manner.
The HTML response, however, would simply be updated to exclude the
removed options or to update the URLs used for them. Clients would see
the new HTML, display it properly, and allow users to select whatever
the new set of operations happens to be. Once again, the uniform
interface of REST has proven to be extremely flexible: despite a
potentially radically new layout for our hypermedia API, clients
continue to work.
An important fact emerges from this: due to this flexibility,
hypermedia APIs do not have the versioning headaches that JSON Data
APIs do.
Once a Hypermedia-Driven Application has been “entered into” (that
is, loaded through some entry point URL), all functionality and
resources are surfaced through self-describing messages. Therefore,
there is no need to exchange documentation with the client: the client
simply renders the hypermedia (in this case HTML) and everything works
out. When a change occurs, there is no need to create a new version of
the API: clients simply retrieve updated hypermedia, which encodes the
new operations and resources in it, and display it to users to work
with.
Layered System
The final “required” constraint on a RESTful system that we will
consider is The Layered System constraint. This constraint can be found
in Section
5.1.6 of Fielding’s dissertation.
To be frank, after the excitement of the uniform interface
constraint, the “layered system” constraint is a bit of a let down. But
it is still worth understanding and it is actually utilized effectively
by The web. The constraint requires that a RESTful architecture be
“layered,” allowing for multiple servers to act as intermediaries
between a client and the eventual “source of truth” server.
These intermediary servers can act as proxies, transform intermediate
requests and responses and so forth.
A common modern example of this layering feature of REST is the use
of Content Delivery Networks (CDNs) to deliver unchanging static assets
to clients more quickly, by storing the response from the origin server
in intermediate servers more closely located to the client making a
request.
This allows content to be delivered more quickly to the end user and
reduces load on the origin server.
Not as exciting for web application developers as the uniform
interface, at least in our opinion, but useful nonetheless.
An Optional Constraint:
Code-On-Demand
We called The Layered System constraint the final “required”
constraint because Fielding mentions one additional constraint on a
RESTful system. This Code On Demand constraint is somewhat awkwardly
described as “optional” (Section 5.1.7).
In this section, Fielding says:
REST allows client functionality to be extended by downloading and
executing code in the form of applets or scripts. This simplifies
clients by reducing the number of features required to be
pre-implemented. Allowing features to be downloaded after deployment
improves system extensibility. However, it also reduces visibility, and
thus is only an optional constraint within REST.
Roy Fielding, Architectural Styles and the Design of Network-based
Software Architectures
So, scripting was and is a native aspect of the original RESTful
model of the web, and thus should of course be allowed in a
Hypermedia-Driven Application.
However, in a Hypermedia-Driven Application the presence of scripting
should not change the fundamental networking model: hypermedia
should continue to be the engine of application state, server
communication should still consist of hypermedia exchanges rather than,
for example, JSON data exchanges, and so on. (JSON Data API’s certainly
have their place; in Chapter 10 we’ll discuss when and how to use
them).
Today, unfortunately, the scripting layer of the web, JavaScript, is
quite often used to replace, rather than augment the hypermedia
model. We will elaborate in a later chapter what scripting that does not
replace the underlying hypermedia system of the web looks like.
Conclusion
After this deep dive into the components and concepts behind
hypermedia systems — including Roy Fielding’s insights into their
operation — we hope you have much better understanding of REST, and in
particular, of the uniform interface and HATEOAS. We hope you can see
why these characteristics make hypermedia systems so
flexible.
If you were not aware of the full significance of REST and HATEOAS
before now, don’t feel bad: it took some of us over a decade of working
in web development, and building a hypermedia-oriented library to boot,
to understand the special nature of HTML, hypermedia and the web!
HTML Notes: HTML5 Soup
The beginning of wisdom is to call things by their right names.
Confucius
Elements like <section>,
<article>, <nav>,
<header>, <footer>,
<figure> have become a sort of shorthand for
HTML.
By using these elements, a page can make false promises, like
<article> elements being self-contained, reusable
entities, to clients like browsers, search engines and scrapers that
can’t know better. To avoid this:
Make sure that the element you’re using fits your use case. Check
the HTML spec.
Don’t try to be specific when you can’t or don’t need to.
Sometimes, <div> is fine.
The most authoritative resource for learning about HTML is the HTML
specification. The current specification lives on https://html.spec.whatwg.org/multipage.1 There’s no need to rely on hearsay
to keep up with developments in HTML.
Section 4 of the spec features a list of all available elements,
including what they represent, where they can occur, and what they are
allowed to contain. It even tells you when you’re allowed to leave out
closing tags!
The single-page version is too slow to load and render
on most computers. There’s also a “developers’ edition” at /dev, but the
standard version has nicer styling.↩︎
To start our journey into Hypermedia-Driven Applications, we are
going to create a simple contact management web application called
Contact.app. We will start with a basic, “Web 1.0-style” Multi-Page
Application (MPA), in the grand CRUD (Create, Read, Update, Delete)
tradition. It will not be the best contact management application in the
world, but it will be simple and it will do its job.
This application will also be easy to incrementally improve in the
coming chapters by utilizing the hypermedia-oriented library htmx.
By the time we are finished building and enhancing the application,
over the next few chapters, it will have some very slick features that
most developers today would assume requires the use of a SPA JavaScript
framework.
Picking A “Web Stack”
In order to demonstrate how web 1.0 applications work, we need to
pick a server-side language and a library for handling HTTP requests.
Colloquially, this is called our “Server-Side” or “Web” stack, and there
are literally hundreds of options to choose from, many with passionate
followings. You probably have a web framework that you prefer and, while
we wish we could write this book for every possible stack out there, in
the interest of simplicity (and sanity) we can only pick one.
For this book we are going to use the following stack:
Flask as our
web framework, allowing us to connect HTTP requests to Python
logic.
Jinja2 for our
server-side templating language, allowing us to render HTML responses
using a familiar and intuitive syntax.
Why this particular stack?
Python is the most popular programming language in the world, as of
this writing, according to the TIOBE index, a respected
measure of programming language popularity. More importantly, Python is
easy to read even if you aren’t familiar with it.
We chose the Flask web framework because it is simple and does not
impose a lot of structure on top of the basics of HTTP request
handling.
This bare-bones approach is a good match for our needs: in other
cases you might consider a more full-featured Python framework, such as
Django, which supplies much
more functionality out of the box than Flask does.
By using Flask for our book, we will be able to keep our code focused
on hypermedia exchanges.
We picked Jinja2 templates because they are the default templating
language for Flask. They are simple enough and similar enough to most
other server-side templating languages that most people who are familiar
with any server-side (or client-side) templating library should be able
to understand them quickly and easily.
Even if this combination of technologies isn’t your preferred stack,
please, keep reading: you will learn quite a bit from the patterns we
introduce in the coming chapters and it shouldn’t be hard to map them
into your preferred language and frameworks.
With this stack we will be rendering HTML on the server-side
to return to clients, rather than producing JSON. This is the
traditional approach to building web applications. However, with the
rise of SPAs, this approach is not as widely used a technique as it once
was. Today, as people are rediscovering this style of web applications,
the term “Server-Side Rendering” or SSR is emerging as the way that
people talk about it. This contrasts with “Client-Side Rendering”, that
is, rendering templates in the browser with data retrieved in JSON form
from the server, as is common in SPA libraries.
In Contact.app we will intentionally keep things as simple as
possible to maximize the teaching value of our code: it won’t be
perfectly factored code, but it will be easy to follow for readers, even
if they have little Python experience, and it should be easy to
translate both the application and the techniques demonstrated into your
preferred programming environment.
Python
Since this book is for learning how to use hypermedia effectively,
we’ll just briefly introduce the various technologies we use
around that hypermedia. This has some obvious drawbacks: if you
aren’t comfortable with Python, for example, some example Python code in
the book may be a bit confusing or mysterious at first.
If you feel like you need a quick introduction to the language before
diving into the code, we recommend the following books and websites:
We think most web developers, even developers who are unfamiliar with
Python, should be able to follow along with our examples. Most of the
authors of this book hadn’t written much Python before writing it, and
we got the hang of it pretty quickly.
Introducing Flask: Our First
Route
Flask is a simple but flexible web framework for Python. We’ll ease
into it by touching on its core elements.
A Flask application consists of a series of routes tied to
functions that execute when an HTTP request to a given path is made. It
uses a Python feature called “decorators” to declare the route that will
be handled, which is then followed by a function to handle requests to
that route. We’ll use the term “handler” to refer to the functions
associated with a route.
Let’s create our first route definition, a simple “Hello World”
route. In the following Python code you will see the @app
symbol. This is the flask decorator that allows us to set up our routes.
Don’t worry too much about how decorators work in Python, just know that
this feature allows us to map a given path to a particular
function (i.e., handler). The Flask application, when started, will take
HTTP requests and look up the matching handler and invoke it.
The route() method on the Flask decorator takes an
argument: the path you wish the route to handle. Here we pass in the
root or / path, as a string, to handle requests to the root
path.
This route declaration is then followed by a simple function
definition, index(). In Python, decorators invoked in this
manner apply to the function immediately following them. Therefore, this
function becomes the “handler” for that route, and will be executed when
an HTTP request to the given path is made.
Note that the name of the function doesn’t matter, we can call it
whatever we’d like so long as it is unique. In this case we chose
index() because that fits with the route we are handling:
the root “index” of the web application.
So we have the index() function immediately following
our route definition for the root, and this will become the handler for
the root URL in our web application.
The handler in this case is dead simple, it just returns a string,
“Hello World!”, to the client. This isn’t hypermedia yet, but as we can
see in [fig-helloworld], a
browser will render it just fine.
Hello World!
Great, there’s our first step into Flask, showing the core technique
we are going to use to respond to HTTP requests: routes mapped to
handlers.
For Contact.app, rather than rendering “Hello World!” at the root
path, we are going to do something a little fancy: we are going to
redirect to another path, the /contacts path. Redirects are
a feature of HTTP that allow you to redirect a client to another
location with an HTTP response.
We are going to display a list of contacts as our root page, and,
arguably, redirecting to the /contacts path to display this
information is a bit more consistent with the notion of resources with
REST. This is a judgement call on our part, and not something we feel is
too important, but it makes sense in terms of routes we will set up
later in the application.
To change our “Hello World” route to a redirect, we only need to
change one line of code:
Now the index() function returns the result of the
Flask-supplied redirect() function with the path we’ve
supplied. In this case the path is /contacts, passed in as
a string argument. Now, if you navigate to the root path,
/, our Flask application will forward you on to the
/contacts path.
Contact.app Functionality
Now that we have some understanding of how to define routes, let’s
get down to specifying and then implementing our web application.
What will Contact.app do?
Initially, it will allow users to:
View a list of contacts, including first name, last name, phone
and email address
Search the contacts
Add a new contact
View the details of a contact
Edit the details of a contact
Delete a contact
So, as you can see, Contact.app is a CRUD application, the sort of
application that is perfect for an old-school web 1.0 approach.
Note that the source code of Contact.app is available on GitHub.
Showing A Searchable
List Of Contacts
Let’s add our first real bit of functionality: the ability to show
all the contacts in our app in a list (really, in a table).
This functionality is going to be found at the /contacts
path, which is the path our previous route is redirecting to.
We will use Flask to route the /contacts path to a
handler function, contacts(). This function will do one of
two things:
If there is a search term found in the request, it will filter
down to only contacts matching that term
If not, it will simply list all contacts
This is a common approach in web 1.0 style applications: the same URL
that displays all instances of some resource also serves as the search
results page for those resources. Taking this approach makes it easy to
reuse the list display that is common to both types of request.
Here is what the code looks like for this handler:
Look for the query parameter named q, which stands
for “query.”
If the parameter exists, call the Contact.search()
function with it.
If not, call the Contact.all() function.
Pass the result to the index.html template to render
to the client.
We see the same sort of routing code we saw in our first example, but
we have a more elaborate handler function. First, we check to see if a
search query parameter named q is part of the request.
Query Strings
A “query string” is part of the URL specification. Here is an example
URL with a query string in it:
https://example.com/contacts?q=joe. The query string is
everything after the ?, and has a name-value pair format.
In this URL, the query parameter q is set to the string
value joe. In plain HTML, a query string can be included in
a request either by being hardcoded in an anchor tag or, more
dynamically, by using a form tag with a GET request.
To return to our Flask route, if a query parameter named
q is found, we call out to the search() method
on a Contact model object to do the actual contact search
and return all the matching contacts.
If the query parameter is not found, we simply get all
contacts by invoking the all() method on the
Contact object.
Finally, we render a template, index.html that displays
the given contacts, passing in the results of whichever of these two
functions we end up calling.
A Note On The Contact Class
The Contact Python class we’re using is the “domain
model” or just “model” class for our application, providing the
“business logic” around the management of Contacts.
It could be working with a database (it isn’t) or a simple flat file
(it is), but we’re going to skip over the internal details of the model.
Think of it as a “normal” domain model class, with methods on it that
act in a “normal” manner.
We will treat Contact as a resource, and focus
on how to effectively provide hypermedia representations of that
resource to clients.
The list & search templates
Now that we have our handler logic written, we’ll create a template
to render HTML in our response to the client. At a high level, our HTML
response needs to have the following elements:
A list of any matching or all contacts.
A search box where a user may type and submit search
terms.
A bit of surrounding “chrome”: a header and footer for the
website that will be the same regardless of the page you are
on.
We are using the Jinja2 templating language, which has the following
features:
We can use double-curly braces, {{ }}, to embed
expression values in the template.
we can use curly-percents, {% %}, for directives,
like iteration or including other content.
Beyond this basic syntax, Jinja2 is very similar to other templating
languages used to generate content, and should be easy to follow for
most web developers.
Let’s look at the first few lines of code in the
index.html template:
Delimit the content to be inserted into the layout.
Create a search form that will issue an HTTP GET to
/contacts.
Create an input for a user to type search queries.
The first line of code references a base template,
layout.html, with the extends directive. This
layout template provides the layout for the page (again, sometimes
called “the chrome”): it wraps the template content in an
<html> tag, imports any necessary CSS and JavaScript
in a <head> element, places a
<body> tag around the main content and so forth. All
the common content wrapped around the “normal” content for the entire
application is located in this file.
The next line of code declares the content section of
this template. This content block is used by the
layout.html template to inject the content of
index.html within its HTML.
Next we have our first bit of actual HTML, rather than just Jinja
directives. We have a simple HTML form that allows you to search
contacts by issuing a GET request to the
/contacts path. The form itself contains a label and an
input with the name “q.” This input’s value will be submitted with the
GET request to the /contacts path, as a query
string (since this is a GET request.)
Note that the value of this input is set to the Jinja expression
{{ request.args.get('q') or '' }}. This expression is
evaluated by Jinja and will insert the request value of “q” as the
input’s value, if it exists. This will “preserve” the search value when
a user does a search, so that when the results of a search are rendered
the text input contains the term that was searched for. This makes for a
better user experience since the user can see exactly what the current
results match, rather than having a blank text box at the top of the
screen.
Finally, we have a submit-type input. This will render as a button
and, when it is clicked, it will trigger the form to issue an HTTP
request.
This search interface forms the top of our contact page. Following it
is a table of contacts, either all contacts or the contacts that match
the search, if a search was done.
Here is what the template code for the contact table looks like:
Iterate over the contacts that were passed in to the
template.
Output the values of the current contact, first name, last name,
etc.
An “operations” column, with links to edit or view the contact
details.
This is the core of the page: we construct a table with appropriate
headers matching the data we are going to show for each contact. We
iterate over the contacts that were passed into the template by the
handler method using the for loop directive in Jinja2. We
then construct a series of rows, one for each contact, where we render
the first and last name, phone and email of the contact as table cells
in the row.
Additionally, we have a table cell that includes two links:
A link to the “Edit” page for the contact, located at
/contacts/{{ contact.id }}/edit (e.g., For the contact with
id 42, the edit link will point to
/contacts/42/edit)
A link to the “View” page for the contact
/contacts/{{ contact.id }} (using our previous contact
example, the view page would be at /contacts/42)
Finally, we have a bit of end-matter: a link to add a new contact and
a Jinja2 directive to end the content block:
Link to the page that allows you to create a new
contact.
The closing element of the content block.
And that’s our complete template. Using this simple server-side
template, in combination with our handler method, we can respond with an
HTML representation of all the contacts requested. So far, so
hypermedia.
[fig-contactapp] is what
the template looks like, rendered with a bit of contact information.
Contact.app
Now, our application won’t win any design awards at this point, but
notice that our template, when rendered, provides all the functionality
necessary to see all the contacts and search them, and also provides
links to edit them, view details of them or even create a new one.
And it does all this without the client (that is, the browser)
knowing a thing about what contacts are or how to work with them.
Everything is encoded in the hypermedia. A web browser
accessing this application just knows how to issue HTTP requests and
then render HTML, nothing more about the specifics of our applications
end points or underlying domain model.
As simple as our application is at this point, it is thoroughly
RESTful.
Adding A New Contact
The next bit of functionality that we will add to our application is
the ability to add new contacts. To do this, we are going to need to
handle that /contacts/new URL referenced in the “Add
Contact” link above. Note that when a user clicks on that link, the
browser will issue a GET request to the
/contacts/new URL.
All the other routes we have so far use GET as well, but
we are actually going to use two different HTTP methods for this bit of
functionality: an HTTP GET to render a form for adding a
new contact, and then an HTTP POSTto the same
path to actually create the contact, so we are going to be explicit
about the HTTP method we want to handle when we declare this route.
Declare a route, explicitly handling GET requests to
this path.
Render the new.html template, passing in a new
contact object.
Simple enough. We just render a new.html template with a
new Contact. (Contact() is how you construct a new instance
of the Contact class in Python, if you aren’t familiar with
it.)
While the handler code for this route is very simple, the
new.html template is more complicated.
For the remaining templates we are going to omit the layout directive
and the content block declaration, but you can assume they are the same
unless we say otherwise. This will let us focus on the “meat” of the
template.
If you are familiar with HTML you are probably expecting a form
element here, and you will not be disappointed. We are going to use the
standard form hypermedia control for collecting contact information and
submitting it to the server.
A form that submits to the /contacts/new path, using
an HTTP POST.
A label for the first form input.
The first form input, of type email.
Any error messages associated with this field.
In the first line of code we create a form that will submit back
to the same path that we are handling:
/contacts/new. Rather than issuing an HTTP GET
to this path, however, we will issue an HTTP POST to it.
Using a POST in this manner will signal to the server that
we want to create a new Contact, rather than get a form for creating
one.
We then have a label (always a good practice!) and an input that
captures the email of the contact being created. The name of the input
is email and, when this form is submitted, the value of
this input will be submitted in the POST request,
associated with the email key.
Next we have inputs for the other fields for contacts:
It is easy to miss in this straight-forward example: we are seeing
the flexibility of hypermedia in action.
If we add a new field, remove a field, or change the logic around how
fields are validated or work with one another, this new state of affairs
would be reflected in the new hypermedia representation given to users.
A user would see the updated new form and be able to work with these new
features, with no software update required.
Handling the post to
/contacts/new
The next step in our application is to handle the POST
that this form makes to /contacts/new.
To do so, we need to add another route to our application that
handles the /contacts/new path. The new route will handle
an HTTP POST method instead of an HTTP GET. We
will use the submitted form values to attempt to create a new
Contact.
If we are successful in creating a Contact, we will redirect the user
to the list of contacts and show a success message. If we aren’t
successful, then we will render the new contact form again with whatever
values the user entered and render error messages about what issues need
to be fixed so that the user can correct them.
We construct a new contact object with the values from the
form.
We try to save it.
On success, “flash” a success message & redirect to the
/contacts page.
On failure, re-render the form, showing any errors to the
user.
The logic in this handler is a bit more complex than other methods we
have seen. The first thing we do is create a new Contact, again using
the Contact() syntax in Python to construct the object. We
pass in the values that the user submitted in the form by using the
request.form object, a feature provided by Flask.
This request.form allows us to access submitted form
values in an easy and convenient way, by simply passing in the same name
associated with the various inputs.
We also pass in None as the first value to the
Contact constructor. This is the “id” parameter, and by
passing in None we are signaling that it is a new contact,
and needs to have an ID generated for it. (Again, we are not going into
the details of how this model object is implemented, our only concern is
using it to generate hypermedia responses.)
Next, we call the save() method on the Contact object.
This method returns true if the save is successful, and
false if the save is unsuccessful (for example, a bad email
was submitted by the user).
If we are able to save the contact (that is, there were no validation
errors), we create a flash message indicating success, and
redirect the browser back to the list page. A “flash” is a common
feature in web frameworks that allows you to store a message that will
be available on the next request, typically in a cookie or in a
session store.
Finally, if we are unable to save the contact, we re-render the
new.html template with the contact. This will show the same
template as above, but the inputs will be filled in with the submitted
values, and any errors associated with the fields will be rendered to
feedback to the user as to what validation failed.
The Post/Redirect/Get Pattern
This handler implements a common strategy in web 1.0-style
development called the Post/Redirect/Get
or PRG pattern. By issuing an HTTP redirect once a contact has been
created and forwarding the browser on to another location, we ensure
that the POST does not end up in the browsers request
cache.
This means that if the user accidentally (or intentionally) refreshes
the page, the browser will not submit another POST,
potentially creating another contact. Instead, it will issue the
GET that we redirect to, which should be side-effect
free.
We will use the PRG pattern in a few different places in this
book.
OK, so we have our server-side logic set up to save contacts. And,
believe it or not, this is about as complicated as our handler logic
will get, even when we look at adding more sophisticated htmx-driven
behaviors.
Viewing The Details Of A
Contact
The next piece of functionality we will implement is the detail page
for a Contact. The user will navigate to this page by clicking the
“View” link in one of the rows in the list of contacts. This will take
them to the path /contacts/<contact id> (e.g.,
/contacts/42).
This is a common pattern in web development: contacts are treated as
resources and the URLs around these resources are organized in a
coherent manner.
If you wish to view all contacts, you issue a GET to
/contacts.
If you want a hypermedia representation allowing you to create a
new contact, you issue a GET to
/contacts/new.
If you wish to view a specific contact (with, say, an id of
42), you issue a `GET to
/contacts/42.
The Eternal Bike Shed of URL Design
It is easy to quibble about the particulars of the path scheme you
use for your application:
“Should we POST to /contacts/new or to
/contacts?”
We have seen many arguments online and in person advocating for one
approach versus another. We feel it is more important to understand the
overarching idea of resources and hypermedia
representations, rather than getting worked up about the smaller
details of your URL design.
We recommend you just pick a reasonable, resource-oriented URL layout
you like and then stay consistent. Remember, in a hypermedia system, you
can always change your endpoints later, because you are using hypermedia
as the engine of application state!
Our handler logic for the detail route is going to be very
simple: we just look the Contact up by id, which is embedded in the path
of the URL for the route. To extract this ID we are going to need to
introduce a final bit of Flask functionality: the ability to call out
pieces of a path and have them automatically extracted and passed in to
a handler function.
Here is what the code looks like, just a few lines of simple
Python:
Map the path, with a path variable named
contact_id.
The handler takes the value of this path parameter.
Look up the corresponding contact.
Render the show.html template.
You can see the syntax for extracting values from the path in the
first line of code: you enclose the part of the path you wish to extract
in <> and give it a name. This component of the path
will be extracted and then passed into the handler function, via the
parameter with the same name.
So, if you were to navigate to the path /contacts/42,
the value 42 would be passed into the
contacts_view() function for the value of
contact_id.
Once we have the id of the contact we want to look up, we load it up
using the find method on the Contact object.
We then pass this contact into the show.html template and
render a response.
The Contact Detail Template
Our show.html template is relatively simple, just
showing the same information as the table but in a slightly different
format (perhaps for printing). If we add functionality like “notes” to
the application later on, this will give us a good place to do so.
Again, we will omit the “chrome” of the template and focus on the
meat:
We simply render a First Name and Last Name header, with the
additional contact information below it, and a couple of links: a link
to edit the contact and a link to navigate back to the full list of
contacts.
Editing And Deleting A
Contact
Next up we will tackle the functionality on the other end of that
“Edit” link. Editing a contact is going to look very similar to creating
a new contact. As with adding a new contact, we are going to need two
routes that handle the same path, but using different HTTP methods: a
GET to /contacts/<contact_id>/edit will
return a form allowing you to edit the contact and a POST
to that path will update it.
We are also going to piggyback the ability to delete a contact along
with this editing functionality. To do this we will need to handle a
POST to
/contacts/<contact_id>/delete.
Let’s look at the code to handle the GET, which, again,
will return an HTML representation of an editing interface for the given
resource:
As you can see this looks a lot like our “Show Contact”
functionality. In fact, it is nearly identical except for the template:
here we render edit.html rather than
show.html.
While our handler code looked similar to the “Show Contact”
functionality, the edit.html template is going to look very
similar to the template for the “New Contact” functionality: we will
have a form that submits updated contact values to the same “edit” URL
and that presents all the fields of a contact as inputs for editing,
along with any error messages.
Issue a POST to the
/contacts/{{ contact.id }}/edit path.
As with the new.html page, the input is tied to the
contact’s email.
This HTML is nearly identical to our new.html form,
except that this form is going to submit a POST to a
different path, based on the id of the contact that we want to update.
(It’s worth mentioning here that, rather than POST, we
would prefer to use a PUT or PATCH, but those
are not available in plain HTML.)
Following this we have the remainder of our form, again very similar
to the new.html template, and our button to submit the
form.
In the final part of our template we have a small difference between
the new.html and edit.html. Below the main
editing form, we include a second form that allows you to delete a
contact. It does this by issuing a POST to the
/contacts/<contact id>/delete path. Just as we would
prefer to use a PUT to update a contact, we would much
rather use an HTTP DELETE request to delete one.
Unfortunately that also isn’t possible in plain HTML.
To finish up the page, there is a simple hyperlink back to the list
of contacts.
Given all the similarities between the new.html and
edit.html templates, you may be wondering why we are not
refactoring these two templates to share logic between them.
That’s a good observation and, in a production system, we would probably
do just that.
For our purposes, however, since our application is small and simple,
we will leave the templates separate.
Factoring Your Applications
One thing that often trips people up who are coming to hypermedia
applications from a JavaScript background is the notion of “components”.
In JavaScript-oriented applications it is common to break your app up
into small client-side components that are then composed together. These
components are often developed and tested in isolation and provide a
nice abstraction for developers to create testable code.
With Hypermedia-Driven Applications, in contrast, you factor your
application on the server side. As we said, the above form could be
refactored into a shared template between the edit and create templates,
allowing you to achieve a reusable and DRY (Don’t Repeat Yourself)
implementation.
Note that factoring on the server-side tends to be coarser-grained
than on the client-side: you tend to split out common sections
rather than create lots of individual components. This has benefits (it
tends to be simple) as well as drawbacks (it is not nearly as isolated
as client-side components).
Overall, a properly factored server-side hypermedia application can
be extremely DRY.
Handling the post to
/contacts/<contact_id>/edit
Next we need to handle the HTTP POST request that the
form in our edit.html template submits. We will declare
another route that handles the same path as the GET
above.
Update the contact with the new information from the
form.
Attempt to save it.
On success, flash a success message & redirect to the detail
page.
On failure, re-render the edit template, showing any
errors.
The logic in this handler is very similar to the logic in the handler
for adding a new contact. The only real difference is that, rather than
creating a new Contact, we look the contact up by id and then call the
update() method on it with the values that were entered in
the form.
Once again, this consistency between our CRUD operations is one of
the nice and simplifying aspects of traditional CRUD web
applications.
Deleting A Contact
We piggybacked contact delete functionality into the same template
used to edit a contact. This second form will issue an HTTP
POST to /contacts/<contact_id>/delete,
and we will need to create a handler for that path as well.
Handle a POST the
/contacts/<contact_id>/delete path.
Look up and then invoke the delete() method on the
contact.
Flash a success message and redirect to the main list of
contacts.
The handler code is very simple since we don’t need to do any
validation or conditional logic: we simply look up the contact the same
way we have been doing in our other handlers and invoke the
delete() method on it, then redirect back to the list of
contacts with a success flash message.
No need for a template in this case, the contact is gone.
Contact.app… Implemented!
And, well… believe it or not, that’s our entire contact
application!
If you’ve struggled with parts of the code so far, don’t worry: we
don’t expect you to be a Python or Flask expert (we aren’t!). You just
need a basic understanding of how they work to benefit from the
remainder of the book.
This is a small and simple application, but it does demonstrate many
of the aspects of traditional, web 1.0 applications: CRUD, the
Post/Redirect/Get pattern, working with domain logic in a controller,
organizing our URLs in a coherent, resource-oriented manner.
And, furthermore, this is a deeply Hypermedia-Driven web
application. Without thinking about it very much, we have been using
REST, HATEOAS and all the other hypermedia concepts we discussed
earlier. We would bet that this simple little contact app of ours is
more RESTful than 99% of all JSON APIs ever built!
Just by virtue of using a hypermedia, HTML, we naturally
fall into the RESTful network architecture.
So that’s great. But what’s the matter with this little web app? Why
not end here and go off to develop web 1.0 style applications?
Well, at some level, nothing is wrong with it. Particularly for an
application as simple as this one, the older way of building web apps
might be a perfectly acceptable approach.
However, our application does suffer from that “clunkiness” that we
mentioned earlier when discussing web 1.0 applications: every request
replaces the entire screen, introducing a noticeable flicker when
navigating between pages. You lose your scroll state. You have to click
around a bit more than you might in a more sophisticated web
application.
Contact.app, at this point, just doesn’t feel like a “modern” web
application.
Is it time to reach for a JavaScript framework and JSON APIs to make
our contact application more interactive?
No. No it isn’t.
It turns out that we can improve the user experience of this
application while retaining its fundamental hypermedia architecture.
In the next few chapters we will look at htmx, a hypermedia-oriented library that
will let us improve our contact application while retaining the
hypermedia-based approach we have used so far.
HTML Notes: Framework Soup
Components encapsulate a section of a page along with its dynamic
behavior. While encapsulating behavior is a good way to organize code,
it can also separate elements from their surrounding context, which can
lead to wrong or inadequate relationships between elements. The result
is what one might call component soup, where information is
hidden in component state, rather than being present in the HTML, which
is now incomprehensible due to missing context.
Before you reach for components for reuse, consider your options.
Lower-level mechanisms often (allow you to) produce better HTML. In some
cases, components can actually improve the clarity of your
HTML.
The fact that the HTML document is something that you barely touch,
because everything you need in there will be injected via JavaScript,
puts the document and the page structure out of focus.
In order to avoid <div> soup (or Markdown soup, or
Component soup), you need to be aware of the markup you’re producing and
be able to change it.
Some SPA frameworks, and some web components, make this more
difficult by putting layers of abstraction between the code the
developer writes and the generated markup.
While these abstractions can allow developers to create richer UI or
work faster, their pervasiveness means that developers can lose sight of
the actual HTML (and JavaScript) being sent to clients. Without diligent
testing, this leads to inaccessibility, poor SEO, and bloat.
In the previous chapter we introduced a simple Web 1.0-style
hypermedia application to manage contacts. Our application supported the
normal CRUD operations for contacts, as well as a simple mechanism for
searching contacts. Our application was built using nothing but forms
and anchor tags, the traditional hypermedia controls used to interact
with servers. The application exchanges hypermedia (HTML) with the
server over HTTP, issuing GET and POST HTTP
requests and receiving back full HTML documents in response.
It is a basic web application, but it is also definitely a
Hypermedia-Driven Application. It is robust, it leverages the web’s
native technologies, and it is simple to understand.
So what’s not to like about the application?
Unfortunately, our application has a few issues common to web 1.0
style applications:
From a user experience perspective: there is a noticeable refresh
when you move between pages of the application, or when you create,
update or delete a contact. This is because every user interaction (link
click or form submission) requires a full page refresh, with a whole new
HTML document to process after each action.
From a technical perspective, all the updates are done with the
POST HTTP method. This, despite the fact that more logical
actions and HTTP request types like PUT and
DELETE exist and would make more sense for some of the
operations we implemented. After all, if we wanted to delete a resource,
wouldn’t it make more sense to use an HTTP DELETE request
to do so? Somewhat ironically, since we have used pure HTML, we are
unable to access the full expressive power of HTTP, which was designed
specifically for HTML.
The first point, in particular, is noticeable in Web 1.0 style
applications like ours and is what is responsible for giving them the
reputation for being “clunky” when compared with their more
sophisticated JavaScript-based Single Page Application cousins.
We could address this issue by adopting a Single Page Application
framework, and updating our server-side to provide JSON-based responses.
Single Page Applications eliminate the clunkiness of web 1.0
applications by updating a web page without refreshing it: they can
mutate parts of the Document Object Model (DOM) of the existing page
without needing to replace (and re-render) the entire page.
The DOM
The DOM is the internal model that a browser builds up when it
processes HTML, forming a tree of “nodes” for the tags and other content
in the HTML. The DOM provides a programmatic JavaScript API that allows
you to update the nodes in a page directly, without the use of
hypermedia. Using this API, JavaScript code can insert new content, or
remove or update existing content, entirely outside the normal browser
request mechanism.
There are a few different styles of SPA, but, as we discussed in
Chapter 1, the most common approach today is to tie the DOM to a
JavaScript model and then let an SPA framework like React or Vuereactively update the DOM
when a JavaScript model is updated: you make a change to a JavaScript
object that is stored locally in memory in the browser, and the web page
“magically” updates its state to reflect the change in the model.
In this style of application, communication with the server is
typically done via a JSON Data API, with the application sacrificing the
advantages of hypermedia in order to provide a better, smoother user
experience.
Many web developers today would not even consider the hypermedia
approach due to the perceived “legacy” feel of these web 1.0 style
applications.
Now, the second more technical issue we mentioned may strike you as a
bit pedantic, and we are the first to admit that conversations around
REST and which HTTP Action is right for a given operation can become
very tedious. But still, it’s odd that, when using plain HTML, it is
impossible to use all the functionality of HTTP!
Just seems wrong, doesn’t it?
A Close Look At A Hyperlink
It turns out that we can boost the interactivity of our application
and address both of these issues without resorting to the SPA
approach. We can do so by using a hypermedia-oriented
JavaScript library, htmx. The authors of
this book built htmx specifically to extend HTML as a hypermedia and
address the issues with legacy HTML applications we mentioned above (as
well as a few others.)
Before we get into how htmx allows us to improve the UX of our Web
1.0 style application, let’s revisit the hyperlink/anchor tag from
Chapter 1. Recall, a hyperlink is what is known as a hypermedia
control, a mechanism that describes some sort of interaction with a
server by encoding information about that interaction directly and
completely within the control itself.
Consider again this simple anchor tag which, when interpreted by a
browser, creates a hyperlink to the website for this book:
Let’s break down exactly what happens with this link:
The browser will render the text “Hypermedia Systems” to the
screen, likely with a decoration indicating it is clickable.
Then, when a user clicks on the text…
The browser will issue an HTTP GET to
https://hypermedia.systems…
The browser will load the HTML body of the HTTP response into the
browser window, replacing the current document.
So we have four aspects of a simple hypermedia link like this, with
the last three aspects supplying the mechanism that distinguishes a
hyperlink from “normal” text and, thus, makes this a hypermedia
control.
Now, let’s take a moment and think about how we can
generalize these last three aspects of a hyperlink.
Why Only Anchors & Forms?
Consider: what makes anchor tags (and forms) so special?
Why can’t other elements issue HTTP requests as well?
For example, why shouldn’t button elements be able to
issue HTTP requests? It seems arbitrary to have to wrap a form tag
around a button just to make deleting contacts work in our application,
for example.
Maybe: other elements should be able to issue HTTP requests as well.
Maybe other elements should be able to act as hypermedia controls on
their own.
This is our first opportunity to generalize HTML as a hypermedia.
Opportunity 1
HTML could be extended to allow any element to issue a
request to the server and act as a hypermedia control.
Why Only Click & Submit
Events?
Next, let’s consider the event that triggers the request to the
server on our link: a click event.
Well, what’s so special about clicking (in the case of anchors) or
submitting (in the case of forms) things? Those are just two of many,
many events that are fired by the DOM, after all. Events like mouse
down, or key up, or blur are all events you might want to use to issue
an HTTP request.
Why shouldn’t these other events be able to trigger requests as
well?
This gives us our second opportunity to expand the expressiveness of
HTML:
Opportunity 2
HTML could be extended to allow any event — not just a
click, as in the case of hyperlinks — to trigger HTTP requests.
Why Only GET & POST?
Getting a bit more technical in our thinking leads us to the problem
we noted earlier: plain HTML only give us access to the GET
and POST actions of HTTP.
HTTP stands for Hypertext Transfer Protocol, and yet the
format it was explicitly designed for, HTML, only supports two of the
five developer-facing request types. You have to use JavaScript
and issue an AJAX request to get at the other three:
DELETE, PUT and PATCH.
Let’s recall what these different HTTP request types are designed to
represent:
GET corresponds with “getting” a representation for
a resource from a URL: it is a pure read, with no mutation of the
resource.
POST submits an entity (or data) to the given
resource, often creating or mutating the resource and causing a state
change.
PUT submits an entity (or data) to the given
resource for update or replacement, again likely causing a state
change.
PATCH is similar to PUT but implies a
partial update and state change rather than a complete replacement of
the entity.
DELETE deletes the given resource.
These operations correspond closely to the CRUD operations we
discussed in Chapter 2. By giving us access to only two of the five,
HTML hamstrings our ability to take full advantage of HTTP.
This gives us our third opportunity to expand the expressiveness of
HTML:
Opportunity 3
HTML could be extended so that it allows access to the missing three
HTTP methods, PUT, PATCH and
DELETE.
Why Only Replace The Entire
Screen?
As a final observation, consider the last aspect of a hyperlink: it
replaces the entire screen when a user clicks on it.
It turns out that this technical detail is the primary culprit for
poor user experience in Web 1.0 Applications. A full page refresh can
cause a flash of unstyled content, where content “jumps” on the screen
as it transitions from its initial to its styled final form. It also
destroys the scroll state of the user by scrolling to the top of the
page, removes focus from a focused element and so forth.
But, if you think about it, there is no rule saying that hypermedia
exchanges must replace the entire document.
This gives us our fourth, final and perhaps most important
opportunity to generalize HTML:
Opportunity 4
HTML could be extended to allow the responses to requests to replace
elements within the current document, rather than requiring
that they replace the entire document.
This is actually a very old concept in hypermedia. Ted Nelson, in his
1980 book “Literary Machines” coined the term transclusion to
capture this idea: the inclusion of content into an existing document
via a hypermedia reference. If HTML supported this style of “dynamic
transclusion,” then Hypermedia-Driven Applications could function much
more like a Single Page Application, where only part of the DOM is
updated by a given user interaction or network request.
Extending HTML as a
Hypermedia with Htmx
These four opportunities present us a way to extend HTML well beyond
its current abilities, but in a way that is entirely within the
hypermedia model of the web. The fundamentals of HTML, HTTP, the
browser, and so on, won’t be changed dramatically. Rather, these
generalizations of existing functionality already found within
HTML would simply let us accomplish more using HTML.
Htmx is a JavaScript library that extends HTML in exactly this
manner, and it will be the focus of the next few chapters of this book.
Again, htmx is not the only JavaScript library that takes this
hypermedia-oriented approach (other excellent examples are Unpoly and Hotwire), but htmx is the purest in its
pursuit of extending HTML as a hypermedia.
Installing and Using Htmx
From a practical “getting started” perspective, htmx is a simple,
dependency-free and stand-alone JavaScript library that can be added to
a web application by simply including it via a script tag
in your head element.
Because of this simple installation model, you can take advantage of
tools like public CDNs to install the library.
Below is an example using the popular unpkg Content Delivery Network (CDN) to
install version 1.9.2 of the library. We use an integrity
hash to ensure that the delivered JavaScript content matches what we
expect. This SHA can be found on the htmx website.
We also mark the script as crossorigin="anonymous" so no
credentials will be sent to the CDN.
If you are used to modern JavaScript development, with complex build
systems and large numbers of dependencies, it may be a pleasant surprise
to find that that’s all it takes to install htmx.
This is in the spirit of the early web, when you could simply include
a script tag and things would “just work.”
If you don’t want to use a CDN, you can download htmx to your local
system and adjust the script tag to point to wherever you keep your
static assets. Or, you may have a build system that automatically
installs dependencies. In this case you can use the Node Package Manager
(npm) name for the library: htmx.org and install it in the
usual manner that your build system supports.
Once htmx has been installed, you can begin using it immediately.
No JavaScript Required…
And here we get to the interesting part of htmx: htmx does not
require you, the user of htmx, to actually write any JavaScript.
Instead, you will use attributes placed directly on elements
in your HTML to drive more dynamic behavior. Htmx extends HTML as a
hypermedia, and it is designed to make that extension feel as natural
and consistent as possible with existing HTML concepts. Just as an
anchor tag uses an href attribute to specify the URL to
retrieve, and forms use an action attribute to specify the
URL to submit the form to, htmx uses HTML attributes to specify
the URL that an HTTP request should be issued to.
Triggering HTTP Requests
Let’s look at the first feature of htmx: the ability for any element
in a web page to issue HTTP requests. This is the core functionality
provided by htmx, and it consists of five attributes that can be used to
issue the five different developer-facing types of HTTP requests:
hx-get - issues an HTTP GET
request.
hx-post - issues an HTTP POST
request.
hx-put - issues an HTTP PUT
request.
hx-patch - issues an HTTP PATCH
request.
hx-delete - issues an HTTP DELETE
request.
Each of these attributes, when placed on an element, tells the htmx
library: “When a user clicks (or whatever) this element, issue an HTTP
request of the specified type.”
The values of these attributes are similar to the values of both
href on anchors and action on forms: you
specify the URL you wish to issue the given HTTP request type to.
Typically, this is done via a server-relative path.
For example, if we wanted a button to issue a GET
request to /contacts then we would write the following
HTML:
<button hx-get="/contacts"><1> Get The Contacts</button>
A simple htmx-powered button
A simple button that issues an HTTP GET to
/contacts.
The htmx library will see the hx-get attribute on this
button, and hook up some JavaScript logic to issue an HTTP
GET AJAX request to the /contacts path when
the user clicks on it.
Very easy to understand and very consistent with the rest of
HTML.
It’s All Just HTML
With the request issued by the button above, we get to perhaps the
most important thing to understand about htmx: it expects the response
to this AJAX request to be HTML. Htmx is an extension of HTML.
A native hypermedia control like an anchor tag will typically get an
HTML response to an HTTP request it creates. Similarly, htmx expects the
server to respond to the requests that it makes with HTML.
This may surprise web developers who are used to responding to an
AJAX request with JSON, which is far and away the most common response
format for such requests. But AJAX requests are just HTTP requests and
there is no rule saying they must use JSON. Recall again that AJAX
stands for Asynchronous JavaScript & XML, so JSON is already a step
away from the format originally envisioned for this API: XML.
Htmx simply goes another direction and expects HTML.
Htmx vs. “Plain” HTML
Responses
There is an important difference between the HTTP responses to
“normal” anchor or form driven HTTP requests and to htmx-powered
requests: in the case of htmx triggered requests, responses can be
partial bits of HTML.
In htmx-powered interactions, as you will see, we are often not
replacing the entire document. Rather we are using “transclusion” to
include content within an existing document. Because of this,
it is often not necessary or desirable to transfer an entire HTML
document from the server to the browser.
This fact can be used to save bandwidth as well as resource loading
time. Less overall content is transferred from the server to the client,
and it isn’t necessary to reprocess a head tag with style
sheets, script tags, and so forth.
When the “Get Contacts” button is clicked, a partial HTML
response might look something like this:
This is just an unordered list of contacts with some clickable
elements in it. Note that there is no opening html tag, no
head tag, and so forth: it is a raw HTML list,
without any decoration around it. A response in a real application might
contain more sophisticated HTML than this simple list, but even if it
were more complicated it wouldn’t need to be an entire page of HTML: it
could just be the “inner” content of the HTML representation for this
resource.
Now, this simple list response is perfect for htmx. Htmx will simply
take the returned content and then swap it in to the DOM in place of
some element in the page. (More on exactly where it will be placed in
the DOM in a moment.) Swapping in HTML content in this manner is fast
and efficient because it leverages the existing native HTML parser in
the browser, rather than requiring a significant amount of client-side
JavaScript to be executed.
This small HTML response shows how htmx stays within the hypermedia
paradigm: just like a “normal” hypermedia control in a “normal” web
application, we see hypermedia being transferred to the client in a
stateless and uniform manner.
This button just gives us a slightly more sophisticated mechanism for
building a web application using hypermedia.
Targeting Other Elements
Now, given that htmx has issued a request and gotten back some HTML
as a response, and that we are going to swap this content into the
existing page (rather than replacing the entire page), the question
becomes: where should this new content be placed?
It turns out that the default htmx behavior is to simply put the
returned content inside the element that triggered the request. That’s
not a good thing in the case of our button: we will end up with
a list of contacts awkwardly embedded within the button element. That
will look pretty silly and is obviously not what we want.
Fortunately htmx provides another attribute, hx-target
which can be used to specify exactly where in the DOM the new
content should be placed. The value of the hx-target
attribute is a Cascading Style Sheet (CSS) selector that allows
you to specify the element to put the new hypermedia content into.
Let’s add a div tag that encloses the button with the id
main. We will then target this div with the
response:
<div id="main"><1><button hx-get="/contacts" hx-target="#main"><2> Get The Contacts</button></div>
A simple htmx-powered button
A div element that wraps the button.
The hx-target attribute that specifies the target of
the response.
We have added hx-target="#main" to our button, where
#main is a CSS selector that says “The thing with the ID
‘main’.”
By using CSS selectors, htmx builds on top of familiar and standard
HTML concepts. This keeps the additional conceptual load for working
with htmx to a minimum.
Given this new configuration, what would the HTML on the client look
like after a user clicks on this button and a response has been received
and processed?
The response HTML has been swapped into the div,
replacing the button that triggered the request. Transclusion! And this
has happened “in the background” via AJAX, without a clunky page
refresh.
Swap Styles
Now, perhaps we don’t want to load the content from the server
response into the div, as child elements. Perhaps, for whatever
reason, we wish to replace the entire div with the response. To
handle this, htmx provides another attribute, hx-swap, that
allows you to specify exactly how the content should be swapped
into the DOM.
The hx-swap attribute supports the following values:
innerHTML - The default, replace the inner html of
the target element.
outerHTML - Replace the entire target element with
the response.
beforebegin - Insert the response before the target
element.
afterbegin - Insert the response before the first
child of the target element.
beforeend - Insert the response after the last child
of the target element.
afterend - Insert the response after the target
element.
delete - Deletes the target element regardless of
the response.
none - No swap will be performed.
The first two values, innerHTML and
outerHTML, are taken from the standard DOM properties that
allow you to replace content within an element or in place of an entire
element respectively.
The next four values are taken from the
Element.insertAdjacentHTML() DOM API, which allow you to
place an element or elements around a given element in various ways.
The last two values, delete and none are
specific to htmx. The first option will remove the target element from
the DOM, while the second option will do nothing (you may want to only
work with response headers, an advanced technique we will look at later
in the book.)
Again, you can see htmx stays as close as possible to existing web
standards in order to minimize the conceptual load necessary for its
use.
So let’s consider that case where, rather than replacing the
innerHTML content of the main div above, we want to replace
the entire div with the HTML response.
To do so would require only a small change to our button, adding a
new hx-swap attribute:
<div id="main"><button hx-get="/contacts" hx-target="#main" hx-swap="outerHTML"><1> Get The Contacts</button></div>
Replacing the entire div
The hx-swap attribute specifies how to swap in new
content.
Now, when a response is received, the entire div will be
replaced with the hypermedia content:
You can see that, with this change, the target div has been entirely
removed from the DOM, and the list that was returned as the response has
replaced it.
Later in the book we will see additional uses for
hx-swap, for example when we implement infinite scrolling
in our contact management application.
Note that with the hx-get, hx-post,
hx-put, hx-patch and hx-delete
attributes, we have addressed two of the four opportunities for
improvement that we enumerated regarding plain HTML:
Opportunity 1: We can now issue an HTTP request with any
element (in this case we are using a button).
Opportunity 3: We can issue any sort of HTTP request we
want, PUT, PATCH and DELETE, in
particular.
And, with hx-target and hx-swap we have
addressed a third shortcoming: the requirement that the entire page be
replaced.
Opportunity 4: We can now replace any element we want in our page
via transclusion, and we can do so in any manner we want.
So, with only seven relatively simple additional attributes, we have
addressed most of the shortcomings of HTML as a hypermedia that we
identified earlier.
What’s next? Recall the one other opportunity we noted: the fact that
only a click event (on an anchor) or a submit
event (on a form) can trigger an HTTP request. Let’s look at how we can
address that limitation.
Using Events
Thus far we have been using a button to issue a request with htmx.
You have probably intuitively understood that the button would issue its
request when you clicked on the button since, well, that’s what you do
with buttons: you click on them.
And, yes, by default when an hx-get or another
request-driving annotation from htmx is placed on a button, the request
will be issued when the button is clicked.
However, htmx generalizes this notion of an event triggering a
request by using, you guessed it, another attribute:
hx-trigger. The hx-trigger attribute allows
you to specify one or more events that will cause the element to trigger
an HTTP request.
Often you don’t need to use hx-trigger because the
default triggering event will be what you want. The default triggering
event depends on the element type, and should be fairly intuitive:
Requests on input, textarea &
select elements are triggered by the change
event.
Requests on form elements are triggered on the
submit event.
Requests on all other elements are triggered by the
click event.
To demonstrate how hx-trigger works, consider the
following situation: we want to trigger the request on our button when
the mouse enters it. Now, this is certainly not a good UX
pattern, but bear with us: we are just using this as an example.
To respond to a mouse entering the button, we would add the following
attribute to our button:
<div id="main"><button hx-get="/contacts" hx-target="#main" hx-swap="outerHTML" hx-trigger="mouseenter"><1> Get The Contacts</button></div>
A (bad?) button that triggers on mouse
entry
Issue a request on the… mouseenter event.
Now, with this hx-trigger attribute in place, whenever
the mouse enters this button, a request will be triggered. Silly, but it
works.
Let’s try something a bit more realistic and potentially useful:
let’s add support for a keyboard shortcut for loading the contacts,
Ctrl-L (for “Load”). To do this we will need to take
advantage of additional syntax that the hx-trigger
attribute supports: event filters and additional arguments.
Event filters are a mechanism for determining if a given event should
trigger a request or not. They are applied to an event by adding square
brackets after it: someEvent[someFilter]. The filter itself
is a JavaScript expression that will be evaluated when the given event
occurs. If the result is truthy, in the JavaScript sense, it will
trigger the request. If not, the request will not be triggered.
In the case of keyboard shortcuts, we want to catch the
keyup event in addition to the click event:
<div id="main"><button hx-get="/contacts" hx-target="#main" hx-swap="outerHTML" hx-trigger="click, keyup"><1> Get The Contacts</button></div>
A start, trigger on keyup
A trigger with two events.
Note that we have a comma separated list of events that can trigger
this element, allowing us to respond to more than one potential
triggering event. We still want to respond to the click
event and load the contacts, in addition to handling the
Ctrl-L keyboard shortcut.
Unfortunately there are two problems with our keyup
addition: As it stands, it will trigger requests on any keyup
event that occurs. And, worse, it will only trigger when a keyup occurs
within this button. The user would need to tab onto the button
to make it active and then begin typing.
Let’s fix these two issues. To fix the first one, we will use a
trigger filter to test that Control key and the “L” key are pressed
together:
<div id="main"><button hx-get="/contacts" hx-target="#main" hx-swap="outerHTML" hx-trigger="click, keyup[ctrlKey && key == 'l']"><1> Get The Contacts</button></div>
Getting better with filter on keyup
keyup now has a filter, so the control key and L
must be pressed.
The trigger filter in this case is
ctrlKey && key == 'l'. This can be read as “A key
up event, where the ctrlKey property is true and the key property is
equal to l.” Note that the properties ctrlKey and
key are resolved against the event rather than the global
name space, so you can easily filter on the properties of a given event.
You can use any expression you like for a filter, however: calling a
global JavaScript function, for example, is perfectly acceptable.
OK, so this filter limits the keyup events that will trigger the
request to only Ctrl-L presses. However, we still have the
problem that, as it stands, only keyup events
within the button will trigger the request.
If you are not familiar with the JavaScript event bubbling model:
events typically “bubble” up to parent elements. So an event like
keyup will be triggered first on the focused element, and
then on its parent (enclosing) element, and so on, until it reaches the
top level document object that is the root of all other
elements.
To support a global keyboard shortcut that works regardless of what
element has focus, we will take advantage of event bubbling and a
feature that the hx-trigger attribute supports: the ability
to listen to other elements for events. The syntax for doing
this is the from: modifier, which is added after an event
name and that allows you to specify a specific element to listen for the
given event on using a CSS selector.
In this case, we want to listen to the body element,
which is the parent element of all visible elements on the page.
Here is what our updated hx-trigger attribute looks
like:
<div id="main"><button hx-get="/contacts" hx-target="#main" hx-swap="outerHTML" hx-trigger="click, keyup[ctrlKey && key == 'l'] from:body"><1> Get The Contacts</button></div>
Even better, listen for keyup on the
body
Listen to the ‘keyup” event on the body
tag.
Now, in addition to clicks, the button will listen for
keyup events on the body of the page. So it will issue a
request when it is clicked on and also whenever someone hits
Ctrl-L within the body of the page.
And now we have a nice keyboard shortcut for our Hypermedia-Driven
Application.
The hx-trigger attribute supports many more modifiers,
and it is more elaborate than other htmx attributes. This is because
events, in general, are complicated and require a lot of details to get
just right. The default trigger will often suffice, however, and you
typically don’t need to reach for complicated hx-trigger
features when using htmx.
Even with more sophisticated trigger specifications like the keyboard
shortcut we just added, the overall feel of htmx is declarative
rather than imperative. That keeps htmx-powered applications
“feeling like” standard web 1.0 applications in a way that adding
significant amounts of JavaScript does not.
Htmx: HTML eXtended
And hey, check it out! With hx-trigger we have addressed
the final opportunity for improvement of HTML that we outlined at the
start of this chapter:
Opportunity 2: We can use any event to trigger an HTTP
request.
That’s a grand total of eight, count ‘em, eight attributes
that all fall squarely within the same conceptual model as normal HTML
and that, by extending HTML as a hypermedia, open up a whole new world
of user interaction possibilities within it.
Here is a table summarizing those opportunities and which htmx
attributes address them:
Any element should be able to make HTTP requests
hx-get, hx-post, hx-put,
hx-patch, hx-delete
Any event should be able to trigger an HTTP request
hx-trigger
Any HTTP Action should be available
hx-put, hx-patch,
hx-delete
Any place on the page should be replaceable (transclusion)
hx-target, hx-swap
Passing Request Parameters
So far we have just looked at a situation where a button makes a
simple GET request. This is conceptually very close to what
an anchor tag might do. But there is that other native hypermedia
control in HTML-based applications: forms. Forms are used to pass
additional information beyond just a URL up to the server in a
request.
This information is captured via input and input-like elements within
the form via the various types of input tags available in HTML.
Htmx allows you include this additional information in a way that
mirrors HTML itself.
Enclosing Forms
The simplest way to pass input values with a request in htmx is to
enclose the element making a request within a form tag.
Let’s take our original search form and convert it to use htmx
instead:
When an htmx-powered element is within an ancestor form tag, all
input values within that form will be submitted for non-GET
requests
We have switched from an input of type
submit to a button and added the
hx-post attribute
Now, when a user clicks on this button, the value of the input with
the id search will be included in the request. This is by
virtue of the fact that there is a form tag enclosing both the button
and the input: when an htmx-driven request is triggered, htmx will look
up the DOM hierarchy for an enclosing form, and, if one is found, it
will include all values from within that form. (This is sometimes
referred to as “serializing” the form.)
You might have noticed that the button was switched from a
GET request to a POST request. This is
because, by default, htmx does not include the closest
enclosing form for GET requests, but it does
include the form for all other types of requests.
This may seem a little strange, but it avoids junking up URLs that
are used within forms when dealing with history entries, which we will
discuss in a bit. You can always include an enclosing form’s values with
an element that uses a GET by using the
hx-include attribute, which we will discuss next.
Note also that we could have added the hx-post attribute
to the form, rather than to the button but that would create a somewhat
awkward duplication of the search URL in the action and
hx-post attributes. This can be avoided by using the
hx-boost attribute, which we discuss in the next
chapter.
Including Inputs
While enclosing all the inputs you want included in a request within
a form is the most common approach for serializing inputs for htmx
requests, it isn’t always possible or desirable: form tags can have
layout consequences and simply cannot be placed in some spots in HTML
documents. A good example of the latter situation is in table row
(tr) elements: the form tag is not a valid
child or parent of table rows, so you can’t place a form within or
around a row of data in a table.
To address this issue, htmx provides a mechanism for including input
values in requests: the hx-include attribute. The
hx-include attribute allows you to select input values that
you wish to include in a request via CSS selectors.
Here is the above example reworked to include the input, dropping the
form:
hx-include can be used to include values directly in
a request.
The hx-include attribute takes a CSS selector value and
allows you to specify exactly which values to send along with the
request. This can be useful if it is difficult to colocate an element
issuing a request with all the desired inputs.
It is also useful when you do, in fact, want to submit values with a
GET request and overcome the default behavior of htmx.
Relative CSS selectors
The hx-include attribute and, in fact, most attributes
that take a CSS selector, also support relative CSS selectors.
These allow you to specify a CSS selector relative to the
element it is declared on. Here are some examples:
closest
Find the closest parent element matching the given selector, e.g.,
closest form.
next
Find the next element (scanning forward) matching the given selector,
e.g., next input.
previous
Find the previous element (scanning backwards) matching the given
selector, e.g., previous input.
find
Find the next element within this element matching the given
selector, e.g., find input.
this
The current element.
Using relative CSS selectors often allows you to avoid generating ids
for elements, since you can take advantage of their local structural
layout instead.
Inline Values
A final way to include values in htmx-driven requests is to use the
hx-vals attribute, which allows you to include “static”
values in the request. This can be useful if you have additional
information that you want to include in requests, but you don’t want to
have this information embedded in, for example, hidden inputs (which
would be the standard mechanism for including additional, hidden
information in HTML.)
Here is an example of hx-vals:
<button hx-get="/contacts" hx-vals='{"state":"MT"}'><1> Get The Contacts In Montana</button>
An htmx-powered button with
hx-vals
hx-vals, a JSON value to include in the
request.
The parameter state with the value MT will
be included in the GET request, resulting in a path and
parameters that looks like this: /contacts?state=MT. Note
that we switched the hx-vals attribute to use single quotes
around its value. This is because JSON strictly requires double quotes
and, therefore, to avoid escaping we needed to use the single-quote form
for the attribute value.
You can also prefix hx-vals with a js: and
pass values evaluated at the time of the request, which can be useful
for including things like a dynamically maintained variable, or value
from a third party JavaScript library.
For example, if the state variable were maintained
dynamically, via some JavaScript, and there existed a JavaScript
function, getCurrentState(), that returned the currently
selected state, it could be included dynamically in htmx requests like
so:
<button hx-get="/contacts" hx-vals='js:{"state":getCurrentState()}'><1> Get The Contacts In The Selected State</button>
A dynamic value
With the js: prefix, this expression will evaluate
at submit time.
These three mechanisms, using form tags, using the
hx-include attribute and using the hx-vals
attribute, allow you to include values in your hypermedia requests with
htmx in a manner that should feel very familiar and in keeping with the
spirit of HTML, while also giving you the flexibility to achieve what
you want.
History Support
We have a final piece of functionality to close out our overview of
htmx: browser history support. When you use normal HTML links and forms,
your browser will keep track of all the pages that you have visited. You
can then use the back button to navigate back to a previous page and,
once you have done this, you can use a forward button to go forward to
the original page you were on.
This notion of history was one of the killer features of the early
web. Unfortunately it turns out that history becomes tricky when you
move to the Single Page Application paradigm. An AJAX request does not,
by itself, register a web page in your browser’s history, which is a
good thing: an AJAX request may have nothing to do with the state of the
web page (perhaps it is just recording some activity in the browser), so
it wouldn’t be appropriate to create a new history entry for the
interaction.
However, there are likely to be a lot of AJAX driven interactions in
a Single Page Application where it is appropriate to create a
history entry. There is a JavaScript API to work with browser history,
but this API is deeply annoying and difficult to work with, and thus
often ignored by JavaScript developers.
If you have ever used a Single Page Application and accidentally
clicked the back button, only to lose your entire application state and
have to start over, you have seen this problem in action.
In htmx, as with Single Page Application frameworks, you will often
need to explicitly work with the history API. Fortunately, since htmx
sticks so close to the native model of the web and since it is
declarative, getting web history right is typically much easier to do in
an htmx-based application.
Consider the button we have been looking at to load contacts:
<button hx-get="/contacts" hx-target="#main"> Get The Contacts</button>
Our trusty button
As it stands, if you click this button it will retrieve the content
from /contacts and load it into the element with the id
main, but it will not create a new history
entry.
If we wanted it to create a history entry when this request happened,
we would add a new attribute to the button, the hx-push-url
attribute:
<button hx-get="/contacts" hx-target="#main" hx-push-url="true"><1> Get The Contacts</button>
Our trusty button, now with history!
hx-push-url will create an entry in history when the
button is clicked.
Now, when the button is clicked, the /contacts path will
be put into the browser’s navigation bar and a history entry will be
created for it. Furthermore, if the user clicks the back button, the
original content for the page will be restored, along with the original
URL.
Now, the name hx-push-url for this attribute might sound
a little obscure, but it is based on the JavaScript API,
history.pushState(). This notion of “pushing” derives from
the fact that history entries are modeled as a stack, and so you are
“pushing” new entries onto the top of the stack of history entries.
With this relatively simple, declarative mechanism, htmx allows you
to integrate with the back button in a way that mimics the “normal”
behavior of HTML.
Now, there is one additional thing we need to handle to get history
“just right”: we have “pushed” the /contacts path into the
browsers location bar successfully, and the back button works. But what
if someone refreshes their browser while on the /contacts
page?
In this case, you will need to handle the htmx-based “partial”
response as well as the non-htmx “full page” response. You can do this
using HTTP headers, a topic we will go into in detail later in the
book.
Conclusion
So that’s our whirlwind introduction to htmx. We’ve only seen about
ten attributes from the library, but you can see a hint of just how
powerful these attributes can be. Htmx enables a much more sophisticated
web application than is possible in plain HTML, with minimal additional
conceptual load compared to most JavaScript-based approaches.
Htmx aims to incrementally improve HTML as a hypermedia in a manner
that is conceptually coherent with the underlying markup language. Like
any technical choice, this is not without trade-offs: by staying so
close to HTML, htmx does not give developers a lot of infrastructure
that many might feel should be there “by default”.
By staying closer to the native model of the web, htmx aims to strike
a balance between simplicity and functionality, deferring to other
libraries for more elaborate frontend extensions on top of the existing
web platform. The good news is that htmx plays well with others, so when
these needs arise it is often easy enough to bring in another library to
handle them.
HTML Notes: Budgeting For HTML
The close relationship between content and markup means that good
HTML is labor-intensive. Most sites have a separation between the
authors, who are rarely familiar with HTML, and the developers, who need
to develop a generic system able to handle any content that’s thrown at
it — this separation usually taking the form of a CMS. As a result,
having markup tailored to content, which is often necessary for advanced
HTML, is rarely feasible.
Furthermore, for internationalized sites, content in different
languages being injected into the same elements can degrade markup
quality as stylistic conventions differ between languages. It’s an
expense few organizations can spare.
Thus, we don’t expect every site to contain perfectly conformant
HTML. What’s most important is to avoid wrong HTML — it can be
better to fall back on a more generic element than to be precisely
incorrect.
If you have the resources, however, putting more care in your HTML
will produce a more polished site.
Now that we’ve seen how htmx extends HTML as a hypermedia, it’s time
to put it into action. As we use htmx, we will still be using
hypermedia: we will issue HTTP requests and get back HTML. But, with the
additional functionality that htmx provides, we will have a more
powerful hypermedia to work with, allowing us to accomplish
much more sophisticated interfaces.
This will allow us to address user experience issues, such as long
feedback cycles or painful page refreshes, without needing to write
much, if any, JavaScript, and without creating a JSON API. Everything
will be implemented in hypermedia, using the core hypermedia concepts of
the early web.
Installing Htmx
The first thing we need to do is install htmx in our web application.
We are going to do this by downloading the source and saving it locally
in our application, so we aren’t dependent on any external systems. This
is known as “vendoring” the library. We can grab the latest version of
htmx by navigating our browser to
https://unpkg.com/htmx.org, which will redirect us to the
source of the latest version of the library.
We can save the content from this URL into the
static/js/htmx.js file in our project.
You can, of course, use a more sophisticated JavaScript package
manager such as Node Package Manager (NPM) or yarn to install htmx. You
do this by referring to its package name, htmx.org, in the
manner appropriate for your tool. However, htmx is very small
(approximately 12kb when compressed and zipped) and is dependency free,
so using it does not require an elaborate mechanism or build tool.
With htmx downloaded locally to our applications
/static/js directory, we can now load it in to our
application. We do this by adding the following script tag
to the head tag in our layout.html file, which
will make htmx available and active on every page in our
application:
Recall that the layout.html file is a layout
file included in most templates that wraps the content of those
templates in common HTML, including a head element that we
are using here to install htmx.
Believe it or not, that’s it! This simple script tag will make htmx’s
functionality available across our entire application.
AJAX-ifying Our Application
To get our feet wet with htmx, the first feature we are going to take
advantage of is known as “boosting.” This is a bit of a “magic” feature
in that we don’t need to do much beyond adding a single attribute,
hx-boost, to the application.
When you put hx-boost on a given element with the value
true, it will “boost” all anchor and form elements within
that element. “Boost”, here, means that htmx will convert all those
anchors and forms from “normal” hypermedia controls into AJAX-powered
hypermedia controls. Rather than issuing “normal” HTTP requests that
replace the whole page, the links and forms will issue AJAX requests.
Htmx then swaps the inner content of the <body> tag
in the response to these requests into the existing pages
<body> tag.
This makes navigation feel faster because the browser will not be
re-interpreting most of the tags in the response
<head> and so forth.
Boosted Links
Let’s take a look at an example of a boosted link. Below is a link to
a hypothetical settings page for a web application. Because it has
hx-boost="true" on it, htmx will halt the normal link
behavior of issuing a request to the /settings path and
replacing the entire page with the response. Instead, htmx will issue an
AJAX request to /settings, take the result and replace the
body element with the new content.
The hx-boost attribute makes this link
AJAX-powered.
You might reasonably ask: what’s the advantage here? We are issuing
an AJAX request and simply replacing the entire body.
Is that significantly different from just issuing a normal link
request?
Yes, it is in fact different: with a boosted link, the browser is
able to avoid any processing associated with the head tag. The head tag
often contains many scripts and CSS file references. In the boosted
scenario, it is not necessary to re-process those resources: the scripts
and styles have already been processed and will continue to apply to the
new content. This can often be a very easy way to speed up your
hypermedia application.
A second question you might have is: does the response need to be
formatted specially to work with hx-boost? After all, the
settings page would normally render an html tag, with a
head tag and so forth. Do you need to handle “boosted”
requests specially?
The answer is no: htmx is smart enough to pull out only the content
of the body tag to swap in to the new page. The
head tag is mostly ignored: only the title tag, if it is
present, will be processed. This means you don’t need to do anything
special on the server side to render templates that
hx-boost can handle: just return the normal HTML for your
page, and it should work fine.
Note that boosted links (and forms) will also continue to update the
navigation bar and history, just like normal links, so users will be
able to use the browser back button, will be able to copy and paste URLs
(or “deep links”) and so on. Links will act pretty much like “normal”,
they will just be faster.
Boosted Forms
Boosted form tags work in a similar way to boosted anchor tags: a
boosted form will use an AJAX request rather than the usual
browser-issued request, and will replace the entire body with the
response.
Here is an example of a form that posts messages to the
/messages endpoint using an HTTP POST request.
By adding hx-boost to it, those requests will be done in
AJAX, rather than the normal browser behavior.
<form action="/messages" method="post" hx-boost="true"><1><input type="text" name="message" placeholder="Enter A Message..."><button>Post Your Message</button></form>
A boosted form
As with the link, hx-boost makes this form
AJAX-powered.
A big advantage of the AJAX-based request that hx-boost
uses (and the lack of head processing that occurs) is that it avoids
what is known as a flash of unstyled content:
Flash Of Unstyled Content (FOUC)
A situation where a browser renders a web page before all the styling
information is available for the page. A FOUC causes a disconcerting
momentary “flash” of the unstyled content, which is then restyled when
all the style information is available. You will notice this as a
flicker when you move around the internet: text, images and other
content can “jump around” on the page as styles are applied to it.
With hx-boost the site’s styling is already loaded
before the new content is retrieved, so there is no such flash
of unstyled content. This can make a “boosted” application feel both
smoother and also snappier in general.
Attribute Inheritance
Let’s expand on our previous example of a boosted link, and add a few
more boosted links alongside it. We’ll add links so that we have one to
the /contacts page, the /settings page, and
the /help page. All these links are boosted and will behave
in the manner that we have described above.
This feels a little redundant, doesn’t it? It seems silly to annotate
all three links with the hx-boost="true" attribute right
next to one another.
Htmx offers a feature to help reduce this redundancy: attribute
inheritance. With most attributes in htmx, if you place it on a parent,
the attribute will also apply to children elements. This is how
Cascading Style Sheets work, and that idea inspired htmx to adopt a
similar “cascading htmx attributes” feature.
To avoid the redundancy in this example, let’s introduce a
div element that encloses all the links and then “hoist”
the hx-boost attribute up to that parent div.
This will let us remove the redundant hx-boost attributes
but ensure all the links are still boosted, inheriting that
functionality from the parent div.
Note that any legal HTML element could be used here, we just use a
div out of habit.
Now we don’t have to put an hx-boost="true" on every
link and, in fact, we can add more links alongside the existing ones,
and they, too, will be boosted, without us needing to explicitly
annotate them.
That’s fine, but what if you have a link that you don’t want
boosted within an element that has hx-boost="true" on it? A
good example of this situation is when a link is to a resource to be
downloaded, such as a PDF. Downloading a file can’t be handled well by
an AJAX request, so you probably want that link to behave “normally”,
issuing a full page request for the PDF, which the browser will then
offer to save as a file on the user’s local system.
To handle this situation, you simply override the parent
hx-boost value with hx-boost="false" on the
anchor tag that you don’t want to boost:
The boosting behavior is overridden for this link.
Here we have a new link to a documentation PDF that we wish to
function like a regular link. We have added
hx-boost="false" to the link and this declaration will
override the hx-boost="true" on the parent
div, reverting it to regular link behavior and, thus,
allowing for the file download behavior that we want.
Progressive Enhancement
A nice aspect of hx-boost is that it is an example of
progressive enhancement:
Progressive Enhancement
A software design philosophy that aims to provide as much essential
content and functionality to as many users as possible, while delivering
a better experience to users with more advanced web browsers.
Consider the links in the example above. What would happen if someone
did not have JavaScript enabled?
No problem. The application would continue to work, but it would
issue regular HTTP requests, rather than AJAX-based HTTP requests. This
means that your web application will work for the maximum number of
users; those with modern browsers (or users who have not turned off
JavaScript) can take advantage of the benefits of the AJAX-style
navigation that htmx offers, and others can still use the app just
fine.
Compare the behavior of htmx’s hx-boost attribute with a
JavaScript heavy Single Page Application: such an application often
won’t function at all without JavaScript enabled. It is often
very difficult to adopt a progressive enhancement approach when you use
an SPA framework.
This is not to say that every htmx feature offers
progressive enhancement. It is certainly possible to build features that
do not offer a “No JS” fallback in htmx, and, in fact, many of the
features we will build later in the book will fall into this category.
We will note when a feature is progressive enhancement friendly and when
it is not.
Ultimately, it is up to you, the developer, to decide if the
trade-offs of progressive enhancement (a more basic UX, limited
improvements over plain HTML) are worth the benefits for your
application users.
Adding “hx-boost” to
Contact.app
For the contact app we are building, we want this htmx “boost”
behavior… well, everywhere.
Right? Why not?
How could we accomplish that?
Well, it’s easy (and pretty common in htmx-powered web applications):
we can just add hx-boost on the body tag of
our layout.html template, and we are done.
Now every link and form in our application will use AJAX by default,
making it feel much snappier. Consider the “New Contact” link that we
created on the main page:
<a href="/contacts/new">Add Contact</a>
A newly boosted “add contact” link
Even though we haven’t touched anything on this link or on the
server-side handling of the URL it targets, it will now “just work” as a
boosted link, using AJAX for a snappier user experience, including
updating history, back button support and so on. And, if JavaScript
isn’t enabled, it will fall back to the normal link behavior.
All this with one htmx attribute.
The hx-boost attribute is neat, but is different than
other htmx attributes in that it is pretty “magical”: by making one
small change you modify the behavior of a large number of elements on
the page, turning them into AJAX-powered elements. Most other htmx
attributes are generally lower level and require more explicit
annotations in order to specify exactly what you want htmx to do. In
general, this is the design philosophy of htmx: prefer explicit over
implicit and obvious over “magic.”
However, the hx-boost attribute was too useful to allow
dogma to override practicality, and so it is included as a feature in
the library.
A Second
Step: Deleting Contacts With HTTP DELETE
For our next step with htmx, recall that Contact.app has a small form
on the edit page of a contact that is used to delete the contact:
This form issued an HTTP POST to, for example,
/contacts/42/delete, in order to delete the contact with
the ID 42.
We mentioned previously that one of the annoying things about HTML is
that you can’t issue an HTTP DELETE (or PUT or
PATCH) request directly, even though these are all part of
HTTP and HTTP is obviously designed for transferring HTML.
Thankfully, now, with htmx, we have a chance to rectify this
situation.
The “right thing,” from a RESTful, resource-oriented perspective is,
rather than issuing an HTTP POST to
/contacts/42/delete, to issue an HTTP DELETE
to /contacts/42. We want to delete the contact. The contact
is a resource. The URL for that resource is /contacts/42.
So the ideal is a DELETE request to
/contacts/42/.
Let’s update our application to do this by adding the htmx
hx-delete attribute to the “Delete Contact” button:
Now, when a user clicks this button, htmx will issue an HTTP
DELETE request via AJAX to the URL for the contact in
question.
A couple of things to notice:
We no longer need a form tag to wrap the button,
because the button itself carries the hypermedia action that it performs
directly on itself.
We no longer need to use the somewhat awkward
"/contacts/{{ contact.id }}/delete" route, but can simply
use the "/contacts/{{ contact.id }} route, since we are
issuing a DELETE. By using a DELETE we
disambiguate between a request intended to update the contact and a
request intended to delete it, using the native HTTP tools available for
exactly this reason.
Note that we have done something pretty magical here: we have turned
this button into a hypermedia control. It is no longer
necessary that this button be placed within a larger form
tag in order to trigger an HTTP request: it is a stand-alone, and fully
featured hypermedia control on its own. This is at the heart of htmx,
allowing any element to become a hypermedia control and fully
participate in a Hypermedia-Driven Application.
We should also note that, unlike with the hx-boost
examples above, this solution will not degrade gracefully. To
make this solution degrade gracefully, we would need to wrap the button
in a form element and handle a POST on the server side as
well.
In the interest of keeping our application simple, we are going to
omit that more elaborate solution.
Updating The Server-Side
Code
We have updated the client-side code (if HTML can be considered code)
so it now issues a DELETE request to the appropriate URL,
but we still have some work to do. Since we updated both the route and
the HTTP method we are using, we are going to need to update the
server-side implementation as well to handle this new HTTP request.
Unfortunately, there is a problem with our updated handler: by
default, in Flask the redirect() method responds with a
302 Found HTTP Response Code.
According to the Mozilla Developer Network (MDN) web docs on the 302 Found
response, this means that the HTTP method of the request
will be unchanged when the redirected HTTP request is
issued.
We are now issuing a DELETE request with htmx and then
being redirected to the /contacts path by flask. According
to this logic, that would mean that the redirected HTTP request would
still be a DELETE method. This means that, as it stands,
the browser will issue a DELETE request to
/contacts.
This is definitely not what we want: we would like the HTTP
redirect to issue a GET request, slightly modifying the
Post/Redirect/Get behavior we discussed earlier to be a
Delete/Redirect/Get.
Fortunately, there is a different response code, 303 See Other,
that does what we want: when a browser receives a
303 See Other redirect response, it will issue a
GET to the new location.
So we want to update our code to use the 303 response
code in the controller.
Thankfully, this is very easy: there is a second parameter to
redirect() that takes the numeric response code you wish to
send.
Now, when you want to remove a given contact, you can simply issue a
DELETE to the same URL as you used to access the contact in
the first place.
This is a natural HTTP-based approach to deleting a resource.
Targeting The Right Element
We aren’t quite finished with our updated delete button. Recall that,
by default, htmx “targets” the element that triggers a request, and will
place the HTML returned by the server inside that element. Right now,
the “Delete Contact” button is targeting itself.
That means that, since the redirect to the /contacts URL
is going to re-render the entire contact list, we will end up with that
contact list placed inside the “Delete Contact” button.
Mis-targeting like this comes up from time to time when you are
working with htmx and can lead to some pretty funny situations.
The fix for this is easy: add an explicit target to the button, and
target the body element with the response:
A fixed htmx-powered button for deleting a
contact
An explicit target added to the button.
Now our button behaves as expected: clicking on the button will issue
an HTTP DELETE to the server against the URL for the
current contact, delete the contact and redirect back to the contact
list page, with a nice flash message.
Is everything working smoothly now?
Updating The Location
Bar URL Properly
Well, almost.
If you click on the button you will notice that, despite the
redirect, the URL in the location bar is not correct. It still points to
/contacts/{{ contact.id }}. That’s because we haven’t told
htmx to update the URL: it just issues the DELETE request
and then updates the DOM with the response.
As we mentioned, boosting via hx-boost will naturally
update the location bar for you, mimicking normal anchors and forms, but
in this case we are building a custom button hypermedia control to issue
a DELETE. We need to let htmx know that we want the
resulting URL from this request “pushed” into the location bar.
We can achieve this by adding the hx-push-url attribute
with the value true to our button:
Deleting a contact, now with proper location
information
We tell htmx to push the redirected URL up into the location
bar.
Now we are done.
We have a button that, all by itself, is able to issue a properly
formatted HTTP DELETE request to the correct URL, and the
UI and location bar are all updated correctly. This was accomplished
with three declarative attributes placed directly on the button:
hx-delete, hx-target and
hx-push-url.
This required more work than the hx-boost change, but
the explicit code makes it easy to see what the button is doing as a
custom hypermedia control. The resulting solution feels clean; it takes
advantage of the built-in features of the web as a hypermedia system
without any URL hacks.
One More Thing…
There is one additional “bonus” feature we can add to our “Delete
Contact” button: a confirmation dialog. Deleting a contact is a
destructive operation and as it stands right now, if the user
inadvertently clicked the “Delete Contact” button, the application would
just delete that contact. Too bad, so sad for the user.
Fortunately htmx has an easy mechanism for adding a confirmation
message on destructive operations like this: the hx-confirm
attribute. You can place this attribute on an element, with a message as
its value, and the JavaScript method confirm() will be
called before a request is issued, which will show a simple confirmation
dialog to the user asking them to confirm the action. Very easy and a
great way to prevent accidents.
Here is how we would add confirmation of the contact delete
operation:
<button hx-delete="/contacts/{{ contact.id }}" hx-target="body" hx-push-url="true" hx-confirm="Are you sure you want to delete this contact?"><1> Delete Contact</button>
Confirming deletion
This message will be shown to the user, asking them to confirm
the delete.
Now, when someone clicks on the “Delete Contact” button, they will be
presented with a prompt that asks “Are you sure you want to delete this
contact?” and they will have an opportunity to cancel if they clicked
the button in error. Very nice.
With this final change we now have a pretty solid “delete contact”
mechanism: we are using the correct RESTful routes and HTTP Methods, we
are confirming the deletion, and we have removed a lot of the cruft that
normal HTML imposes on us, all while using declarative attributes in our
HTML and staying firmly within the normal hypermedia model of the
web.
Progressive Enhancement?
As we noted earlier about this solution: it is not a
progressive enhancement to our web application. If someone has disabled
JavaScript then this “Delete Contact” button will no longer work. We
would need to do additional work to keep the older form-based mechanism
working in a JavaScript-disabled environment.
Progressive Enhancement can be a hot-button topic in web development,
with lots of passionate opinions and perspectives. Like nearly all
JavaScript libraries, htmx makes it possible to create applications that
do not function in the absence of JavaScript. Retaining support for
non-JavaScript clients requires additional work and complexity in your
application. It is important to determine exactly how important
supporting non-JavaScript clients is before you begin using htmx, or any
other JavaScript framework, for improving your web applications.
Next Steps: Validating
Contact Emails
Let’s move on to another improvement in our application. A big part
of any web app is validating the data that is submitted to the server:
ensuring emails are correctly formatted and unique, numeric values are
valid, dates are acceptable, and so forth.
Currently, our application has a small amount of validation that is
done entirely server-side and that displays an error message when an
error is detected.
We are not going to go into the details of how validation works in
the model objects, but recall what the code for updating a contact looks
like from Chapter 3:
If the save does not succeed we re-render the form to display
error messages.
So we attempt to save the contact, and, if the save()
method returns true, we redirect to the contact’s detail page. If the
save() method does not return true, that indicates that
there was a validation error; instead of redirecting, we re-render the
HTML for editing the contact. This gives the user a chance to correct
the errors, which are displayed alongside the inputs.
Let’s take a look at the HTML for the email input:
Display any errors associated with the email field
We have a label for the input, an input of type text and
then a bit of HTML to display any error messages associated with the
email. When the template is rendered on the server, if there are errors
associated with the contact’s email, they will be displayed in this
span, which will be highlighted red.
Server-Side Validation Logic
Right now there is a bit of logic in the contact class that checks if
there are any other contacts with the same email address, and adds an
error to the contact model if so, since we do not want to have duplicate
emails in the database. This is a very common validation example: emails
are usually unique and adding two contacts with the same email is almost
certainly a user error.
Again, we are not going into the details of how validation works in
our models, but almost all server-side frameworks provide ways to
validate data and collect errors to display to the user. This sort of
infrastructure is very common in Web 1.0 server-side frameworks.
The error message shown when a user attempts to save a contact with a
duplicate email is “Email Must Be Unique”, as seen in [fig-emailerror].
Email validation error
All of this is done using plain HTML and using Web 1.0 techniques,
and it works well.
However, as the application currently stands, there are two
annoyances.
First, there is no email format validation: you can enter
whatever characters you’d like as an email and, as long as they are
unique, the system will allow it.
Second, we only check the email’s uniqueness when all the data is
submitted: if a user has entered a duplicate email, they will not find
out until they have filled in all the fields. This could be quite
annoying if the user was accidentally reentering a contact and had to
put all the contact information in before being made aware of this
fact.
Updating Our Input Type
For the first issue, we have a pure HTML mechanism for improving our
application: HTML 5 supports inputs of type email. All we
need to do is switch our input from type text to type
email, and the browser will enforce that the value entered
properly matches the email format:
A change of the type attribute to email
ensures that values entered are valid emails.
With this change, when the user enters a value that isn’t a valid
email, the browser will display an error message asking for a properly
formed email in that field.
So a simple single-attribute change done in pure HTML improves our
validation and addresses the first problem we noted.
Server-Side vs. Client-Side Validations
Experienced web developers might be grinding their teeth at the code
above: this validation is done on the client-side. That is, we
are relying on the browser to detect the malformed email and correct the
user. Unfortunately, the client-side is not trustworthy: a browser may
have a bug in it that allows the user to circumvent this validation
code. Or, worse, the user may be malicious and figure out a mechanism
around our validation entirely, such as using the developer console to
edit the HTML.
This is a perpetual danger in web development: all validations done
on the client-side cannot be trusted and, if the validation is
important, must be redone on the server-side. This is less of a
problem in Hypermedia-Driven Applications than in Single Page
Applications, because the focus of HDAs is the server-side, but it is
worth bearing in mind as you build your application.
Inline Validation
While we have improved our validation experience a bit, the user must
still submit the form to get any feedback on duplicate emails. We can
next use htmx to improve this user experience.
It would be better if the user were able to see a duplicate email
error immediately after entering the email value. It turns out that
inputs fire a change event and, in fact, the
change event is the default trigger for inputs in
htmx. So, putting this feature to work, we can implement the following
behavior: when the user enters an email, immediately issue a request to
the server and validate that email, and render an error message if
necessary.
This is the input that we want to have drive an HTTP request to
validate the email.
This is the span we want to put the error message, if any,
into.
So we want to add an hx-get attribute to this input.
This will cause the input to issue an HTTP GET request to a
given URL to validate the email. We then want to target the error span
following the input with any error message returned from the server.
Issue an HTTP GET to the email endpoint
for the contact.
Target the next element with the class error on
it.
Note that in the hx-target attribute we are using a
relative positional selector, next. This is a
feature of htmx and an extension to normal CSS. Htmx supports prefixes
that will find targets relative to the current element.
Relative Positional Expressions in Htmx
next
Scan forward in the DOM for the next matching element, e.g.,
next .error
previous
Scan backwards in the DOM for the closest previous matching element,
e.g., previous .alert
closest
Scan the parents of this element for matching element, e.g.,
closest table
find
Scan the children of this element for matching element, e.g.,
find span
this
the current element is the target (default)
By using relative positional expressions we can avoid adding explicit
ids to elements and take advantage of the local structure of HTML.
So, in our example with added hx-get and
hx-target attributes, whenever someone changes the value of
the input (remember, change is the default trigger
for inputs in htmx) an HTTP GET request will be issued to
the given URL. If there are any errors, they will be loaded into the
error span.
Validating Emails
Server-Side
Next, let’s look at the server-side implementation. We are going to
add another endpoint, similar to our edit endpoint in some ways: it is
going to look up the contact based on the ID encoded in the URL. In this
case, however, we only want to update the email of the contact, and we
obviously don’t want to save it! Instead, we will call the
validate() method on it.
That method will validate the email is unique and so forth. At that
point we can return any errors associated with the email directly, or
the empty string if none exist.
Update its email (note that since this is a GET, we
use the args property rather than the form
property).
Validate the contact.
Return a string, either the errors associated with the email
field or, if there are none, the empty string.
With this small bit of server-side code in place, we now have the
following user experience: when a user enters an email and tabs to the
next input field, they are immediately notified if the email is already
taken.
Note that the email validation is still done when the entire
contact is submitted for an update, so there is no danger of allowing
duplicate email contacts to slip through: we have simply made it
possible for users to catch this situation earlier by use of htmx.
It is also worth noting that this particular email validation
must be done on the server side: you cannot determine that an
email is unique across all contacts unless you have access to the data
store of record. This is another simplifying aspect of Hypermedia-Driven
Applications: since validations are done server-side, you have access to
all the data you might need to do any sort of validation you’d like.
Here again we want to stress that this interaction is done entirely
within the hypermedia model: we are using declarative attributes and
exchanging hypermedia with the server in a manner very similar to how
links or forms work. But we have managed to improve our user experience
dramatically.
Taking The User Experience
Further
Despite the fact that we haven’t added a lot of code here, we have a
fairly sophisticated user interface, at least when compared with plain
HTML-based applications. However, if you have used more advanced Single
Page Applications you have probably seen the pattern where an email
field (or a similar sort of input) is validated as you
type.
This seems like the sort of interactivity that is only possible with
a sophisticated, complex JavaScript framework, right?
Well, no.
It turns out that you can implement this functionality in htmx, using
pure HTML attributes.
In fact, all we need to do is to change our trigger. Currently, we
are using the default trigger for inputs, which is the
change event. To validate as the user types, we would want
to capture the keyup event as well:
An explicit keyup trigger has been added along with
change.
With this tiny change, every time a user types a character we will
issue a request and validate the email. Simple.
Debouncing Our Validation
Requests
Simple, yes, but probably not what we want: issuing a new request on
every key up event would be very wasteful and could potentially
overwhelm your server. What we want instead is only issue the request if
the user has paused for a small amount of time. This is called
“debouncing” the input, where requests are delayed until things have
“settled down”.
Htmx supports a delay modifier for triggers that allows
you to debounce a request by adding a delay before the request is sent.
If another event of the same kind appears within that interval, htmx
will not issue the request and will reset the timer.
This turns out to be exactly what we want for our email input: if the
user is busy typing in an email we won’t interrupt them, but as soon as
they pause or leave the field, we’ll issue a request.
Let’s add a delay of 200 milliseconds to the keyup
trigger, which is long enough to detect that the user has stopped
typing.:
We debounce the keyup event by adding a
delay modifier.
Now we no longer issue a stream of validation requests as the user
types. Instead, we wait until the user pauses for a bit and then issue
the request. Much better for our server, and still a great user
experience.
Ignoring Non-Mutating Keys
There is one last issue we should address with the keyup event: as it
stands we will issue a request no matter which keys are
pressed, even if they are keys that have no effect on the value of the
input, such as arrow keys. It would be better if there were a way to
only issue a request if the input value has changed.
And it turns out that htmx has support for that exact pattern, by
using the changed modifier for events. (Not to be confused
with the change event triggered by the DOM on input
elements.)
By adding changed to our keyup trigger, the
input will not issue validation requests unless the keyup event actually
updates the inputs value:
Only sending requests when the input value
changes
We do away with pointless requests by only issuing them when the
input’s value has actually changed.
That’s some pretty good-looking and powerful HTML, providing an
experience that most developers would think requires a complicated
client-side solution.
With a total of three attributes and a simple new server-side
endpoint, we have added a fairly sophisticated user experience to our
web application. Even better, any email validation rules we add on the
server side will automatically just work using this model:
because we are using hypermedia as our communication mechanism there is
no need to keep a client-side and server-side model in sync with one
another.
A great demonstration of the power of the hypermedia
architecture!
Another Application
Improvement: Paging
Let’s move on from the contact editing page for a bit and improve the
root page of the application, found at the /contacts path
and rendering the index.html template.
Currently, Contact.app does not support paging: if there are 10,000
contacts in the database we will show all 10,000 contacts on the root
page. Showing so much data can bog a browser (and a server) down, so
most web applications adopt a concept of “paging” to deal with data sets
this large, where only one “page” of a smaller number of items is shown,
with the ability to navigate around the pages in the data set.
Let’s fix our application so that we only show ten contacts at a time
with a “Next” and “Previous” link if there are more than 10 contacts in
the contact database.
The first change we will make is to add a simple paging widget to our
index.html template.
We will conditionally include two links:
If we are beyond the “first” page, we will include a link to the
previous page
If there are ten contacts in the current result set, we will
include a link to the next page
This isn’t a perfect paging widget: ideally we’d show the number of
pages and offer the ability to do more specific page navigation, and
there is the possibility that the next page might have 0 results in it
since we aren’t checking the total results count, but it will do for now
for our simple application.
Let’s look at the jinja template code for this in
index.html.
Include a new div under the table to hold our navigation
links.
If we are beyond page 1, include an anchor tag with the page
decremented by one.
If there are 10 contacts in the current page, include an anchor
tag linking to the next page by incrementing it by one.
Note that here we are using a special jinja filter syntax
contacts|length to compute the length of the contacts list.
The details of this filter syntax is beyond the scope of this book, but
in this case you can think of it as invoking the
contacts.length property and then comparing that with
10.
Now that we have these links in place, let’s address the server-side
implementation of paging.
We are using the page request parameter to encode the
paging state of the UI. So, in our handler, we need to look for that
page parameter and pass that through to our model, as an
integer, so the model knows which page of contacts to return:
Resolve the page parameter, defaulting to page 1 if no page is
passed in.
Pass the page through to the model when loading all contacts so
it knows which page of 10 contacts to return.
This is fairly straightforward: we just need to get another
parameter, like the q parameter we passed in for searching
contacts earlier, convert it to an integer and then pass it through to
the Contact model, so it knows which page to return.
And, with that small change, we are done: we now have a very basic
paging mechanism for our web application.
And, believe it or not, it is already using AJAX, thanks to our use
of hx-boost in the application. Easy!
Click To Load
This paging mechanism is fine for a basic web application, and it is
used extensively on the internet. But it has some drawbacks associated
with it: every time you click the “Next” or “Previous” buttons you get a
whole new page of contacts and lose any context you had on the previous
page.
Sometimes a more advanced paging UI pattern might be better. Maybe,
rather than loading in a new page of elements and replacing the current
elements, it would be nicer to append the next page of elements
inline, after the current elements.
This is the common “click to load” UX pattern, found in more advanced
web applications.
A Click To Load UI
In [fig-clicktoload], you
have a button that you can click, and it will load the next set of
contacts directly into the page, rather than “paging” to the next page.
This allows you to keep the current contacts “in context” visually on
the page, but still progress through them as you would in a normal,
paged user interface.
Let’s see how we can implement this UX pattern in htmx.
It’s actually surprisingly simple: we can just take the existing
“Next” link and repurpose it a bit using nothing but a few htmx
attributes!
We want to have a button that, when clicked, appends the rows from
the next page of contacts to the current, existing table, rather than
re-rendering the whole table. This can be achieved by adding a new row
to our table that has just such a button in it:
Only show “Load More” if there are 10 contact results in the
current page.
Target the closest enclosing row.
Replace the entire row with the response from the
server.
Select out the table rows from the response.
Let’s go through each attribute in detail here.
First, we are using hx-target to target the “closest”
tr element, that is, the closest parent table
row.
Second, we want to replace this entire row with whatever
content comes back from the server.
Third, we want to yank out only the tr elements in the
response. We are replacing this tr element with a new set
of tr elements, which will have additional contact
information in them, as well as, if necessary, a new “Load More” button
that points to the next next page. To do this, we use a CSS
selector tbody > tr to ensure we only pull out the rows
in the body of the table in the response. This avoids including rows in
the table header, for example.
Finally, we issue an HTTP GET to the url that will serve
the next page of contacts, which looks just like the “Next” link from
above.
Somewhat surprisingly, no server-side changes are necessary for this
new functionality. This is because of the flexibility that htmx gives
you with respect to how it processes server responses.
So, four attributes, and we now have a sophisticated “Click To Load”
UX, via htmx.
Infinite Scroll
Another common pattern for dealing with large sets of things is known
as the “Infinite Scroll” pattern. In this pattern, as the last item of a
list or table of elements is scrolled into view, more elements are
loaded and appended to the list or table.
Now, this behavior makes more sense in situations where a user is
exploring a category or series of social media posts, rather than in the
context of a contact application. However, for completeness, and to just
show what you can do with htmx, we will implement this pattern as
well.
It turns out that we can repurpose the “Click To Load” code to
implement this new pattern quite easily: if you think about it for a
moment, infinite scroll is really just the “Click To Load” logic, but
rather than loading when a click event occurs, we want to load when an
element is “revealed” in the view portal of the browser.
As luck would have it, htmx offers a synthetic (non-standard) DOM
event, revealed that can be used in tandem with the
hx-trigger attribute, to trigger a request when, well, when
an element is revealed.
So let’s convert our button to a span and take advantage of this
event:
We have converted our element from a button to a span, since the
user will not be clicking on it.
We trigger the request when the element is revealed, that is when
it comes into view in the portal.
All we needed to do to convert from “Click to Load” to “Infinite
Scroll” was to update our element to be a span and then add the
revealed event trigger.
The fact that switching to infinite scroll was so easy shows how well
htmx generalizes HTML: just a few attributes allow us to dramatically
expand what we can achieve in the hypermedia.
And, again, we are doing all this while taking advantage of the
RESTful model of the web. Despite all this new behavior, we are still
exchanging hypermedia with the server, with no JSON API response to be
seen.
As the web was designed.
HTML Notes: Caution With Modals and “display:
none”
Think twice about modals. Modal windows have become popular,
almost standard, in many web applications today.
Unfortunately, modal windows do not play well with much of the
infrastructure of the web and introduce client-side state that can be
difficult (though not impossible) to integrate cleanly with the
hypermedia-based approach.
Modal windows can be used safely for views that don’t constitute a
resource or correspond to a domain entity:
Alerts
Confirmation dialogs
Forms for creating/updating entities
Otherwise, consider using alternatives such as inline editing, or a
separate page, rather than a modal.
Use display: none; with care. The issue is that
it is not purely cosmetic — it also removes elements from the
accessibility tree and keyboard focus. This is sometimes done to present
the same content to visual and aural interfaces. If you want to hide an
element visually without hiding it from assistive technology (e.g. the
element contains information that is communicated through styling), you
can use this utility class:
So far so good with Contact.app: we have a nice little web
application with some significant improvements over a plain HTML-based
application. We’ve added a proper “Delete Contact” button, done some
dynamic validation of input and looked at different approaches to add
paging to the application. As we have said, many web developers would
expect that a lot of JavaScript-based scripting would be required to get
these features, but we’ve done it all in relatively pure HTML, using
only htmx attributes.
We will eventually add some client-side scripting to our
application: hypermedia is powerful, but it isn’t all powerful
and sometimes scripting might be the best (or only) way to achieve a
given goal. For now, however, let’s see what we can accomplish with
hypermedia.
The first advanced htmx feature we will create is known as the
“Active Search” pattern. Active Search is when, as a user types text
into a search box, the results of that search are dynamically shown.
This pattern was made popular when Google adopted it for search results,
and many applications now implement it.
To implement Active Search, we are going to use techniques closely
related to the way we did email validation in the previous chapter. If
you think about it, the two features are similar in many ways: in both
cases we want to issue a request as the user types into an input and
then update some other element with a response. The server-side
implementations will, of course, be very different, but the frontend
code will look fairly similar due to htmx’s general approach of “issue a
request on an event and replace something on the screen.”
Our Current Search UI
Let’s recall what the search field in our application currently looks
like:
The q or “query” parameter our client-side code uses
to search.
Recall that we have some server-side code that looks for the
q parameter and, if it is present, searches the contacts
for that term.
As it stands right now, the user must hit enter when the search input
is focused, or click the “Search” button. Both of these events will
trigger a submit event on the form, causing it to issue an
HTTP GET and re-rendering the whole page.
Currently, thanks to hx-boost, the form will use an AJAX
request for this GET, but we don’t yet get that nice
search-as-you-type behavior we want.
Adding Active Search
To add active search behavior, we will attach a few htmx attributes
to the search input. We will leave the current form as it is, with an
action and method, so that the normal search
behavior works even if a user does not have JavaScript enabled. This
will make our “Active Search” improvement a nice “progressive
enhancement.”
So, in addition to the regular form behavior, we also want
to issue an HTTP GET request when a key up occurs. We want
to issue this request to the same URL as the normal form submission.
Finally, we only want to do this after a small pause in typing has
occurred.
As we said, this functionality is very similar to what we needed for
email validation. In fact, we can copy the hx-trigger
attribute directly from our email validation example, with its small
200-millisecond delay, to wait for a user to stop typing before a
request is triggered.
This is another example of how common patterns come up again and
again when using htmx.
Keep the original attributes, so search will work if JavaScript
is not available.
Issue a GET to the same URL as the form.
Nearly the same hx-trigger specification as for the
email input validation.
We made a small change to the hx-trigger attribute: we
switched out the change event for the search
event. The search event is triggered when someone clears
the search or hits the enter key. It is a non-standard event, but it
doesn’t hurt to include here. The main functionality of the feature is
provided by the second triggering event, the keyup. As in
the email example, this trigger is delayed with the
delay:200ms modifier to “debounce” the input requests and
avoid hammering our server with requests on every keyup.
Targeting The Correct
Element
What we have is close to what we want, but we need to set up the
correct target. Recall that the default target for an element is itself.
As things currently stand, an HTTP GET request will be
issued to the /contacts path, which will, as of now, return
an entire HTML document of search results, and then this whole document
will be inserted into the inner HTML of the search input.
This is, in fact, nonsense: input elements aren’t
allowed to have any HTML inside of them. The browser will, sensibly,
just ignore the htmx request to put the response HTML inside the input.
So, at this point, when a user types anything into our input, a request
will be issued (you can see it in your browser development console if
you try it out) but, unfortunately, it will appear to the user as if
nothing has happened at all.
To fix this issue, what do we want to target with the update instead?
Ideally we’d like to just target the actual results: there is no reason
to update the header or search input, and that could cause an annoying
flash as focus jumps around.
The hx-target attribute allows us to do exactly that.
Let’s use it to target the results body, the tbody element
in the table of contacts:
Because there is only one tbody on the page, we can use
the general CSS selector tbody and htmx will target the
body of the table on the page.
Now if you try typing something into the search box, we’ll see some
results: a request is made and the results are inserted into the
document within the tbody. Unfortunately, the content that
is coming back is still an entire HTML document.
Here we end up with a “double render” situation, where an entire
document has been inserted inside another element, with all the
navigation, headers and footers and so forth re-rendered within that
element. This is an example of one of those mis-targeting issues we
mentioned earlier.
Thankfully, it is pretty easy to fix.
Paring Down Our Content
Now, we could use the same trick we reached for in the “Click To
Load” and “Infinite Scroll” features: the hx-select
attribute. Recall that the hx-select attribute allows us to
pick out the part of the response we are interested in using a CSS
selector.
Adding an hx-select that picks out the table rows in
the tbody of the response.
However, that isn’t the only fix for this problem, and, in this case,
it isn’t the most efficient one. Instead, let’s change the
server-side of our Hypermedia-Driven Application to serve
only the HTML content needed.
HTTP Request Headers In Htmx
In this section, we’ll look at another, more advanced technique for
dealing with a situation where we only want a partial bit of
HTML, rather than a full document. Currently, we are letting the server
create the full HTML document as response and then, on the client side,
we filter the HTML down to the bits that we want. This is easy to do,
and, in fact, might be necessary if we don’t control the server side or
can’t easily modify responses.
In our application, however, since we are doing “Full Stack”
development (that is: we control both frontend and backend
code, and can easily modify either) we have another option: we can
modify our server responses to return only the content necessary, and
remove the need to do client-side filtering.
This turns out to be more efficient, since we aren’t returning all
the content surrounding the bit we are interested in, saving bandwidth
as well as CPU and memory on the server side. So let’s explore returning
different HTML content based on the context information that htmx
provides with the HTTP requests it makes.
Here’s a look again at the current server-side code for our search
logic:
We simply re-render the index.html template every
time, no matter what.
How do we want to change this? We want to render two different bits
of HTML content conditionally:
If this is a “normal” request for the entire page, we want to
render the index.html template in the current manner. In
fact, we don’t want anything to change if this is a “normal”
request.
However, if this is an “Active Search” request, we only want to
render the content that is within the tbody, that is, just
the table rows of the page.
So we need some way to determine exactly which of these two different
types of requests to the /contact URL is being made, in
order to know exactly which content we want to render.
It turns out that htmx helps us distinguish between these two cases
by including a number of HTTP Request Headers when it makes
requests. Request Headers are a feature of HTTP, allowing clients (e.g.,
web browsers) to include name/value pairs of metadata associated with
requests to help the server understand what the client is
requesting.
Here is an example of (some of) the headers the FireFox browser
issues when requesting https://hypermedia.systems:
GET / HTTP/2
Host: hypermedia.systems
User-Agent: Mozilla/5.0 (Macintosh; Intel Mac OS X 10.15; rv:103.0) Gecko/20100101 Firefox/103.0
Accept: text/html,application/xhtml+xml,application/xml;q=0.9,image/avif,image/webp,*/*;q=0.8
Accept-Encoding: gzip, deflate, br
Accept-Language: en-US,en;q=0.5
Cache-Control: no-cache
Connection: keep-alive
DNT: 1
Pragma: no-cache
HTTP headers
Htmx takes advantage of this feature of HTTP and adds additional
headers and, therefore, additional context to the HTTP requests
that it makes. This allows you to inspect those headers and choose what
logic to execute on the server, and what sort of HTML response you want
to send to the client.
Here is a table of the HTTP headers that htmx includes in HTTP
requests:
HX-Boosted
This will be the string “true” if the request is made via an element
using hx-boost
HX-Current-URL
This will be the current URL of the browser
HX-History-Restore-Request
This will be the string “true” if the request is for history
restoration after a miss in the local history cache
HX-Prompt
This will contain the user response to an hx-prompt
HX-Request
This value is always “true” for htmx-based requests
HX-Target
This value will be the id of the target element if it exists
HX-Trigger-Name
This value will be the name of the triggered element if it exists
HX-Trigger
This value will be the id of the triggered element if it exists
Looking through this list of headers, the last one stands out: we
have an id, search on our search input. So the value of the
HX-Trigger header should be set to search when
the request is coming from the search input, which has the id
search.
Let’s add some conditional logic to our controller to look for that
header and, if the value is search, we render only the rows
rather than the whole index.html template:
@app.route("/contacts")def contacts(): search = request.args.get("q")if search isnotNone: contacts_set = Contact.search(search)if request.headers.get('HX-Trigger') =='search': <1># TODO: render only the rows here <2>else: contacts_set = Contact.all()return render_template("index.html", contacts=contacts_set)
Updating our server-side search
If the request header HX-Trigger is equal to
“search” we want to do something different.
We need to learn how to render just the table rows.
OK, so how do we render only the result rows?
Factoring Your Templates
Now we come to a common pattern in htmx: we want to factor
our server-side templates. This means that we want to break our
templates up a bit so that they can be called from multiple contexts. In
this case, we want to break the rows of the results table out to a
separate template we will call rows.html. We will include
it from the original index.html template, and also use it
in our controller to render it by itself when we want to respond with
only the rows for Active Search requests.
Here’s what the table in our index.html file currently
looks like:
The for loop in this template is what produces all the
rows in the final content generated by index.html. What we
want to do is to move the for loop and, therefore, the rows
it creates out to a separate template file so that only that
small bit of HTML can be rendered independently from
index.html.
Using this template we can render only the tr elements
for a given collection of contacts.
Of course, we still want to include this content in the
index.html template: we are sometimes going to be
rendering the entire page, and sometimes only rendering the rows. In
order to keep the index.html template rendering properly,
we can include the rows.html template by using the jinja
include directive at the position we want the content from
rows.html inserted:
<table><thead><tr><th>First</th><th>Last</th><th>Phone</th><th>Email</th><th></th></tr></thead><tbody> {% include 'rows.html' %} <1></tbody></table>
Including the new file
This directive “includes” the rows.html file,
inserting its content into the current template.
So far, so good: our /contacts page is still rendering
properly, just as it did before we split the rows out of the
index.html template.
Using Our New Template
The last step in factoring our templates is to modify our web
controller to take advantage of the new rows.html template
file when it responds to an active search request.
Since rows.html is just another template, just like
index.html, all we need to do is call the
render_template function with rows.html rather
than index.html. This will render only the row
content rather than the entire page:
Render the new template in the case of an active search.
Now, when an Active Search request is made, rather than getting an
entire HTML document back, we only get a partial bit of HTML, the table
rows for the contacts that match the search. These rows are then
inserted into the tbody on the index page, without any need
for hx-select or other client-side processing.
And, as a bonus, the old form-based search still works. We
conditionally render the rows only when the search input
issues the HTTP request via htmx. Again, this is a progressive
enhancement to our application.
HTTP Headers & Caching
One subtle aspect of the approach we are taking here, using headers
to determine the content of what we return, is a feature baked into
HTTP: caching. In our request handler, we are now returning different
content depending on the value of the HX-Trigger header. If
we were to use HTTP Caching, we might get into a situation where someone
makes a non-htmx request (e.g., refreshing a page) and yet the
htmx content is returned from the HTTP cache, resulting in a
partial page of content for the user.
The solution to this problem is to use the HTTP Response
Vary header and call out the htmx headers that you are
using to determine what content you are returning. A full explanation of
HTTP Caching is beyond the scope of this book, but the MDN
article on the topic is quite good, and the htmx documentation discusses
this issue as well.
Updating the
Navigation Bar With “hx-push-url”
One shortcoming of our current Active Search implementation, when
compared with the normal form submission, is that when you submit the
form version it updates the navigation bar of the browser to include the
search term. So, for example, if you search for “joe” in the search box,
you will end up with a url that looks like this in your browser’s nav
bar:
https://example.com/contacts?q=joe
The updated location after a form search
This is a nice feature of browsers: it allows you to bookmark this
search or to copy the URL and send it to someone else. All they have to
do is to click on the link, and they will repeat the exact same search.
This is also tied in with the browser’s notion of history: if you click
the back button it will take you to the previous URL that you came from.
If you submit two searches and want to go back to the first one, you can
simply hit back and the browser will “return” to that search.
As it stands right now, during our Active Search, we are not updating
the browser’s navigation bar. So, users aren’t getting links that can be
copied and pasted, and you aren’t getting history entries either, which
means no back button support. Fortunately, we’ve already seen how to fix
this: with the hx-push-url attribute.
The hx-push-url attribute lets you tell htmx “Please
push the URL of this request into the browser’s navigation bar.” Push
might seem like an odd verb to use here, but that’s the term that the
underlying browser history API uses, which stems from the fact that it
models browser history as a “stack” of locations: when you go to a new
location, that location is “pushed” onto the stack of history elements,
and when you click “back”, that location is “popped” off the history
stack.
So, to get proper history support for our Active Search, all we need
to do is to set the hx-push-url attribute to
true.
By adding the hx-push-url attribute with the value
true, htmx will update the URL when it makes a
request.
Now, as Active Search requests are sent, the URL in the browser’s
navigation bar is updated to have the proper query in it, just like when
the form is submitted.
You might not want this behavior. You might feel it would be
confusing to users to see the navigation bar updated and have history
entries for every Active Search made, for example. Which is fine: you
can simply omit the hx-push-url attribute and it will go
back to the behavior you want. The goal with htmx is to be flexible
enough to achieve the UX that you want, while staying within
the declarative HTML model.
Adding A Request Indicator
A final touch for our Active Search pattern is to add a request
indicator to let the user know that a search is in progress. As it
stands the user has no explicit signal that the active search
functionality is handling a request. If the search takes a bit, a user
may end up thinking that the feature isn’t working. By adding a request
indicator we let the user know that the hypermedia application is busy
and they should wait (hopefully not too long!) for the request to
complete.
Htmx provides support for request indicators via the
hx-indicator attribute. This attribute takes, you guessed
it, a CSS selector that points to the indicator for a given element. The
indicator can be anything, but it is typically some sort of animated
image, such as a gif or svg file, that spins or otherwise communicates
visually that “something is happening.”
The hx-indicator attribute points to the indicator
image after the input.
The indicator is a spinning circle svg file, and has the
htmx-indicator class on it.
We have added the spinner right after the input. This visually
co-locates the request indicator with the element making the request,
and makes it easy for a user to see that something is in fact
happening.
It just works, but how does htmx make the spinner appear and
disappear? Note that the indicator img tag has the
htmx-indicator class on it. htmx-indicator is
a CSS class that is automatically injected into the page by htmx. This
class sets the default opacity of an element to
0, which hides the element from view, while at the same
time not disrupting the layout of the page.
When an htmx request is triggered that points to this indicator,
another class, htmx-request is added to the indicator which
transitions its opacity to 1. So you can use just about anything as an
indicator, and it will be hidden by default. Then, when a request is in
flight, it will be shown. This is all done via standard CSS classes,
allowing you to control the transitions and even the mechanism by which
the indicator is shown (e.g., you might use display rather
than opacity).
Use Request Indicators!
Request indicators are an important UX aspect of any distributed
application. It is unfortunate that browsers have de-emphasized their
native request indicators over time, and it is doubly unfortunate that
request indicators are not part of the JavaScript ajax APIs.
Be sure not to neglect this significant aspect of your application.
Requests might seem instant when you are working on your application
locally, but in the real world they can take quite a bit longer due to
network latency. It’s often a good idea to take advantage of browser
developer tools that allow you to throttle your local browser’s response
times. This will give you a better idea of what real world users are
seeing, and show you where indicators might help users understand
exactly what is going on.
With this request indicator, we now have a pretty sophisticated user
experience when compared with plain HTML, but we’ve built it all as a
hypermedia-driven feature. No JSON or JavaScript to be seen. And our
implementation has the benefit of being a progressive enhancement; the
application will continue to work for clients that don’t have JavaScript
enabled.
Lazy Loading
With Active Search behind us, let’s move on to a very different sort
of enhancement: lazy loading. Lazy loading is when the loading of a
particular bit of content is deferred until later, when needed. This is
commonly used as a performance enhancement: you avoid the processing
resources necessary to produce some data until that data is actually
needed.
Let’s add a count of the total number of contacts to Contact.app,
just below the bottom of our contacts table. This will give us a
potentially expensive operation that we can use to demonstrate how to
add lazy loading with htmx.
First let’s update our server code in the /contacts
request handler to get a count of the total number of contacts. We will
pass that count through to the template to render some new HTML.
Get the total count of contacts from the Contact model.
Pass the count out to the index.html template to use
when rendering.
As with the rest of the application, in the interest of staying
focused on the hypermedia part of Contact.app, we’ll skip over
the details of how Contact.count() works. We just need to
know that:
It returns the total count of contacts in the contact
database.
It may be slow (for the sake of our example).
Next lets add some HTML to our index.html that takes
advantage of this new bit of data, showing a message next to the “Add
Contact” link with the total count of users. Here is what our HTML looks
like:
<p><a href="/contacts/new">Add Contact</a><span>({{ count }} total Contacts)</span><1></p>
Adding a contact count element to the
application
A simple span with some text showing the total number of
contacts.
Well that was easy, wasn’t it? Now our users will see the total
number of contacts next to the link to add new contacts, to give them a
sense of how large the contact database is. This sort of rapid
development is one of the joys of developing web applications the old
way.
[fig-totalcontacts] is
what the feature looks like in our application. Beautiful.
Total contact count display
Of course, as you probably suspected, all is not perfect.
Unfortunately, upon shipping this feature to production, we start
getting complaints from users that the application “feels slow.” Like
all good developers faced with a performance issue, rather than guessing
what the issue might be, we try to get a performance profile of the
application to see what exactly is causing the problem.
It turns out, surprisingly, that the problem is that innocent looking
Contacts.count() call, which is taking up to a second and a
half to complete. Unfortunately, for reasons beyond the scope of this
book, it is not possible to improve that load time, nor is possible to
cache the result.
This leaves us with two options:
Remove the feature.
Come up with some other way to mitigate the performance
issue.
Let’s assume that we can’t remove the feature, and therefore look at
how we can mitigate this performance issue by using htmx instead.
Pulling Out The Expensive
Code
The first step in implementing the Lazy Load pattern is to pull the
expensive code — that is, the call to Contacts.count() —
out of the request handler for the /contacts endpoint.
Let’s put this function call into its own HTTP request handler as a
new HTTP endpoint that we will put at /contacts/count. For
this new endpoint, we won’t need to render a template at all: its sole
job is going to be to render that small bit of text that is in the span,
“(22 total Contacts).”
We no longer call Contacts.count() in this
handler.
Count is no longer passed out to the template to
render in the /contacts handler.
We create a new handler at the /contacts/count path
that does the expensive calculation.
Return the string with the total number of contacts.
So now we have moved the performance issue out of the
/contacts handler code, which renders the main contacts
table, and created a new HTTP endpoint that will produce this
expensive-to-create count string for us.
Now we need to get the content from this new handler into
the span, somehow. As we said earlier, the default behavior of htmx is
to place any content it receives for a given request into the
innerHTML of an element, and that turns out to be exactly
what we want here: we want to retrieve this text and put it into the
span. So we can simply place an hx-get
attribute on the span, pointing to this new path, and do exactly
that.
However, recall that the default event that will trigger a
request for a span element in htmx is the
click event. Well, that’s not what we want! Instead, we
want this request to trigger immediately, when the page loads.
To do this, we can add the hx-trigger attribute to
update the trigger of the requests for the element, and use the
load event.
The load event is a special event that htmx triggers on
all content when it is loaded into the DOM. By setting
hx-trigger to load, we will cause htmx to
issue the GET request when the span element is
loaded into the page.
Issue a GET to /contacts/count when the
load event occurs.
Note that the span starts empty: we have removed the
content from it, and we are allowing the request to
/contacts/count to populate it instead.
And, check it out, our /contacts page is fast again!
When you navigate to the page it feels very snappy and profiling shows
that yes, indeed, the page is loading much more quickly. Why is that?
Well, we’ve deferred the expensive calculation to a secondary request,
allowing the initial request to finish loading faster.
You might say “OK, great, but it’s still taking a second or two to
get the total count on the page.” True, but often the user may not be
particularly interested in the total count. They may just want to come
to the page and search for an existing user, or perhaps they may want to
edit or add a user. The total count of contacts is just a “nice to have”
bit of information in these cases.
By deferring the calculation of the count in this manner we let users
get on with their use of the application while we perform the expensive
calculation.
Yes, the total time to get all the information on the screen takes
just as long. It actually will be a bit longer, since we now need two
HTTP requests to get all the information for the page. But the
perceived performance for the end user will be much better:
they can do what they want nearly immediately, even if some information
isn’t available instantaneously.
Lazy Loading is a great tool to have in your belt when optimizing web
application performance.
Adding An Indicator
A shortcoming of the current implementation is that currently there
is no indication that the count request is in flight, it just appears at
some point when the request finishes.
This isn’t ideal. What we want here is an indicator, just like we
added in our Active Search example. And, in fact, we can simply reuse
that same exact spinner image, copy-and-pasted into the new HTML we have
created.
Now, in this case, we have a one-time request and, once the request
is over, we are not going to need the spinner anymore. So it doesn’t
make sense to use the exact same approach we did with the active search
example. Recall that in that case we placed a spinner after the
span and using the hx-indicator attribute to point to
it.
In this case, since the spinner is only used once, we can put it
inside the content of the span. When the request completes the
content in the response will be placed inside the span, replacing the
spinner with the computed contact count. It turns out that htmx allows
you to place indicators with the htmx-indicator class on
them inside of elements that issue htmx-powered requests. In the absence
of an hx-indicator attribute, these internal indicators
will be shown when a request is in flight.
So let’s add that spinner from the active search example as the
initial content in our span:
Now when the user loads the page, rather than having the total
contact count magically appear, there is a nice spinner indicating that
something is coming. Much better.
Note that all we had to do was copy and paste our indicator from the
active search example into the span. Once again we see how
htmx provides flexible, composable features and building blocks.
Implementing a new feature is often just copy-and-paste, maybe a tweak
or two, and you are done.
But That’s Not Lazy!
You might say “OK, but that’s not really lazy. We are still loading
the count immediately when the page is loaded, we are just doing it in a
second request. You aren’t really waiting until the value is actually
needed.”
Fine. Let’s make it lazy lazy: we’ll only issue the request
when the span scrolls into view.
To do that, let’s recall how we set up the infinite scroll example:
we used the revealed event for our trigger. That’s all we
want here, right? When the element is revealed we issue the request?
Yep, that’s it. Once again, we can mix and match concepts across
various UX patterns to come up with solutions to new problems in
htmx.
Now we have a truly lazy implementation, deferring the expensive
computation until we are absolutely sure we need it. A pretty cool
trick, and, again, a simple one-attribute change demonstrates the
flexibility of both htmx and the hypermedia approach.
Inline Delete
For our next hypermedia trick, we are going to implement the “Inline
Delete” pattern. With this feature, a contact can be deleted directly
from the table of all contacts, rather than requiring the user to
navigate all the way to the edit view of particular contact, in order to
access the “Delete Contact” button we added in the last chapter.
Recall that we already have “Edit” and “View” links for each row, in
the rows.html template:
Now we want to add a “Delete” link as well. And, thinking on it, we
want that link to act an awful lot like the “Delete Contact” button from
edit.html, don’t we? We’d like to issue an HTTP
DELETE to the URL for the given contact and we want a
confirmation dialog to ensure the user doesn’t accidentally delete a
contact.
Here is the “Delete Contact” button html:
<button hx-delete="/contacts/{{ contact.id }}" hx-push-url="true" hx-confirm="Are you sure you want to delete this contact?" hx-target="body"> Delete Contact</button>
The existing row actions
As you may suspect by now, this is going to be another copy-and-paste
job.
One thing to note is that, in the case of the “Delete Contact”
button, we wanted to re-render the whole screen and update the URL,
since we are going to be returning from the edit view for the contact to
the list view of all contacts. In the case of this link, however, we are
already on the list of contacts, so there is no need to update the URL,
and we can omit the hx-push-url attribute.
Here is the code for our inline “Delete” link:
<td><a href="/contacts/{{ contact.id }}/edit">Edit</a><a href="/contacts/{{ contact.id }}">View</a><a href="#" hx-delete="/contacts/{{ contact.id }}" hx-confirm="Are you sure you want to delete this contact?" hx-target="body">Delete</a><1></td>
The existing row actions
Almost a straight copy of the “Delete Contact” button.
As you can see, we have added a new anchor tag and given it a blank
target (the # value in its href attribute) to
retain the correct mouse-over styling behavior of the link. We’ve also
copied the hx-delete, hx-confirm and
hx-target attributes from the “Delete Contact” button, but
omitted the hx-push-url attributes since we don’t want to
update the URL of the browser.
We now have inline delete working, even with a confirmation dialog. A
user can click on the “Delete” link and the row will disappear from the
UI as the entire page is re-rendered.
A Style Sidebar
One side effect of adding this delete link is that we are starting to
pile up the actions in a contact row:
That’s a lot of actions
It would be nice if we didn’t show the actions all in a row, and,
additionally, it would be nice if we only showed the actions when the
user indicated interest in a given row. We will return to this problem
after we look at the relationship between scripting and a
Hypermedia-Driven Application in a later chapter.
For now, let’s just tolerate this less-than-ideal user interface,
knowing that we will fix it later.
Narrowing Our Target
We can get even fancier here, however. What if, rather than
re-rendering the whole page, we just removed the row for the contact?
The user is looking at the row anyway, so is there really a need to
re-render the whole page?
To do this, we’ll need to do a couple of things:
We’ll need to update this link to target the row that it is
in.
We’ll need to change the swap to outerHTML, since we
want to replace (really, remove) the entire row.
We’ll need to update the server side to render empty content when
the DELETE is issued from a “Delete” link rather than from
the “Delete Contact” button on the contact edit page.
First things first, update the target of our “Delete” link to be the
row that the link is in, rather than the entire body. We can once again
take advantage of the relative positional closest feature
to target the closest tr, like we did in our “Click To
Load” and “Infinite Scroll” features:
<td><a href="/contacts/{{ contact.id }}/edit">Edit</a><a href="/contacts/{{ contact.id }}">View</a><a href="#" hx-delete="/contacts/{{ contact.id }}" hx-swap="outerHTML" hx-confirm="Are you sure you want to delete this contact?" hx-target="closest tr">Delete</a><1></td>
The existing row actions
Updated to target the closest enclosing tr (table
row) of the link.
Updating The Server Side
Now we need to update the server side. We want to keep the “Delete
Contact” button working as well, and in that case the current logic is
correct. So we’ll need some way to differentiate between
DELETE requests that are triggered by the button and
DELETE requests that come from this anchor.
The cleanest way to do this is to add an id attribute to
the “Delete Contact” button, so that we can inspect the
HX-Trigger HTTP Request header to determine if the delete
button was the cause of the request. This is a simple change to the
existing HTML:
<button id="delete-btn"<1> hx-delete="/contacts/{{ contact.id }}" hx-push-url="true" hx-confirm="Are you sure you want to delete this contact?" hx-target="body"> Delete Contact</button>
Adding an id to the “delete contact”
button
An id attribute has been added to the
button.
By giving this button an id attribute, we now have a mechanism for
differentiating between the delete button in the edit.html
template and the delete links in the rows.html template.
When this button issues a request, it will look something like this:
You can see that the request now includes the id of the
button. This allows us to write code very similar to what we did for the
active search pattern, using a conditional on the
HX-Trigger header to determine what we want to do. If that
header has the value delete-btn, then we know the request
came from the button on the edit page, and we can do what we are
currently doing: delete the contact and redirect to
/contacts page.
If it does not have that value, then we can simply delete
the contact and return an empty string. This empty string will replace
the target, in this case the row for the given contact, thereby removing
the row from the UI.
Updating our server code to handle two different delete)
patterns
If the delete button on the edit page submitted this request,
then continue to do the previous logic.
If not, simply return an empty string, which will delete the
row.
And that’s our server-side implementation: when a user clicks
“Delete” on a contact row and confirms the delete, the row will
disappear from the UI. Once again, we have a situation where just
changing a few lines of simple code gives us a dramatically different
behavior. Hypermedia is powerful in this manner.
The Htmx Swapping Model
This is pretty cool, but there is another improvement we can make if
we take some time to understand the htmx content swapping model: it
would be nice if, rather than just instantly deleting the row, we faded
it out before we removed it. The fade would make it clear that the row
is being removed, giving the user some nice visual feedback on the
deletion.
It turns out we can do this pretty easily with htmx, but to do so
we’ll need to dig in to exactly how htmx swaps content.
You might think that htmx simply puts the new content into the DOM,
but that’s not in fact how it works. Instead, content goes through a
series of steps as it is added to the DOM:
When content is received and about to be swapped into the DOM,
the htmx-swapping CSS class is added to the target
element.
A small delay then occurs (we will discuss why this delay exists
in a moment).
Next, the htmx-swapping class is removed from the
target and the htmx-settling class is added.
The new content is swapped into the DOM.
Another small delay occurs.
Finally, the htmx-settling class is removed from the
target.
There is more to the swap mechanic (settling, for example, is a more
advanced topic that we will discuss in a later chapter) but this is
enough for now.
Now, there are small delays in the process here, typically on the
order of a few milliseconds. Why so? It turns out that these small
delays allow CSS transitions to occur.
CSS Transitions
CSS transitions are a technology that allow you to animate a
transition from one style to another. So, for example, if you changed
the height of something from 10 pixels to 20 pixels, by using a CSS
transition you can make the element smoothly animate to the new height.
These sorts of animations are fun, often increase application usability,
and are a great mechanism to add polish to your web application.
Unfortunately, CSS transitions are difficult to access in plain HTML:
you usually have to use JavaScript and add or remove classes to get them
to trigger. This is why the htmx swap model is more complicated than you
might initially think. By swapping in classes and adding small delays,
you can access CSS transitions purely within HTML, without needing to
write any JavaScript!
Taking Advantage of
“htmx-swapping”
OK, so, let’s go back and look at our inline delete mechanic: we
click an htmx-enhanced link which deletes the contact and then swaps
some empty content in for the row. We know that before the
tr element is removed, it will have the
htmx-swapping class added to it. We can take advantage of
that to write a CSS transition that fades the opacity of the row to 0.
Here is what that CSS looks like:
We want this style to apply to tr elements with the
htmx-swapping class on them.
The opacity will be 0, making it invisible.
The opacity will transition to 0 over a 1 second
time period, using the ease-out function.
Again, this is not a CSS book and we are not going to go deeply into
the details of CSS transitions, but hopefully the above makes sense to
you, even if this is the first time you’ve seen CSS transitions.
So, think about what this means from the htmx swapping model: when
htmx gets content back to swap into the row it will put the
htmx-swapping class on the row and wait a bit. This will
allow the transition to a zero opacity to occur, fading the row out.
Then the new (empty) content will be swapped in, which will effectively
remove the row.
Sounds good, and we are nearly there. There is one more thing we need
to do: the default “swap delay” for htmx is very short, a few
milliseconds. That makes sense in most cases: you don’t want to have
much of a delay before you put the new content into the DOM. But, in
this case, we want to give the CSS animation time to complete before we
do the swap, we want to give it a second, in fact.
Fortunately htmx has an option for the hx-swap
annotation that allows you to set the swap delay: following the swap
type you can add swap: followed by a timing value to tell
htmx to wait a specific amount of time before it swaps. Let’s update our
HTML to allow a one second delay before the swap is done for the delete
action:
<td><a href="/contacts/{{ contact.id }}/edit">Edit</a><a href="/contacts/{{ contact.id }}">View</a><a href="#" hx-delete="/contacts/{{ contact.id }}" hx-swap="outerHTML swap:1s"<1> hx-confirm="Are you sure you want to delete this contact?" hx-target="closest tr">Delete</a></td>
The existing row actions
A swap delay changes how long htmx waits before it swaps in new
content.
With this modification, the existing row will stay in the DOM for an
additional second, with the htmx-swapping class on it. This
will give the row time to transition to an opacity of zero, giving the
fade out effect we want.
Now, when a user clicks on a “Delete” link and confirms the delete,
the row will slowly fade out and then, once it has faded to a 0 opacity,
it will be removed. Pretty fancy, and all done in a declarative,
hypermedia-oriented manner, no JavaScript required. (Well, obviously
htmx is written in JavaScript, but you know what we mean: we didn’t have
to write any JavaScript to implement the feature.)
Bulk Delete
The final feature we are going to implement in this chapter is a
“Bulk Delete.” The current mechanism for deleting users is nice, but it
would be annoying if a user wanted to delete five or ten contacts at a
time, wouldn’t it? For the bulk delete feature, we want to add the
ability to select rows via a checkbox input and delete them all in a
single go by clicking a “Delete Selected Contacts” button.
To get started with this feature, we’ll need to add a checkbox input
to each row in the rows.html template. This input will have
the name selected_contact_ids and its value will be the
id of the contact for the current row.
Here is what the updated code for rows.html looks
like:
{% for contact in contacts %}<tr><td><input type="checkbox" name="selected_contact_ids" value="{{ contact.id }}"></td><1><td>{{ contact.first }}</td> ... omitted</tr>{% endfor %}
Adding a checkbox to each row
A new cell with the checkbox input whose value is set to the
current contact’s id.
We’ll also need to add an empty column in the header for the table to
accommodate the checkbox column. With that done we now get a series of
check boxes, one for each row, a pattern no doubt familiar to you from
the web ([fig-checkboxes]).
Checkboxes for our contact rows
If you are not familiar with or have forgotten the way checkboxes
work in HTML: a checkbox will submit its value associated with the name
of the input if and only if it is checked. So if, for example, you
checked the contacts with the ids 3, 7 and 9, then those three values
would all be submitted to the server. Since all the checkboxes in this
case have the same name, selected_contact_ids, all three
values would be submitted with the name
selected_contact_ids.
The “Delete Selected
Contacts” Button
The next step is to add a button below the table that will delete all
the selected contacts. We want this button, like our delete links in
each row, to issue an HTTP DELETE, but rather than issuing
it to the URL for a given contact, like we do with the inline delete
links and with the delete button on the edit page, here we want to issue
the DELETE to the /contacts URL.
As with the other delete elements, we want to confirm that the user
wishes to delete the contacts, and, for this case, we are going to
target the body of page, since we are going to re-render the whole
table.
Here is what the button code looks like:
<button hx-delete="/contacts"<1> hx-confirm="Are you sure you want to delete these contacts?" <2> hx-target="body"> <3> Delete Selected Contacts</button>
The “delete selected contacts” button
Issue a DELETE to /contacts.
Confirm that the user wants to delete the selected
contacts.
Target the body.
Pretty easy. One question though: how are we going to include the
values of all the selected checkboxes in the request? As it stands right
now, this is just a stand-alone button, and it doesn’t have any
information indicating that it should include any other information in
the DELETE request it makes.
Fortunately, htmx has a few different ways to include values of
inputs with a request.
One way would be to use the hx-include attribute, which
allows you to use a CSS selector to specify the elements you want to
include in the request. That would work fine here, but we are going to
use another approach that is a bit simpler in this case.
By default, if an element is a child of a form element
and makes a non-GET request, htmx will include all the
values of inputs within that form. In situations like this, where there
is a bulk operation for a table, it is common to enclose the whole table
in a form tag, so that it is easy to add buttons that operate on the
selected items.
Let’s add that form tag around the table, and be sure to enclose the
button in it as well:
<form><1><table> ... omitted</table><button hx-delete="/contacts" hx-confirm="Are you sure you want to delete these contacts?" hx-target="body"> Delete Selected Contacts</button></form><2>
The “delete selected contacts” button
The form tag encloses the entire table.
The form tag also encloses the button.
Now, when the button issues a DELETE, it will include
all the contact ids that have been selected as the
selected_contact_ids request variable.
The Server Side
for Delete Selected Contacts
The server-side implementation is going to look like our original
server-side code for deleting a contact. In fact, once again, we can
just copy and paste, and make a few fixes:
We want to change the URL to /contacts.
We want the handler to get all the ids submitted as
selected_contact_ids and iterate over each one, deleting
the given contact.
Those are the only changes we need to make! Here is what the
server-side code looks like:
@app.route("/contacts/", methods=["DELETE"]) <1>def contacts_delete_all(): contact_ids = [int(id)# note: in htmx 1.0 we would use the request.form property insteadforidin request.args.getlist("selected_contact_ids") ] <2>for contact_id in contact_ids: <3> contact = Contact.find(contact_id) contact.delete() <4> flash("Deleted Contacts!") <5> contacts_set = Contact.all()return render_template("index.html", contacts=contacts_set)
The “delete selected contacts” button
We handle a DELETE request to the
/contacts/ path.
Convert the selected_contact_ids values submitted to
the server from a list of strings to a list integers.
Iterate over all of the ids.
Delete the given contact with each id.
Beyond that, it’s the same code as our original delete handler:
flash a message and render the index.html
template.
So, we took the original delete logic and slightly modified it to
deal with an array of ids, rather than a single id.
You might notice one other small change: we did away with the
redirect that was in the original delete code. We did so because we are
already on the page we want to re-render, so there is no reason to
redirect and have the URL update to something new. We can just re-render
the page, and the new list of contacts (sans the contacts that were
deleted) will be re-rendered.
And there we go, we now have a bulk delete feature for our
application. Once again, not a huge amount of code, and we are
implementing these features entirely by exchanging hypermedia with a
server in the traditional, RESTful manner of the web.
HTML Notes: Accessible by Default?
Accessibility problems can arise when we try to implement controls
that aren’t built into HTML.
Earlier, in Chapter 1, we looked at the example of a <div>
improvised to work like a button. Let’s look at a different example:
what if you make something that looks like a set of tabs, but you use
radio buttons and CSS hacks to build it? It’s a neat hack that makes the
rounds in web development communities from time to time.
The problem here is that tabs have requirements beyond clicking to
change content. Your improvised tabs may be missing features that will
lead to user confusion and frustration, as well as some undesirable
behaviors. From the ARIA Authoring
Practices Guide on tabs:
Keyboard interaction
Can the tabs be focused with the Tab key?
ARIA roles, states, and properties
“[The element that contains the tabs] has role
tablist.”
“Each [tab] has role tab […]”
“Each element that contains the content panel for a
tab has role tabpanel.”
“Each [tab] has the property aria-controls referring
to its associated tabpanel element.”
“The active tab element has the state
aria-selected set to true and all other
tab elements have it set to false.”
“Each element with role tabpanel has the property
aria-labelledby referring to its associated
tab element.”
You would need to write a lot of code to make your improvised tabs
fulfill all of these requirements. Some of the ARIA attributes can be
added directly in HTML, but they are repetitive and others (like
aria-selected) need to be set through JavaScript since they
are dynamic. The keyboard interactions can be error-prone too.
It’s not impossible, not even that hard, to make your own tab set
implementation. However, it’s difficult to trust that a new
implementation will work for all users in all environments, since most
of us have limited resources for testing.
Stick with established libraries for UI interactions. If a
use case requires a bespoke solution, test exhaustively for
keyboard interaction and accessibility. Test manually. Test
automatically. Test with screen readers, test with a keyboard, test on
different browsers and hardware, and run linters (while coding and/or in
CI). Testing is critical to ensure machine readability, or human
readability, or page weight.
Also consider: Does the information need to be presented as tabs?
Sometimes the answer is yes, but if not, a sequence of details and
disclosures fulfills a very similar purpose.
Compromising UX just to avoid JavaScript is bad development. But
sometimes it’s possible to achieve an equal (or better!) quality of UX
while allowing for a simpler and more robust implementation by changing
the design.
Contact.app has come a long way from a traditional web 1.0-style web
application: we’ve added active search, bulk delete, some nice
animations, and a slew of other features. We have reached a level of
interactivity that most web developers would assume requires some sort
of Single-Page Application JavaScript framework, but we’ve done it using
htmx-powered hypermedia instead.
Let’s look at how we can add a final significant feature to
Contact.app: downloading an archive of all the contacts.
From a hypermedia perspective, downloading a file isn’t exactly
rocket science: using the HTTP Content-Disposition response
header, we can easily tell the browser to download and save a file to
the local computer.
However, let’s make this problem more interesting: let’s add in the
fact that the export can take a bit of time, from five to ten seconds,
or sometimes even longer, to complete.
This means that if we implemented the download as a “normal” HTTP
request, driven by a link or a button, the user might sit with very
little visual feedback, wondering if the download is actually happening,
while the export is being completed. They might even give up in
frustration and click the download hypermedia control again, causing a
second archive request. Not good.
This turns out to be a classic problem in web app development. When
faced with potentially long-running process like this, we ultimately
have two options:
When the user triggers the action, block until it is complete and
then respond with the result.
Begin the action and return immediately, showing some sort of UI
indicating that things are in progress.
Blocking and waiting for the action to complete is certainly the
simpler way to handle it, but it can be a bad user experience,
especially if the action takes a while to complete. If you’ve ever
clicked on something in a web 1.0-style application and then had to sit
there for what seems like an eternity before anything happens, you’ve
seen the practical results of this choice.
The second option, starting the action asynchronously (say, by
creating a thread, or submitting it to a job runner system) is much
nicer from a user experience perspective: the server can respond
immediately and the user doesn’t need to sit there wondering what’s
going on.
But the question is, what do you respond with? The job
probably isn’t complete yet, so you can’t provide a link to the
results.
We have seen a few different “simple” approaches in this scenario in
various web applications:
Let the user know that the process has started and that they will
be emailed a link to the completed process results when it is
finished.
Let the user know that the process has started and recommend that
they should manually refresh the page to see the status of the
process.
Let the user know that the process has started and automatically
refresh the page every few seconds using some JavaScript.
All of these will work, but none of them is a great user
experience.
What we’d really like in this scenario is something more
like what you see when, for example, you download a large file via the
browser: a nice progress bar indicating where in the process you are,
and, when the process is complete, a link to click immediately to view
the result of the process.
This may sound like something impossible to implement with
hypermedia, and, to be honest, we’ll need to push htmx pretty hard to
make this all work, but, when it is done, it won’t be that much
code, and we will be able to achieve the user experience we want for
this archiving feature.
UI Requirements
Before we dive into the implementation, let’s discuss in broad terms
what our new UI should look like: we want a button in the application
labeled “Download Contact Archive.” When a user clicks on that button,
we want to replace that button with a UI that shows the progress of the
archiving process, ideally with a progress bar. As the archive job makes
progress, we want to move the progress bar along towards completion.
Then, when the archive job is done, we want to show a link to the user
to download the contact archive file.
In order to actually do the archiving, we are going to use a python
class, Archiver, that implements all the functionality that
we need. As with the Contact class, we aren’t going to go
into the implementation details of Archiver, because that’s
beyond the scope of this book. For now you just need to know is that it
provides all the server-side behavior necessary to start a contact
archive process and get the results when that process is done.
Archiver gives us the following methods to work
with:
status() - A string representing the status of the
download, either Waiting, Running or
Complete
progress() - A number between 0 and 1, indicating
how much progress the archive job has made
run() - Starts a new archive job (if the current
status is Waiting)
reset() - Cancels the current archive job, if any,
and resets to the “Waiting” state
archive_file() - The path to the archive file that
has been created on the server, so we can send it to the client
get() - A class method that lets us get the Archiver
for the current user
A fairly uncomplicated API.
The only somewhat tricky aspect to the whole API is that the
run() method is non-blocking. This means that it
does not immediately create the archive file, but rather it
starts a background job (as a thread) to do the actual archiving. This
can be confusing if you aren’t used to multithreading in code: you might
be expecting the run() method to “block”, that is, to
actually execute the entire export and only return when it is finished.
But, if it did that, we wouldn’t be able to start the archive process
and immediately render our desired archive progress UI.
Beginning Our Implementation
We now have everything we need to begin implementing our UI: a
reasonable outline of what it is going to look like, and the domain
logic to support it.
So, to start, note that this UI is largely self-contained: we want to
replace the button with the download progress bar, and then the progress
bar with a link to download the results of the completed archive
process.
The fact that our archive user interface is all going to be within a
specific part of the UI is a strong hint that we will want to create a
new template to handle it. Let’s call this template
archive_ui.html.
Also note that we are going to want to replace the entire download UI
in multiple cases:
When we start the download, we will want to replace the button
with a progress bar.
As the archive process proceeds, we will want to replace/update
the progress bar.
When the archive process completes, we will want to replace the
progress bar with a download link.
To update the UI in this way, we need to set a good target for the
updates. So, let’s wrap the entire UI in a div tag, and
then use that div as the target for all our operations.
Here is the start of the template for our new archive user
interface:
This div will be the target for all elements within it.
Replace the entire div every time using
outerHTML.
Next, lets add the “Download Contact Archive” button to the
div that will kick off the archive-then-download process.
We’ll use a POST to the path /contacts/archive
to trigger the start of the archiving process:
This template will now be included in the main template.
With that done, we now have a button showing up in our web
application to get the download going. Since the enclosing
div has an hx-target="this" on it, the button
will inherit that target and replace that enclosing div
with whatever HTML comes back from the POST to
/contacts/archive.
Adding the Archiving
Endpoint
Our next step is to handle the POST that our button is
making. We want to get the Archiver for the current user
and invoke the run() method on it. This will start the
archive process running. Then we will render some new content indicating
that the process is running.
To do that, we want to reuse the archive_ui template to
handle rendering the archive UI for both states, when the archiver is
“Waiting” and when it is “Running.” (We will handle the “Complete” state
in a bit).
This is a very common pattern: we put all the different potential UIs
for a given chunk of the user interface into a single template, and
conditionally render the appropriate interface. By keeping everything in
one file, it makes it much easier for other developers (or for us, if we
come back after a while!) to understand exactly how the UI works on the
client side.
Since we are going to conditionally render different user interfaces
based on the state of the archiver, we will need to pass the archiver
out to the template as a parameter. So, again: we need to invoke
run() on the archiver in our controller and then pass the
archiver along to the template, so it can render the UI appropriate for
the current status of the archive process.
Render the archive_ui.html template, passing in the
archiver.
Conditionally Rendering
A Progress UI
Now let’s turn our attention to updating our archiving UI by setting
archive_ui.html to conditionally render different content
depending on the state of the archive process.
Recall that the archiver has a status() method. When we
pass the archiver through as a variable to the template, we can consult
this status() method to see the status of the archive
process.
If the archiver has the status Waiting, we want to
render the “Download Contact Archive” button. If the status is
Running, we want to render a message indicating that
progress is happening. Let’s update our template code to do just
that:
Only render the archive button if the status is
“Waiting.”
Render different content when status is “Running.”
For now, just some text saying the process is running.
OK, great, we have some conditional logic in our template view, and
the server-side logic to support kicking off the archive process. We
don’t have a progress bar yet, but we’ll get there! Let’s see how this
works as it stands, and refresh the main page of our application…
UndefinedError
jinja2.exceptions.UndefinedError: 'archiver' is undefined
Something Went Wrong
Ouch!
We get an error message right out of the box. Why? Ah, we are
including the archive_ui.html in the
index.html template, but now the
archive_ui.html template expects the archiver to be passed
through to it, so it can conditionally render the correct UI.
That’s an easy fix: we just need to pass the archiver through when we
render the index.html template as well:
Now with that done, we can load up the page. And, sure enough, we can
see the “Download Contact Archive” button.
When we click on it, the button is replaced with the content
“Running…”, and we can see in our development console on the server-side
that the job is indeed getting kicked off properly.
Polling
That’s definitely progress, but we don’t exactly have the best
progress indicator here: just some static text telling the user that the
process is running.
We want to make the content update as the process makes progress and,
ideally, show a progress bar indicating how far along it is. How can we
do that in htmx using plain old hypermedia?
The technique we want to use here is called “polling”, where we issue
a request on an interval and update the UI based on the new state of the
server.
Polling? Really?
Polling has a bit of a bad rap, and it isn’t the sexiest technique in
the world: today developers might look at a more advanced technique like
WebSockets or Server Sent Events (SSE) to address this situation.
But, say what one will, polling works and it is drop-dead
simple. You need to be careful not to overwhelm your system with polling
requests, but, with a bit of care, you can create a reliable, passively
updated component in your UI using it.
Htmx offers two types of polling. The first is “fixed rate polling”,
which uses a special hx-trigger syntax to indicate that
something should be polled on a fixed interval.
This works great in situations when you want to poll indefinitely,
for example if you want to constantly poll for new messages to display
to the user. However, fixed rate polling isn’t ideal when you have a
definite process after which you want to stop polling: it keeps polling
forever, until the element it is on is removed from the DOM.
In our case, we have a definite process with an ending to it. So, it
will be better to use the second polling technique, known as “load
polling.” In load polling, we take advantage of the fact that htmx
triggers a load event when content is loaded into the DOM.
We can create a trigger on this load event, and add a bit
of a delay so that the request doesn’t trigger immediately.
With this, we can conditionally render the hx-trigger on
every request: when a process has completed we simply do not include the
load trigger, and the load polling stops. This offers a
nice and simple way to poll until a definite process finishes.
Using Polling To Update
The Archive UI
Let’s use load polling to update our UI as the archiver makes
progress. To show the progress, let’s use a CSS-based progress bar,
taking advantage of the progress() method which returns a
number between 0 and 1 indicating how close the archive process is to
completion.
The width of the inner element corresponds to the
progress.
This CSS-based progress bar has two components: an outer
div that provides the wire frame for the progress bar, and
an inner div that is the actual progress bar indicator. We
set the width of the inner progress bar to some percentage (note we need
to multiply the progress() result by 100 to get a
percentage) and that will make the progress indicator the appropriate
width within the parent div.
What About The
Element?
We are perhaps dipping our toes into the “div soup” here, using a
div tag when there is a perfectly good HTML5 tag, the progress
element, that is designed specifically for showing, well, progress.
We decided not to use the progress element for this
example because we want our progress bar to update smoothly, and we will
need to use a CSS technique not available for the progress
element to make that happen. That’s unfortunate, but sometimes we have
to play with the cards we are dealt.
We will, however, use the proper progress
bar roles to make our div-based progress bar play well
with assistive technologies.
Let’s update our progress bar to have the proper ARIA roles and
values:
Our CSS-Based Progress Bar, as implemented in [lst]:progress-bar-css
Adding The Progress Bar UI
Let’s add the code for our progress bar into our
archive_ui.html template for the case when the archiver is
running, and let’s update the copy to say “Creating Archive…”:
Now when we click the “Download Contact Archive” button, we get the
progress bar. But it still doesn’t update because we haven’t implemented
load polling yet: it just sits there, at zero.
To get the progress bar updating dynamically, we’ll need to implement
load polling using hx-trigger. We can add this to pretty
much any element inside the conditional block for when the archiver is
running, so let’s add it to that div that is wrapping
around the “Creating Archive…” text and the progress bar.
Let’s make it poll by issuing an HTTP GET to the same
path as the POST: /contacts/archive.
Issue a GET to /contacts/archive 500
milliseconds after the content loads.
When this GET is issued to
/contacts/archive, it is going to replace the
div with the id archive-ui, not just itself.
The hx-target attribute on the div with the id
archive-ui is inherited by all child elements
within that div, so the children will all target that
outermost div in the archive_ui.html file.
Now we need to handle the GET to
/contacts/archive on the server. Thankfully, this is quite
easy: all we want to do is re-render archive_ui.html with
the archiver:
Like so much else with hypermedia, the code is very readable and not
complicated.
Now, when we click the “Download Contact Archive”, sure enough, we
get a progress bar that updates every 500 milliseconds. As the result of
the call to archiver.progress() incrementally updates from
0 to 1, the progress bar moves across the screen for us. Very cool!
Downloading The Result
We have one final state to handle, the case when
archiver.status() is set to “Complete”, and there is a JSON
archive of the data ready to download. When the archiver is complete, we
can get the local JSON file on the server from the archiver via the
archive_file() call.
Let’s add another case to our if statement to handle the “Complete”
state, and, when the archive job is complete, lets render a link to a
new path, /contacts/archive/file, which will respond with
the archived JSON file. Here is the new code:
Rendering A Download Link When Archiving
Completes
If the status is “Complete”, render a download link.
The link will issue a GET to
/contacts/archive/file.
Note that the link has hx-boost set to
false. It has this so that the link will not inherit the
boost behavior that is present for other links and, thus, will not be
issued via AJAX. We want this “normal” link behavior because an AJAX
request cannot download a file directly, whereas a plain anchor tag
can.
Downloading The Completed
Archive
The final step is to handle the GET request to
/contacts/archive/file. We want to send the file that the
archiver created down to the client. We are in luck: Flask has a
mechanism for sending a file as a downloaded response, the
send_file() method.
As you see in the code that follows, we pass three arguments to
send_file(): the path to the archive file that the archiver
created, the name of the file that we want the browser to create, and if
we want it sent “as an attachment.” This last argument tells Flask to
set the HTTP response header Content-Disposition to
attachment with the given filename; this is what triggers
the browser’s file-downloading behavior.
Send the file to the client via Flask’s send_file()
method.
Perfect. Now we have an archive UI that is very slick. You click the
“Download Contacts Archive” button and a progress bar appears. When the
progress bar reaches 100%, it disappears and a link to download the
archive file appears. The user can then click on that link and download
their archive.
We’re offering a user experience that is much more user-friendly than
the common click-and-wait experience of many websites.
Smoothing Things Out:
Animations in Htmx
As nice as this UI is, there is one minor annoyance: as the progress
bar updates it “jumps” from one position to the next. This feels a bit
like a full page refresh in web 1.0 style applications. Is there a way
we can fix this? (Obviously there is, this why we went with a
div rather than a progress element!)
Let’s walk through the cause of this visual problem and how we might
fix it. (If you’re in a hurry to get to an answer, feel free to jump
ahead to “our solution.”)
It turns out that there is a native HTML technology for smoothing out
changes on an element from one state to another: the CSS Transitions
API, the same one that we discussed in Chapter 4. Using CSS Transitions,
you can smoothly animate an element between different styling by using
the transition property.
If you look back at our CSS definition of the
.progress-bar class, you will see the following transition
definition: transition: width .6s ease;. This means that
when the width of the progress bar is changed from, say 20% to 30%, the
browser will animate over a period of .6 seconds using the “ease”
function (which has a nice accelerate/decelerate effect).
So why isn’t that transition being applied in our current UI? The
reason is that, in our example, htmx is replacing the progress
bar with a new one every time it polls. It isn’t updating the width of
an existing element. CSS transitions, unfortunately, only apply
when the properties of an existing element change inline, not when the
element is replaced.
This is a reason why pure HTML-based applications can feel jerky and
unpolished when compared with their SPA counterparts: it is hard to use
CSS transitions without some JavaScript.
But there is some good news: htmx has a way to utilize CSS
transitions even when it replaces content in the DOM.
The “Settling” Step in Htmx
When we discussed the htmx swap model in Chapter 4, we focused on the
classes that htmx adds and removes, but we skipped over the process of
“settling.” In htmx, settling involves several steps: when htmx is about
to replace a chunk of content, it looks through the new content and
finds all elements with an id on it. It then looks in the
existing content for elements with the same
id.
If there is one, it does the following somewhat elaborate
shuffle:
The new content gets the attributes of the old
content temporarily.
The new content is inserted.
After a small delay, the new content has its attributes reverted
to their actual values.
So, what is this strange little dance supposed to achieve?
Well, if an element has a stable id between swaps, you can now write
CSS transitions between various states. Since the new content
briefly has the old attributes, the normal CSS transition
mechanism will kick in when the actual values are restored.
Our Smoothing Solution
So, we arrive at our fix.
All we need to do is add a stable ID to our progress-bar
element.
The progress bar div now has a stable id across
requests.
Despite the complicated mechanics going on behind the scenes in htmx,
the solution is as simple as adding a stable id attribute
to the element we want to animate.
Now, rather than jumping on every update, the progress bar should
smoothly move across the screen as it is updating, using the CSS
transition defined in our style sheet. The htmx swapping model allows us
to achieve this even though we are replacing the content with new
HTML.
And voila: we have a nice, smoothly animated progress bar for our
contact archiving feature. The result has the look and feel of a
JavaScript-based solution, but we did it with the simplicity of an
HTML-based approach.
Now that, dear reader, does spark joy.
Dismissing The Download UI
Some users may change their mind, and decide not to download the
archive. They may never witness our glorious progress bar, but that’s
OK. We’re going to give these users a button to dismiss the download
link and return to the original export UI state.
To do this, we’ll add a button that issues a DELETE to
the path /contacts/archive, indicating that the current
archive can be removed or cleaned up.
We’ll add it after the download link, like so:
<a hx-boost="false" href="/contacts/archive/file"> Archive Ready! Click here to download. ↓</a><button hx-delete="/contacts/archive">Clear Download</button><1>
Clearing the download
A simple button that issues a DELETE to
/contacts/archive.
Now the user has a button that they can click on to dismiss the
archive download link. But we will need to hook it up on the server
side. As usual, this is pretty straightforward: we create a new handler
for the DELETE HTTP Action, invoke the reset()
method on the archiver, and re-render the archive_ui.html
template.
Since this button is picking up the same hx-target and
hx-swap configuration as everything else, it “just
works.”
This looks pretty similar to our other handlers, doesn’t it?
Sure does! That’s the idea!
An Alternative UX:
Auto-Download
While we prefer the current user experience for archiving contacts,
there are other alternatives. Currently, a progress bar shows the
progress of the process and, when it completes, the user is presented
with a link to actually download the file. Another pattern that we see
on the web is “auto-downloading”, where the file downloads immediately
without the user needing to click a link.
We can add this functionality quite easily to our application with
just a bit of scripting. We will discuss scripting in a
Hypermedia-Driven Application in more depth in Chapter 9, but, put
briefly: scripting is perfectly acceptable in a HDA, as long as it
doesn’t replace the core hypermedia mechanics of the application.
For our auto-download feature we will use _hyperscript, our preferred scripting
option. JavaScript would also work here, and would be nearly as simple;
again, we’ll discuss scripting options in detail in Chapter 9.
All we need to do to implement the auto-download feature is the
following: when the download link renders, automatically click on the
link for the user.
The _hyperscript code reads almost the same as the previous sentence
(which is a major reason why we love hyperscript):
<a hx-boost="false" href="/contacts/archive/file" _="on load click() me"><1> Archive Downloading! Click here if the download does not start.</a>
Auto-downloading
A bit of _hyperscript to make the file auto-download.
Crucially, the scripting here is simply enhancing the
existing hypermedia, rather than replacing it with a non-hypermedia
request. This is hypermedia-friendly scripting, as we will cover in more
depth in a bit.
A Dynamic Archive UI:
Complete
In this chapter we’ve managed to create a dynamic UI for our contact
archive functionality, with a progress bar and auto-downloading, and
we’ve done nearly all of it — with the exception of a small bit of
scripting for auto-download — in pure hypermedia. It took about 16 lines
of front end code and 16 lines of backend code to build the whole
thing.
HTML, with a bit of help from a hypermedia-oriented JavaScript
library such as htmx, can in fact be extremely powerful and
expressive.
HTML Notes: Markdown soup
Markdown soup is the lesser known sibling of
<div> soup. This is the result of web developers
limiting themselves to the set of elements that the Markdown language
provides shorthand for, even when these elements are incorrect. More
seriously, it’s important to be aware of the full power of our tools,
including HTML. Consider the following example of an IEEE-style
citation:
[1] C.H. Gross, A. Stepinski, and D. Akşimşek, <1>
  _Hypermedia Systems_, <2>
  Bozeman, MT, USA: Big Sky Software.
  Available: <https://hypermedia.systems/>
The reference number is written in brackets.
Underscores around the book title creates an <em>
element.
Here, <em> is used because it’s the only Markdown element that
is presented in italics by default. This indicates that the book title
is being stressed, but the purpose is to mark it as the title of a work.
HTML has the <cite> element that’s intended for this
exact purpose.
Furthermore, even though this is a numbered list perfect for the
<ol> element, which Markdown supports, plain text is
used for the reference numbers instead. Why could this be? The IEEE
citation style requires that these numbers are presented in square
brackets. This could be achieved on an <ol> with CSS,
but Markdown doesn’t have a way to add a class to elements meaning the
square brackets would apply to all ordered lists.
Don’t shy away from using embedded HTML in Markdown. For larger
sites, also consider Markdown extensions.
{.ieee-reference-list} <1>1. C.H. Gross, A. Stepinski, and D. Akşimşek, <2><cite>Hypermedia Systems</cite>, <3> Bozeman, MT, USA: Big Sky Software. Available: <https://hypermedia.systems/>
Many Markdown dialects let us add ids, classes and attributes
using curly braces.
We can now use the <ol> element, and create the brackets in
CSS.
We use <cite> to mark the title of the work
being cited (not the whole citation!)
You can also use custom processors to produce extra-detailed HTML
instead of writing it by hand:
{% reference_list %} <1>[hypers2023]: <2> C.H. Gross, A. Stepinski, and D. Akşimşek, _Hypermedia Systems_, Bozeman, MT, USA: Big Sky Software, 2023. Available: <https://hypermedia.systems/>{% end %}
reference_list is a macro that will transform the
plain text to highly-detailed HTML.
A processor can also resolve identifiers, so we don’t have to
manually keep the reference list in order and the in-text citations in
sync.
In this chapter we are going to look deeper into the htmx toolkit.
We’ve accomplished quite a bit with what we’ve learned so far. Still,
when you are developing Hypermedia-Driven Applications, there will be
times when you need to reach for additional options and techniques.
We will go over the more advanced attributes in htmx, as well as
expand on the advanced details of attributes we have already used.
Additionally, we will look at functionality that htmx offers beyond
simple HTML attributes: how htmx extends standard HTTP request and
responses, how htmx works with (and produces) events, and how to
approach situations where there isn’t a simple, single target on the
page to be updated.
Finally, we will take a look at practical considerations when doing
htmx development: how to debug htmx-based applications effectively,
security considerations you will need to take into account when working
with htmx, and how to configure the behavior of htmx.
With the features and techniques in this chapter, you will be able to
pull off extremely sophisticated user interfaces using only htmx and
perhaps a small bit of hypermedia-friendly client-side scripting.
Htmx Attributes
Thus far we have used about fifteen different attributes from htmx in
our application. The most important ones have been:
hx-get, hx-post, etc.
To specify the AJAX request an element should make
hx-trigger
To specify the event that triggers a request
hx-swap
To specify how to swap the returned HTML content into the DOM
hx-target
To specify where in the DOM to swap the returned HTML content
Two of these attributes, hx-swap and
hx-trigger, support a number of useful options for creating
more advanced Hypermedia-Driven Applications.
hx-swap
We’ll start with the hx-swap attribute. This is often
not included on elements that issue htmx-driven requests because its
default behavior — innerHTML, which swaps the inner HTML of
the element — tends to cover most use cases.
We earlier saw situations where we wanted to override the default
behavior and use outerHTML, for example. And, in Chapter 2,
we discussed some other swap options beyond these two,
beforebegin, afterend, etc.
In Chapter 5, we also looked at the swap delay modifier
for hx-swap, which allowed us to fade some content out
before it was removed from the DOM.
In addition to these, hx-swap offers further control
with the following modifiers:
settle
Like swap, this allows you to apply a specific delay
between when the content has been swapped into the DOM and when its
attributes are “settled”, that is, updated from their old values (if
any) to their new values. This can give you fine-grained control over
CSS transitions.
show
Allows you to specify an element that should be shown — that is,
scrolled into the viewport of the browser if necessary — when a request
is completed.
scroll
Allows you to specify a scrollable element (that is, an element with
scrollbars), that should be scrolled to the top or bottom when a request
is completed.
focus-scroll
Allows you to specify that htmx should scroll to the focused element
when a request completes. The default for this modifier is “false.”
So, for example, if we had a button that issued a GET
request, and we wished to scroll to the top of the body
element when the request completed, we would write the following
HTML:
<button hx-get="/contacts" hx-target="#content-div" hx-swap="innerHTML show:body:top"><1> Get Contacts</button>
Scrolling to the top of the page
This tells htmx to show the top of the body after the swap
occurs.
More details and examples can be found online in the
hx-swapdocumentation.
hx-trigger
Like hx-swap, hx-trigger can often be
omitted when you are using htmx, because the default behavior is
typically what you want. Recall the default triggering events are
determined by an element’s type:
Requests on input, textarea &
select elements are triggered by the change
event.
Requests on form elements are triggered on the
submit event.
Requests on all other elements are triggered by the
click event.
There are times, however, when you want a more elaborate trigger
specification. A classic example is the active search example we
implemented in Contact.app:
This example took advantage of two modifiers available for the
hx-trigger attribute:
delay
Allows you to specify a delay to wait before a request is issued. If
the event occurs again, the first event is discarded and the timer
resets. This allows you to “debounce” requests.
changed
Allows you to specify that a request should only be issued when the
value property of the given element has changed.
hx-trigger has several additional modifiers. This makes
sense, because events are fairly complex and we want to be able to take
advantage of all the power they offer. We will discuss events in more
detail below.
Here are the other modifiers available on
hx-trigger:
once
The given event will only trigger a request once.
throttle
Allows you to throttle events, only issuing them once every certain
interval. This is different than delay in that the first
event will trigger immediately, but any following events will not
trigger until the throttle time period has elapsed.
from
A CSS selector that allows you to pick another element to listen for
events on. We will see an example of this used later in the chapter.
target
A CSS selector that allows you to filter events to only those that
occur directly on a given element. In the DOM, events “bubble” to their
ancestor elements, so a click event on a button will also
trigger a click event on an enclosing div, all
the way up to the body element. Sometimes you want to
specify an event directly on a given element, and this attribute allows
you to do that.
consume
If this option is set to true, the triggering event will
be cancelled and not propagate to ancestor elements.
queue
This option allows you to specify how events are queued in htmx. By
default, when htmx receives a triggering event, it will issue a request
and start an event queue. If the request is still in flight when another
event is received, it will queue the event and, when the request
finishes, trigger a new request. By default, it only keeps the last
event it receives, but you can modify that behavior using this option:
for example, you can set it to none and ignore all
triggering events that occur during a request.
Trigger filters
The hx-trigger attribute also allows you to specify a
filter for events by using square brackets enclosing a
JavaScript expression after the event name.
Let’s say you have a complex situation where contacts should only be
retrievable in certain situations. You have a JavaScript function,
contactRetrievalEnabled() that returns a boolean,
true if contacts can be retrieved and false
otherwise. How could you use this function to place a gate on a button
that issues a request to /contacts?
To do this using an event filter in htmx, you would write the
following HTML:
<script>functioncontactRetrievalEnabled() {// code to test if contact retrieval is enabled... }</script><button hx-get="/contacts" hx-trigger="click[contactRetrievalEnabled()]"><1> Get Contacts</button>
The active search input
A request is issued on click only when
contactRetrievalEnabled() returns
true.
The button will not issue a request if
contactRetrievalEnabled() returns false, allowing you to
dynamically control when the request will be made. There are common
situations that call for an event trigger, when you only want to issue a
request under specific circumstances:
if a certain element has focus
if a given form is valid
if a set of inputs have specific values
Using event filters, you can use whatever logic you’d like to filter
requests by htmx.
Synthetic events
In addition to these modifiers, hx-trigger offers a few
“synthetic” events, that is events that are not part of the regular DOM
API. We have already seen load and revealed in
our lazy loading and infinite scroll examples, but htmx also gives you
an intersect event that triggers when an element intersects
its viewport.
This synthetic event uses the modern Intersection Observer API, which
you can read more about at MDN.
Intersection gives you fine-grained control over exactly when a
request should be triggered. For example, you can set a threshold and
specify that the request be issued only when an element is 50%
visible.
The hx-trigger attribute certainly is the most complex
in htmx. More details and examples can be found in its documentation.
Other Attributes
Htmx offers many other less commonly used attributes for fine-tuning
the behavior of your Hypermedia-Driven Application.
Here are some of the most useful ones:
hx-push-url
“Pushes” the request URL (or some other value) into the navigation
bar.
hx-preserve
Preserves a bit of the DOM between requests; the original content
will be kept, regardless of what is returned.
hx-sync
Synchronized requests between two or more elements.
hx-disable
Disables htmx behavior on this element and any children. We will come
back to this when we discuss the topic of security.
Let’s take a look at hx-sync, which allows us to
synchronize AJAX requests between two or more elements. Consider a
simple case where we have two buttons that both target the same element
on the screen:
<button hx-get="/contacts" hx-target="body"> Get Contacts</button><button hx-get="/settings" hx-target="body"> Get Settings</button>
Two competing buttons
This is fine and will work, but what if a user clicks the “Get
Contacts” button and then the request takes a while to respond? And, in
the meantime the user clicks the “Get Settings” button? In this case we
would have two requests in flight at the same time.
If the /settings request finished first and displayed
the user’s setting information, they might be very surprised if they
began making changes and then, suddenly, the /contacts
request finished and replaced the entire body with the contacts
instead!
To deal with this situation, we might consider using an
hx-indicator to alert the user that something is going on,
making it less likely that they click the second button. But if we
really want to guarantee that there is only one request at a time issued
between these two buttons, the right thing to do is to use the
hx-sync attribute. Let’s enclose both buttons in a
div and eliminate the redundant hx-target
specification by hoisting the attribute up to that div. We
can then use hx-sync on that div to coordinate requests
between the two buttons.
Here is our updated code:
<div hx-target="body"<1> hx-sync="this"> <2><button hx-get="/contacts"> Get Contacts</button><button hx-get="/settings"> Get Settings</button></div>
Syncing two buttons
Hoist the duplicate hx-target attributes to the
parent div.
Synchronize on the parent div.
By placing the hx-sync attribute on the div
with the value this, we are saying “Synchronize all htmx
requests that occur within this div element with one
another.” This means that if one button already has a request in flight,
other buttons within the div will not issue requests until
that has finished.
The hx-sync attribute supports a few different
strategies that allow you to, for example, replace an existing request
in flight, or queue requests with a particular queuing strategy. You can
find complete documentation, as well as examples, at the htmx.org page
for hx-sync.
As you can see, htmx offers a lot of attribute-driven functionality
for more advanced Hypermedia-Driven Applications. A complete reference
for all htmx attributes can be found on the htmx
website.
Events
Thus far we have worked with JavaScript events in htmx primarily via
the hx-trigger attribute. This attribute has proven to be a
powerful mechanism for driving our application using a declarative,
HTML-friendly syntax.
However, there is much more we can do with events. Events play a
crucial role both in the extension of HTML as a hypermedia, and, as
we’ll see, in hypermedia-friendly scripting. Events are the “glue” that
brings the DOM, HTML, htmx and scripting together. You might think of
the DOM as a sophisticated “event bus” for applications.
We can’t emphasize enough: to build advanced Hypermedia-Driven
Applications, it is worth the effort to learn about events in
depth.
Htmx-Generated Events
In addition to making it easy to respond to events, htmx
also emits many useful events. You can use these events to add
more functionality to your application, either via htmx itself, or by
way of scripting.
Here are some of the most commonly used events triggered by htmx:
htmx:load
Triggered when new content is loaded into the DOM by htmx.
htmx:configRequest
Triggered before a request is issued, allowing you to
programmatically configure the request or cancel it entirely.
htmx:afterRequest
Triggered after a request has responded.
htmx:abort
A custom event that can be sent to an htmx-powered element to abort
an open request.
Using the htmx:configRequest Event
Let’s look at an example of how to work with htmx-emitted events.
We’ll use the htmx:configRequest event to configure an HTTP
request.
Consider the following scenario: your server-side team has decided
that they want you to include a server-generated token for extra
security on every request. The token is going to be stored in
localStorage in the browser, in the slot
special-token.
The token is being set via some JavaScript (don’t worry about the
details yet) when the user first logs in:
let response =awaitfetch("/token");<1>localStorage['special-token'] =await response.text();
Getting The Token in JavaScript
Get the value of the token then set it into localStorage
The server-side team wants you to include this special token on every
request made by htmx, as the X-SPECIAL-TOKEN header. How
could you achieve this? One way would be to catch the
htmx:configRequest event and update the
detail.headers object with this token from
localStorage.
In VanillaJS, it would look something like this, placed in a
<script> tag in the <head> of our
HTML document:
Retrieve the value from local storage and set it into a
header.
As you can see, we add a new value to the headers
property of the event’s detail property. After the event handler
executes, this headers property is read by htmx and used to
construct the request headers for the AJAX request it makes.
The detail property of the
htmx:configRequest event contains a slew of useful
properties that you can update to change the “shape” of the request,
including:
detail.parameters
Allows you to add or remove request parameters
detail.target
Allows you to update the target of the request
detail.verb
Allows you to update HTTP “verb” of the request (e.g.
GET)
So, for example, if the server-side team decided they wanted the
token included as a parameter, rather than as a request header, you
could update your code to look like this:
Retrieve the value from local storage and set it into a
parameter.
As you can see, this gives you a lot of flexibility in updating the
AJAX request that htmx makes.
The full documentation for the htmx:configRequest event
(and other events you might be interested in) can be found on the htmx
website.
Canceling a Request Using htmx:abort
We can listen for any of the many useful events from htmx, and we can
respond to those events using hx-trigger. What else can we
do with events?
It turns out that htmx itself listens for one special event,
htmx:abort. When htmx receives this event on an element
that has a request in flight, it will abort the request.
Consider a situation where we have a potentially long-running request
to /contacts, and we want to offer a way for the users to
cancel the request. What we want is a button that issues the request,
driven by htmx, of course, and then another button that will send an
htmx:abort event to the first one.
JavaScript to look up the button and send it an
htmx:abort event
So now, if a user clicks on the “Get Contacts” button and the request
takes a while, they can click on the “Cancel” button and end the
request. Of course, in a more sophisticated user interface, you may want
to disable the “Cancel” button unless an HTTP request is in flight, but
that would be a pain to implement in pure JavaScript.
Thankfully this isn’t too bad to implement in hyperscript, so let’s
take a look at what that would look like:
<button id="contacts-btn" hx-get="/contacts" hx-target="body"> Get Contacts</button><button _="on click send htmx:abort to #contacts-btn on htmx:beforeRequest from #contacts-btn remove @disabled from me on htmx:afterRequest from #contacts-btn add @disabled to me"> Cancel</button>
A hyperscript-Powered Button With An
Abort
Now we have a “Cancel” button that is enabled only when a request
from the contacts-btn button is in flight. And we are
taking advantage of htmx-generated and handled events, as well as the
event-friendly syntax of hyperscript, to make it happen. Slick!
Server Generated Events
We are going to talk more about the various ways that htmx enhances
regular HTTP requests and responses in the next section, but, since it
involves events, we are going to discuss one HTTP Response header that
htmx supports: HX-Trigger. We have discussed before how
HTTP requests and responses support headers, name-value pairs
that contain metadata about a given request or response. We took
advantage of the HX-Trigger request header, which includes
the id of the element that triggered a given request.
In addition to this request header, htmx also supports a
response header also named HX-Trigger. This
response header allows you to trigger an event on the element
that submitted an AJAX request. This turns out to be a powerful way to
coordinate elements in the DOM in a decoupled manner.
To see how this might work, let’s consider the following situation:
we have a button that grabs new contacts from some remote system on the
server. We will ignore the details of the server-side implementation,
but we know that if we issue a POST to the
/sync path, it will trigger a synchronization with the
system.
Now, this synchronization may or may not result in new contacts being
created. In the case where new contacts are created, we want to
refresh our contacts table. In the case where no contacts are created,
we don’t want to refresh the table.
To implement this we could conditionally add an
HX-Trigger response header with the value
contacts-updated:
A call to the remote system that synchronized our contact
database with it
If any contacts were updated we conditionally trigger the
contacts-updated event on the client
This value would trigger the contacts-updated event on
the button that made the AJAX request to /sync. We can then
take advantage of the from: modifier of the
hx-trigger attribute to listen for that event. With this
pattern we can effectively trigger htmx requests from the server
side.
Here is what the client-side code might look like:
The response to this request may conditionally trigger the
contacts-updated event
This table listens for the event and refreshes when it
occurs
The table listens for the contacts-updated event, and it
does so on the body element. It listens on the
body element since the event will bubble up from the
button, and this allows us to not couple the button and table together:
we can move the button and table around as we like and, via events, the
behavior we want will continue to work fine. Additionally, we may want
other elements or requests to trigger the
contacts-updated event, so this provides a general
mechanism for refreshing the contacts table in our application.
HTTP Requests & Responses
We have just seen an advanced feature of HTTP responses supported by
htmx, the HX-Trigger response header, but htmx supports
quite a few more headers for both requests and responses. In Chapter 4
we discussed the headers present in HTTP Requests. Here are some of the
more important headers you can use to change htmx behavior with HTTP
responses:
HX-Location
Causes a client-side redirection to a new location
HX-Push-Url
Pushes a new URL into the location bar
HX-Refresh
Refreshes the current page
HX-Retarget
Allows you to specify a new target to swap the response content into
on the client side
You can find a reference for all requests and response headers in the
htmx
documentation.
HTTP Response Codes
Even more important than response headers, in terms of information
conveyed to the client, is the HTTP Response Code. We discussed
HTTP Response Codes in Chapter 3. By and large htmx handles various
response codes in the manner that you would expect: it swaps content for
all 200-level response codes and does nothing for others. There are,
however, two “special” 200-level response codes:
204 No Content - When htmx receives this response
code, it will not swap any content into the DOM (even if the
response has a body)
286 - When htmx receives this response code to a
request that is polling, it will stop the polling
You can override the behavior of htmx with respect to response codes
by, you guessed it, responding to an event! The
htmx:beforeSwap event allows you to change the behavior of
htmx with respect to various status codes.
Let’s say that, rather than doing nothing when a 404
occurred, you wanted to alert the user that an error had occurred. To do
so, you want to invoke a JavaScript method,
showNotFoundError(). Let’s add some code to use the
htmx:beforeSwap event to make this happen:
If the response code is a 404, show the user a
dialog.
You can also use the htmx:beforeSwap event to configure
if the response should be swapped into the DOM and what element the
response should target. This gives you quite a bit of flexibility in
choosing how you want to use HTTP Response codes in your application.
Full documentation on the htmx:beforeSwap event can be
found at htmx.org.
Updating Other Content
Above we saw how to use a server-triggered event, via the
HX-Trigger HTTP response header, to update a piece of the
DOM based on the response to another part of the DOM. This technique
addresses the general problem that comes up in Hypermedia-Driven
Applications: “How do I update other content?” After all, in normal HTTP
requests, there is only one “target”, the entire screen, and, similarly,
in htmx-based requests, there is only one target: either the explicit or
implicit target of the element.
If you want to update other content in htmx, you have a few
options:
Expanding Your Selection
The first option, and the simplest, is to “expand the target.” That
is, rather than simply replacing a small part of the screen, expand the
target of your htmx-driven request until it is large enough to enclose
all the elements that need to be updated on a screen. This has the
tremendous advantage of being simple and reliable. The downside is that
it may not provide the user experience that you want, and it may not
play well with a particular server-side template layout. Regardless, we
always recommend at least thinking about this approach first.
Out of Band Swaps
A second option, a bit more complex, is to take advantage of “Out Of
Band” content support in htmx. When htmx receives a response, it will
inspect it for top-level content that includes the
hx-swap-oob attribute. That content will be removed from
the response, so it will not be swapped into the DOM in the normal
manner. Instead, it will be swapped in for the content that it matches
by id.
Let’s look at an example. Consider the situation we had earlier,
where a contacts table needs to be updated if an integration pulls down
any new contacts. Previously we solved this by using events and a
server-triggered event via the HX-Trigger response
header.
This time, we’ll use the hx-swap-oob attribute in the
response to the POST to /integrations/1. The
new contacts table content will “piggyback” on the response.
<button hx-post="/integrations/1"><1> Pull Contacts From Integration</button> ...<table id="contacts-table"><2> ...</table>
The updated contacts table
The button still issues a POST to
/integrations/1.
The table no longer listens for an event, but it now has an
id.
Next, the response to the POST to
/integrations/1 will include the content that needs to be
swapped into the button, per the usual htmx mechanism. But it will also
include a new, updated version of the contacts table, which will be
marked as hx-swap-oob="true". This content will be removed
from the response so that it is not inserted into the button. Instead,
it is swapped into the DOM in place of the existing table since it has a
matching id.
HTTP/1.1 200 OK
Content-Type: text/html; charset=utf-8
...

Pull Contacts From Integration <1>

<table id="contacts-table" hx-swap-oob="true"> <2>
  ...
</table>
A response with out-of-band content
This content will be placed in the button.
This content will be removed from the response and swapped by
id.
Using this piggybacking technique, you can update content wherever
needed on a page. The hx-swap-oob attribute supports other
additional features, all of which are documented.
Depending on how exactly your server-side templating technology
works, and what level of interactivity your application requires, out of
band swapping can be a powerful mechanism for content updates.
Events
Finally, the most complex mechanism for updating content is the one
we saw back in the events section: using server-triggered events to
update elements. This approach can be very clean, but also requires a
deeper conceptual knowledge of HTML and events, and a commitment to the
event-driven approach. While we like this style of development, it isn’t
for everyone. We typically recommend this pattern only if the htmx
philosophy of event-driven hypermedia really speaks to you.
If it does speak to you, however, we say: go for it. We’ve
created some very complex and flexible user interfaces using this
approach, and we are quite fond of it.
Being Pragmatic
All of these approaches to the “Updating Other Content” problem will
work, and will often work well. However, there may come a point where it
would just be simpler to use a different approach for your UI, like the
reactive one. As much as we like the hypermedia approach, the reality is
that there are some UX patterns that simply cannot be implemented easily
using it. The canonical example of this sort of pattern, which we have
mentioned before, is something like a live online spreadsheet: it is
simply too complex a user interface, with too many interdependencies, to
be done well via exchanges of hypermedia with a server.
In cases like this, and any time you feel like an htmx-based solution
is proving to be more complex than another approach might be, we
recommend that you consider a different technology. Be pragmatic, and
use the right tool for the job. You can always use htmx for the parts of
your application that aren’t as complex and don’t need the full
complexity of a reactive framework, and save that complexity budget for
the parts that do.
We encourage you to learn many different web technologies, with an
eye to the strengths and weaknesses of each one. This will give you a
deep tool chest to reach into when problems present themselves. Our
experience is that, with htmx, hypermedia is a tool you can reach for
frequently.
Debugging
We are not ashamed to admit: we are big fans of events. They are the
underlying technology of almost any interesting user interface, and are
particularly useful in the DOM once they have been unlocked for general
use in HTML. They let you build nicely decoupled software while often
preserving the locality of behavior we like so much.
However, events are not perfect. One area where events can be
particularly tricky to deal with is debugging: you often want
to know why an event isn’t happening. But where can you set a
break point for something that isn’t happening? The answer, as
of right now, is: you can’t.
There are two techniques that can help in this regard, one provided
by htmx, the other provided by Chrome, the browser by Google.
Logging Htmx Events
The first technique, provided by htmx itself, is to call the
htmx.logAll() method. When you do this, htmx will log all
the internal events that occur as it goes about its business, loading up
content, responding to events and so forth.
This can be overwhelming, but with judicious filtering can help you
zero in on a problem. Here are what (a bit of) the logs look like when
clicking on the “docs” link on https://htmx.org, with logAll()
enabled:
But, if you take a deep breath and squint, you can see that it isn’t
that bad: a series of htmx events, some of which we have seen
before (there’s htmx:configRequest!), get logged to the
console, along with the element they are triggered on.
After a bit of reading and filtering, you will be able to make sense
of the event stream, and it can help you debug htmx-related issues.
Monitoring Events in Chrome
The preceding technique is useful if the problem is occurring
somewhere within htmx, but what if htmx is never getting
triggered at all? This comes up some times, like when, for example, you
have accidentally typed an event name incorrectly somewhere.
In cases like this you will need recourse to a tool available in the
browser itself. Fortunately, the Chrome browser by Google provides a
very useful function, monitorEvents(), that allows you to
monitor all events that are triggered on an element.
This feature is available only in the console, so you can’t
use it in code on your page. But, if you are working with htmx in
Chrome, and are curious why an event isn’t triggering on an element, you
can open the developers console and type the following:
This will then print all the events that are triggered on
the element with the id some-element to the console. This
can be very useful for understanding exactly which events you want to
respond to with htmx, or troubleshooting why an expected event isn’t
occurring.
Using these two techniques will help you as you (infrequently, we
hope) troubleshoot event-related issues when developing with htmx.
Security Considerations
In general, htmx and hypermedia tends to be more secure than
JavaScript heavy approaches to building web applications. This is
because, by moving much of the processing to the back end, the
hypermedia approach tends not to expose as much surface area of your
system to end users for manipulation and shenanigans.
However, even with hypermedia, there are still situations that
require care when doing development. Of particular concern are
situations where user-generated content is shown to other users: a
clever user might try to insert htmx code that tricks the other users
into clicking on content that triggers actions they don’t want to
take.
In general, all user-generated content should be escaped on the
server-side, and most server-side rendering frameworks provide
functionality for handling this situation. But there is always a risk
that something slips through the cracks.
In order to help you sleep better at night, htmx provides the
hx-disable attribute. When this attribute is placed on an
element, all htmx attributes within that element will be ignored.
Content Security Policies & Htmx
A Content Security Policy (CSP) is a browser technology that allows
you to detect and prevent certain types of content injection-based
attacks. A full discussion of CSPs is beyond the scope of this book, but
we refer you to the Mozilla
Developer Network article on the topic for more information.
A common feature to disable using a CSP is the eval()
feature of JavaScript, which allows you to evaluate arbitrary JavaScript
code from a string. This has proven to be a security issue and many
teams have decided that it is not worth the risk to keep it enabled in
their web applications.
Htmx does not make heavy use of eval() and, thus, a CSP
with this restriction in place will be fine. The one feature that does
rely on eval() is event filters, discussed above. If you
decide to disable eval() for your web application, you will
not be able to use the event filtering syntax.
Configuring
There are a large number of configuration options available for htmx.
Some examples of things you can configure are:
The default swap style
The default swap delay
The default timeout of AJAX requests
A full list of configuration options can be found in the config
section of the main htmx
documentation.
Htmx is typically configured via a meta tag, found in
the header of a page. The name of the meta tag should be
htmx-config, and the content attribute should contain the
configuration overrides, formatted as JSON. Here is an example:
In this case, we are overriding the default swap style from the usual
innerHTML to outerHTML. This might be useful
if you find yourself using outerHTML more frequently than
innerHTML and want to avoid having to explicitly set that
swap value throughout your application.
HTML Notes: Semantic HTML
Telling people to “use semantic HTML” instead of “read the spec” has
led to a lot of people guessing at the meaning of tags — “looks pretty
semantic to me!” — instead of engaging with the spec.
I think being asked to write meaningful HTML better lights
the path to realizing that it isn’t about what the text means to
humans—it’s about using tags for the purpose outlined in the specs to
meet the needs of software like browsers, assistive technologies, and
search engines.
We recommend talking about, and writing, conformant HTML.
(We can always bikeshed further). Use the elements to the full extent
provided by the HTML specification, and let the software take from it
whatever meaning they can.
REST allows client functionality to be extended by downloading and
executing code in the form of applets or scripts. This simplifies
clients by reducing the number of features required to be
pre-implemented.
Roy Fielding, Architectural Styles and the Design of Network-based
Software Architectures
Thus far we have (mostly) avoided writing any JavaScript (or
_hyperscript) in Contact.app, mainly because the functionality we
implemented has not required it. In this chapter we are going to look at
scripting and, in particular, hypermedia-friendly scripting within the
context of a Hypermedia-Driven Application.
Is Scripting Allowed?
A common criticism of the web is that it’s being misused. There is a
narrative that WWW was created as a delivery system for “documents”, and
only came to be used for “applications” by way of an accident or bizarre
circumstances.
However, the concept of hypermedia challenges the split of document
and application. Hypermedia systems like HyperCard, which preceded the
web, featured rich capabilities for active and interactive experiences,
including scripting.
HTML, as specified and implemented, does lack affordances needed to
build highly interactive applications. This doesn’t mean, however, that
hypermedia’s purpose is “documents” over “applications.”
Rather, while the theoretical foundation is there, the implementation
is underdeveloped. With JavaScript being the only extension point and
hypermedia controls not being well integrated to JavaScript (why can’t
one click a link without halting the program?), developers have not
internalized hypermedia and have instead used the web as a dumb pipe for
apps that imitate “native” ones.
A goal of this book is to show that it is possible to build
sophisticated web applications using the original technology of the web,
hypermedia, without the application developer needing to reach for the
abstractions provided by the large, popular JavaScript frameworks.
Htmx itself is, of course, written in JavaScript, and one of its
advantages is that hypermedia interactions that go through htmx expose a
rich interface to JavaScript code with configuration, events, and htmx’s
own extension support.
Htmx expands the expressiveness of HTML enough that it removes the
need for scripting in many situations. This makes htmx attractive to
people who don’t want to write JavaScript, and there are many of those
sorts of developers, wary of the complexity of Single Page Application
frameworks.
However, dunking on JavaScript is not the aim of the htmx project.
The goal of htmx is not less JavaScript, but less code, more readable
and hypermedia-friendly code.
Scripting has been a massive force multiplier for the web. Using
scripting, web application developers are not only able to enhance their
HTML websites, but also create full-fledged client-side applications
that can often compete with native, thick client applications.
This JavaScript-centric approach to building web applications is a
testament to the power of the web and to the sophistication of web
browsers in particular. It has its place in web development: there are
situations where the hypermedia approach simply can’t provide the level
of interaction that an SPA can.
However, in addition to this more JavaScript-centric style, we want
to develop a style of scripting more compatible and consistent with
Hypermedia-Driven Applications.
Scripting for Hypermedia
Borrowing from Roy Fielding’s notion of “constraints” defining REST,
we offer two constraints of hypermedia-friendly scripting. You are
scripting in an HDA-compatible manner if the following two constraints
are adhered to:
The main data format exchanged between server and client must be
hypermedia, the same as it would be without scripting.
Client-side state, outside the DOM itself, is kept to a
minimum.
The goal of these constraints is to confine scripting to where it
shines best and where nothing else comes close: interaction
design. Business logic and presentation logic are the
responsibility of the server, where we can pick whichever languages or
tools are appropriate for our business domain.
The Server
Keeping business logic and presentation logic both “on the server”
does not mean these two “concerns” are mixed or coupled. They can be
modularized on the server. In fact, they should be modularized
on the server, along with all the other concerns of our application.
Note also that, especially in web development parlance, the humble
“server” is usually a whole fleet of racks, virtual machines, containers
and more. Even a worldwide network of datacenters is reduced to “the
server” when discussing the server-side of a Hypermedia-Driven
Application.
Satisfying these two constraints sometimes requires us to diverge
from what is typically considered best practice for JavaScript. Keep in
mind that the cultural wisdom of JavaScript was largely developed in
JavaScript-centric SPA applications.
The Hypermedia-Driven Application cannot as comfortably fall back on
this tradition. This chapter is our contribution to the development of a
new style and best practices for what we are calling Hypermedia-Driven
Applications.
Unfortunately, simply listing “best practices” is rarely convincing
or edifying. To be honest, it’s boring.
Instead, we will demonstrate these best practices by implementing
client-side features in Contact.app. To cover different aspects of
hypermedia-friendly scripting, we will implement three different
features:
An overflow menu to hold the Edit, View and
Delete actions, to clean up visual clutter in our list of
contacts.
An improved interface for bulk deletion.
A keyboard shortcut for focusing the search box.
The important takeaway in the implementation of each of these
features is that, while they are implemented entirely on the client-side
using scripting, they don’t exchange information with the
server via a non-hypermedia format, such as JSON, and that they
don’t store a significant amount of state outside of the DOM itself.
Scripting Tools for the Web
The primary scripting language for the web is, of course, JavaScript,
which is ubiquitous in web development today.
A bit of interesting internet lore, however, is that JavaScript was
not always the only built-in option. As the quote from Roy Fielding at
the start of this chapter hints, “applets” written in other languages
such as Java were considered to be part of the scripting infrastructure
of the web. In addition, there was a time period when Internet Explorer
supported VBScript, a scripting language based on Visual Basic.
Today, we have a variety of transcompilers (often shortened
to transpilers) that convert many languages to JavaScript, such
as TypeScript, Dart, Kotlin, ClojureScript, F# and more. There is also
the WebAssembly (WASM) bytecode format, which is supported as a
compilation target for C, Rust, and the WASM-first language
AssemblyScript.
However, most of these options are not geared towards a
hypermedia-friendly style of scripting. Compile-to-JS languages are
often paired with SPA-oriented libraries (Dart and AngularDart,
ClojureScript and Reagent, F# and Elm), and WASM is currently mainly
geared toward linking to C/C++ libraries from JavaScript.
We will instead focus on three client-side scripting technologies
that are hypermedia-friendly:
VanillaJS, that is, using JavaScript without depending on any
framework.
Alpine.js, a JavaScript library for adding behavior directly in
HTML.
_hyperscript, a non-JavaScript scripting language created
alongside htmx. Like AlpineJS, _hyperscript is usually embedded in
HTML.
Let’s take a quick look at each of these scripting options, so we
know what we are dealing with.
Note that, as with CSS, we are going to show you just enough of each
of these options to give a flavor of how they work and, we hope, spark
your interest in looking into any of them more extensively.
Vanilla JavaScript
No code is faster than no code.
Merb (Ruby web framework), motto
Vanilla JavaScript is simply using plain JavaScript in your
application, without any intermediate layers. The term “Vanilla” entered
frontend web dev parlance as it became assumed that any sufficiently
“advanced” web app would use some library with a name ending in “.js”.
As JavaScript matured as a scripting language, however, standardized
across browsers and provided more and more functionality, these
frameworks and libraries became less important.
Somewhat ironically though, as JavaScript became more powerful and
removed the need for the first generation of JavaScript libraries such
as jQuery, it also enabled people to build complex SPA libraries. These
SPA libraries are often even more elaborate than the original first
generation of JavaScript libraries.
A quote from the website http://vanilla-js.com, which is well
worth visiting even though it’s slightly out of date, captures the
situation well:
VanillaJS is the lowest-overhead, most comprehensive framework I’ve
ever used.
http://vanilla-js.com
With JavaScript having matured as a scripting language, this is
certainly the case for many applications. It is especially true in the
case of HDAs, since, by using hypermedia, your application will not need
many of the features typically provided by more elaborate Single Page
Application JavaScript frameworks:
Client-side routing
An abstraction over DOM manipulation (i.e., templates that
automatically update when referenced variables change)
Attaching dynamic behavior to server-rendered tags on load (i.e.,
“hydration”)
Network requests
Without all this complexity being handled in JavaScript, your
framework needs are dramatically reduced.
One of the best things about VanillaJS is how you install it: you
don’t have to!
You can just start writing JavaScript in your web application, and it
will simply work.
That’s the good news. The bad news is that, despite improvements over
the last decade, JavaScript has some significant limitations as a
scripting language that can make it less than ideal as a stand-alone
scripting technology for Hypermedia-Driven Applications:
Being as established as it is, it has accreted a lot of features
and warts.
It has a complicated and confusing set of features for working
with asynchronous code.
Working with events is surprisingly difficult.
DOM APIs (a large portion of which were originally designed for
Java, yes Java) are verbose and don’t have a habit of making
common functionality easy to use.
None of these limitations are deal-breakers, of course. Many of them
are gradually being fixed and many people prefer the “close to the
metal” (for lack of a better term) nature of vanilla JavaScript over
more elaborate client-side scripting approaches.
A Simple Counter
To dive into vanilla JavaScript as a front end scripting option,
let’s create a simple counter widget.
Counter widgets are a common “Hello World” example for JavaScript
frameworks, so looking at how it can be done in vanilla JavaScript (as
well as the other options we are going to look at) will be
instructive.
Our counter widget will be very simple: it will have a number, shown
as text, and a button that increments the number.
One problem with tackling this problem in vanilla JavaScript is that
it lacks one thing that most JavaScript frameworks provide: a default
code and architectural style.
With vanilla JavaScript, there are no rules!
This isn’t all bad. It presents a great opportunity to take a small
journey through various styles that people have developed for writing
their JavaScript.
An inline implementation
To begin, let’s start with the simplest thing imaginable: all of our
JavaScript will be written inline, directly in the HTML. When the button
is clicked, we will look up the output element holding the
number, and increment the number contained within it.
We use the onclick attribute to add an event
listener.
Find the output via a querySelector() call.
JavaScript allows us use the ++ operator on
strings.
Not too bad.
It’s not the most beautiful code, and can be irritating especially if
you aren’t used to the DOM APIs.
It’s a little annoying that we needed to add an id to
the output element. The
document.querySelector() function is a bit verbose compared
with, say, the $ function, as provided by jQuery.
But it works. It’s also easy enough to understand, and crucially it
doesn’t require any other JavaScript libraries.
So that’s the simple, inline approach with VanillaJS.
Separating our scripting out
While the inline implementation is simple in some sense, a more
standard way to write this would be to move the code into a separate
JavaScript file. This JavaScript file would then either be linked to via
a <script src> tag or placed into an inline
<script> tag by a build process.
Here we see the HTML and JavaScript separated out from one
another, in different files. The HTML is now “cleaner” in that there is
no JavaScript in it.
The JavaScript is a bit more complex than in our inline version: we
need to look up the button using a query selector and add an event
listener to handle the click event and increment the counter.
We use addEventListener, which is preferable to
onclick for many reasons.
The logic stays the same, only the structure around it
changes.
In moving the JavaScript out to another file, we are following a
software design principle known as Separation of Concerns
(SoC).
Separation of Concerns posits that the various “concerns” (or
aspects) of a software project should be divided up into multiple files,
so that they don’t “pollute” one another. JavaScript isn’t markup, so it
shouldn’t be in your HTML, it should be elsewhere. Styling
information, similarly, isn’t markup, and so it belongs in a separate
file as well (A CSS file, for example.)
For quite some time, this Separation of Concerns was considered the
“orthodox” way to build web applications.
A stated goal of Separation of Concerns is that we should be able to
modify and evolve each concern independently, with confidence that we
won’t break any of the other concerns.
However, let’s look at exactly how this principle has worked out in
our simple counter example. If you look closely at the new HTML, it
turns out that we’ve had to add a class to the button. We added this
class so that we could look the button up in JavaScript and add in an
event handler for the “click” event.
Now, in both the HTML and the JavaScript, this class name is just a
string and there isn’t any process to verify that the button
has the right classes on it or its ancestors to ensure that the event
handler is actually added to the right element.
Unfortunately, it has turned out that the careless use of CSS
selectors in JavaScript can cause what is known as jQuery soup.
jQuery soup is a situation where:
The JavaScript that attaches a given behavior to a given element
is difficult to find.
Code reuse is difficult.
The code ends up wildly disorganized and “flat”, with lots of
unrelated event handlers mixed together.
The name “jQuery soup” comes from the fact that most JavaScript-heavy
applications used to be built in jQuery (many still are), which, perhaps
inadvertently, tended to encourage this style of JavaScript.
So, you can see that the notion of Separation of Concerns doesn’t
always work as well as promised: our concerns end up intertwined or
coupled pretty deeply, even when we separate them into different
files.
 EXPECTATION              REALITY

 HTML   CSS    JS         HTML   CSS    JS
┌────┐ ┌────┐ ┌────┐     ┌────┐ ┌────┐ ┌────┐
│    │ │    │ │    │     │    │ │    │ │    │
│ C  │ │ C  │ │ c  │     │ CO │ │ NC │ │ern │
│ O  │ │ o  │ │ o  │     │    │ │    │ │    │
│ N  │ │ n  │ │ n  │     │ Co │ │ nc │ │ERN │
│ C  │ │ c  │ │ c  │     │    │ │    │ │    │
│ E  │ │ e  │ │ e  │     │ co │ │ NC │ │ERN │
│ R  │ │ r  │ │ r  │     │    │ │    │ │    │
│ N  │ │ n  │ │ n  │     │ CO │ │ Nc │ │ern │
│    │ │    │ │    │     │    │ │    │ │    │
└────┘ └────┘ └────┘     └────┘ └────┘ └────┘
What concerns?
To show that it isn’t just naming between concerns that can get you
into trouble, consider another small change to our HTML that
demonstrates the problems with our separation of concerns: imagine that
we decide to change the number field from an <output>
tag to an <input type="number">.
This small change to our HTML will break our JavaScript, despite the
fact we have “separated” our concerns.
The fix for this issue is simple enough (we would need to change the
.textContent property to .value property), but
it demonstrates the burden of synchronizing markup changes and code
changes across multiple files. Keeping everything in sync can become
increasingly difficult as your application size increases.
The fact that small changes to our HTML can break our scripting
indicates that the two are tightly coupled, despite being
broken up into multiple files. This tight coupling suggests that
separation between HTML and JavaScript (and CSS) is often an illusory
separation of concerns: the concerns are sufficiently related to one
another that they aren’t easily separated.
In Contact.app we are not concerned with “structure,”
“styling” or “behavior”; we are concerned with collecting contact info
and presenting it to users. SoC, in the way it’s formulated in web
development orthodoxy, is not really an inviolate architectural
guideline, but rather a stylistic choice that, as we can see, can even
become a hindrance.
Locality of Behavior
It turns out that there is a burgeoning reaction against the
Separation of Concerns design principle. Consider the following web
technologies and techniques:
JSX
LitHTML
CSS-in-JS
Single-File Components
Filesystem based routing
Each of these technologies colocate code in various
languages that address a single feature (typically a UI
widget).
All of them mix implementation concerns together in order to
present a unified abstraction to the end-user. Separating technical
detail concerns just isn’t as much of an, ahem, concern.
Locality of Behavior (LoB) is an alternative software design
principle that we coined, in opposition to Separation of Concerns. It
describes the following characteristic of a piece of software:
The behavior of a unit of code should be as obvious as possible by
looking only at that unit of code.
https://htmx.org/essays/locality-of-behaviour/
In simple terms: you should be able to tell what a button does by
simply looking at the code or markup that creates that button. This does
not mean you need to inline the entire implementation, but that you
shouldn’t need to hunt for it or require prior knowledge of the codebase
to find it.
We will demonstrate Locality of Behavior in all of our examples, both
the counter demos and the features we add to Contact.app. Locality of
behavior is an explicit design goal of both _hyperscript and Alpine.js
(which we will cover later) as well as htmx.
All of these tools achieve Locality of Behavior by having you embed
attributes directly within your HTML, as opposed to having code look up
elements in a document through CSS selectors in order to add event
listeners onto them.
In a Hypermedia-Driven Application, we feel that the Locality of
Behavior design principle is often more important than the more
traditional Separation of Concerns design principle.
What to do with our counter?
So, should we go back to the onclick attribute way of
doing things? That approach certainly wins in Locality of Behavior, and
has the additional benefit that it is baked into HTML.
Unfortunately, however, the on* JavaScript attributes
also come with some drawbacks:
They don’t support custom events.
There is no good mechanism for associating long-lasting variables
with an element — all variables are discarded when an event listener
completes executing.
If you have multiple instances of an element, you will need to
repeat the listener code on each, or use something more clever like
event delegation.
JavaScript code that directly manipulates the DOM gets verbose,
and clutters the markup.
An element cannot listen for events on another element.
Consider this common situation: you have a popup, and you want it to
be dismissed when a user clicks outside of it. The listener will need to
be on the body element in this situation, far away from the actual popup
markup. This means that the body element would need to have listeners
attached to it that deal with many unrelated components. Some of these
components may not even be on the page when it was first rendered, if
they are added dynamically after the initial HTML page is rendered.
So vanilla JavaScript and Locality of Behavior don’t seem to mesh
quite as well as we would like them to.
The situation is not hopeless, however: it’s important to understand
that LoB does not require behavior to be implemented at a use
site, but merely invoked there. That is, we don’t need to write
all our code on a given element, we just need to make it clear that a
given element is invoking some code, which can be located
elsewhere.
Keeping this in mind, it is possible to improve LoB while
writing JavaScript in a separate file, provided we have a reasonable
system for structuring our JavaScript.
RSJS
(the “Reasonable System for JavaScript Structure,” https://ricostacruz.com/rsjs/)
is a set of guidelines for JavaScript architecture targeted at “a
typical non-SPA website.” RSJS provides a solution to the lack of a
standard code style for vanilla JavaScript that we mentioned
earlier.
Here are the RSJS guidelines most relevant for our counter
widget:
“Use data- attributes” in HTML: invoking behavior
via adding data attributes makes it obvious there is JavaScript
happening, as opposed to using random classes or IDs that may be
mistakenly removed or changed.
“One component per file”: the name of the file should match the
data attribute so that it can be found easily, a win for LoB.
To follow the RSJS guidelines, let’s restructure our current HTML and
JavaScript files. First, we will use data attributes, that is,
HTML attributes that begin with data-, a standard feature
of HTML, to indicate that our HTML is a counter component. We will then
update our JavaScript to use an attribute selector that looks for the
data-counter attribute as the root element in our counter
component and wires in the appropriate event handlers and logic.
Additionally, let’s rework the code to use
querySelectorAll() and add the counter functionality to
all counter components found on the page. (You never know how
many counters you might want!)
File should have the same name as the data attribute, so that we
can locate it easily.
Get all elements that invoke this behavior.
Get any child elements we need.
Register event handlers.
Using RSJS solves, or at least alleviates, many of the problems we
pointed out with our first, unstructured example of VanillaJS being
split out to a separate file:
The JS that attaches behavior to a given element is
clear (though only through naming conventions).
Reuse is easy — you can create another counter component
on the page and it will just work.
The code is well-organized — one behavior per
file.
All in all, RSJS is a good way to structure your vanilla JavaScript
in a Hypermedia-Driven Application. So long as the JavaScript isn’t
communicating with a server via a plain data JSON API, or holding a
bunch of internal state outside of the DOM, this is perfectly compatible
with the HDA approach.
Let’s implement a feature in Contact.app using the RSJS/vanilla
JavaScript approach.
VanillaJS in Action: An
Overflow Menu
Our homepage has “Edit”, “View” and “Delete” links for every contact
in our table. This uses a lot of space and creates visual clutter. Let’s
fix that by placing these actions inside a drop-down menu with a button
to open it.
If you’re less familiar with JavaScript and the code here starts to
feel too complicated, don’t worry; the Alpine.js and _hyperscript
examples — which we’ll look at next — are easier to follow.
Let’s begin by sketching the markup we want for our dropdown menu.
First, we need an element, we’ll use a <div>, to
enclose the entire widget and mark it as a menu component. Within this
div, we will have a standard <button> that will
function as the mechanism that shows and hides our menu items. Finally,
we’ll have another <div> that holds the menu items
that we are going to show.
These menu items will be simple anchor tags, as they are in the
current contacts table.
Here is what our updated, RSJS-structured HTML looks like:
The roles and ARIA attributes are based on the Menu and Menu Button
patterns from the ARIA Authoring Practices Guide.
What is ARIA?
As we web developers create more interactive, app-like websites,
HTML’s repertoire of elements won’t have all we need. As we have seen,
using CSS and JavaScript, we can endow existing elements with extended
behavior and appearances, rivaling those of native controls.
However, there was one thing web apps couldn’t replicate. While these
widgets may look similar enough to the real deal, assistive
technology (e.g., screen readers) could only deal with the underlying
HTML elements.
Even if you take the time to get all the keyboard interactions right,
some users often are unable to work with these custom elements
easily.
ARIA was created by W3C’s Web Accessibility Initiative (WAI) in 2008
to address this problem. At a surface level, it is a set of attributes
you can add to HTML to make it meaningful to assistive software such as
a screen reader.
ARIA has two main components that interact with one another:
The first is the role attribute. This attribute has a
predefined set of possible values: menu, dialog, radiogroup
etc. The role attribute does not add any behavior
to HTML elements. Rather, it is a promise you make to the user. When you
annotate an element as role='menu', you are saying: I
will make this element work like a menu.
If you add a role to an element but you don’t
uphold the promise, the experience for many users will be worse
than if the element had no role at all. Thus, it is
written:
No ARIA is better than Bad ARIA.
W3C, Read Me First | APG,
https://www.w3.org/WAI/ARIA/apg/practices/read-me-first/
The second component of ARIA is the states and properties,
all sharing the aria- prefix:
aria-expanded, aria-controls, aria-label etc. These
attributes can specify various things such as the state of a widget, the
relationships between components, or additional semantics. Once again,
these attributes are promises, not implementations.
Rather than learn all the roles and attributes and try to combine
them into a usable widget, the best course of action for most developers
is to rely on the ARIA Authoring Practices Guide (APG), a web resource
with practical information aimed directly at web developers.
If you’re new to ARIA, check out the following W3C resources:
Always remember to test your website for
accessibility to ensure all users can interact with it easily and
effectively.
On the JS side of our implementation, we’ll begin with the RSJS
boilerplate: query for all elements with some data attribute, iterate
over them, get any relevant descendants.
Note that, below, we’ve modified the RSJS boilerplate a bit to
integrate with htmx; we load the overflow menu when htmx loads new
content.
functionoverflowMenu(tree =document) { tree.querySelectorAll("[data-overflow-menu]").forEach(menuRoot => { <1>const button = menuRoot.querySelector("[aria-haspopup]"),<2> menu = menuRoot.querySelector("[role=menu]"),<3> items = [...menu.querySelectorAll("[role=menuitem]")]; });}addEventListener("htmx:load", e =>overflowMenu(e.target));<4>
With RSJS, you’ll be writing
document.querySelectorAll(…).forEach a lot.
To keep the HTML clean, we use ARIA attributes rather than custom
data attributes here.
Use the spread operator to convert a NodeList into a
normal Array.
Initialize all overflow menus when the page is loaded or content
is inserted by htmx.
Conventionally, we would keep track of whether the menu is open using
a JavaScript variable or a property in a JavaScript state object. This
approach is common in large, JavaScript-heavy web applications.
However, this approach has some drawback:
We would need to keep the DOM in sync with the state (harder
without a framework).
We would lose the ability to serialize the HTML (as this open
state isn’t stored in the DOM, but rather in JavaScript).
Instead of taking this approach, we will use the DOM to store our
state. We’ll lean on the hidden attribute on the menu
element to tell us it’s closed. If the HTML of the page is snapshotted
and restored, the menu can be restored as well by simply re-running the
JS.
Optional parameter to specify desired state. This allows us to
use one function to open, close, or toggle the menu.
Focus first item of menu when opened.
Call toggleMenu with current state, to initialize
element attributes.
Toggle menu when button is clicked.
Close menu when focus moves away.
Let’s also make the menu close when we click outside it, a nice
behavior that mimics how native drop-down menus work. This will require
an event listener on the whole window.
Note that we need to be careful with this kind of listener: you may
find that listeners accumulate as components add listeners and fail to
remove them when the component is removed from the DOM. This,
unfortunately, leads to difficult to track down memory leaks.
There is not an easy way in JavaScript to execute logic when an
element is removed. The best option is what is known as the
MutationObserver API. A MutationObserver is
very useful, but the API is quite heavy and a bit arcane, so we won’t be
using it for our example.
Instead, we will use a simple pattern to avoid leaking event
listeners: when our event listener runs, we will check if the attaching
component is still in the DOM, and, if the element is no longer in the
DOM, we will remove the listener and exit.
This is a somewhat hacky, manual form of garbage collection.
As is (usually) the case with other garbage collection algorithms, our
strategy removes listeners in a nondeterministic amount of time after
they are no longer needed. Fortunately for us, With a frequent event
like “the user clicks anywhere in the page” driving the collection, it
should work well enough for our system.
Now, let’s move on to the keyboard interactions for our dropdown
menu. The keyboard handlers turn out to all be pretty similar to one
another and not particularly intricate, so let’s knock them all out in
one go:
Helper: Get the index in the items array of the currently focused
menu item (0 if none).
Move focus to the previous menu item when the up arrow key is
pressed.
Move focus to the next menu item when the down arrow key is
pressed.
Activate the currently focused element when the space key is
pressed.
Move focus to the first menu item when Home is pressed.
Move focus to the last menu item when End is pressed.
Close menu when Escape is pressed.
Return focus to menu button when closing menu.
That should cover all our bases, and we’ll admit that’s a lot of
code. But, in fairness, it’s code that encodes a lot of behavior.
Now, our drop-down menu isn’t perfect, and it doesn’t handle a lot of
things. For example, we don’t support submenus, or menu items being
added or removed dynamically to the menu. If we needed more menu
features like this, it might make more sense to use an off-the-shelf
library, such as GitHub’s details-menu-element.
But, for our relatively simple use case, vanilla JavaScript does a
fine job, and we got to explore ARIA and RSJS while implementing it.
Alpine.js
OK, so that’s an in-depth look at how to structure plain
VanillaJS-style JavaScript. Let’s turn our attention to an actual
JavaScript framework that enables a different approach for adding
dynamic behavior to your application, Alpine.js.
Alpine is a relatively new JavaScript library that allows developers
to embed JavaScript code directly in HTML, akin to the on*
attributes available in plain HTML and JavaScript. However, Alpine takes
this concept of embedded scripting much further than on*
attributes.
Alpine bills itself as a modern replacement for jQuery, the widely
used, older JavaScript library. As you will see, it definitely lives up
to this promise.
Installing Alpine is very easy: it is a single file and is
dependency-free, so you can simply include it via a CDN:
You can also install it via a package manager such as NPM, or vendor
it from your own server.
Alpine provides a set of HTML attributes, all of which begin with the
x- prefix, the main one of which is x-data.
The content of x-data is a JavaScript expression which
evaluates to an object. The properties of this object can, then, be
accessed within the element that the x-data attribute is
located.
To get a flavor of AlpineJS, let’s look at how to implement our
counter example using it.
For the counter, the only state we need to keep track of is the
current number, so let’s declare a JavaScript object with one property,
count, in an x-data attribute on the div for
our counter:
<div class="counter" x-data="{ count: 0 }">
Counter with Alpine, line 1
This defines our state, that is, the data we are going to be using to
drive dynamic updates to the DOM. With the state declared like this, we
can now use it within the div element it is declared on. Let’s
add an output element with an x-text
attribute.
Next, we will bind the x-text attribute to the
count attribute we declared in the x-data
attribute on the parent div element. This will have the
effect of setting the text of the output element to
whatever the value of count is: if count is
updated, so will the text of the output. This is “reactive”
programming, in that the DOM will “react” to changes to the backing
data.
Next, we need to update the count, using a button. Alpine allows you
to attach event listeners with the x-on attribute.
To specify the event to listen for, you add a colon and then the
event name after the x-on attribute name. Then, the value
of the attribute is the JavaScript you wish to execute. This is similar
to the plain on* attributes we discussed earlier, but it
turns out to be much more flexible.
We want to listen for a click event, and we want to
increment count when a click occurs, so here is what the
Alpine code will look like:
With x-on, we specify the event in the attribute
name.
And that’s all it takes. A simple component like a counter should be
simple to code, and Alpine delivers.
“x-on:click” vs. “onclick”
As we said, the Alpine x-on:click attribute (or its
shorthand, the @click attribute) is similar to the built-in
onclick attribute. However, it has additional features that
make it significantly more useful:
You can listen for events from other elements. For example, the
.outside modifier lets you listen to any click event that
is not within the element.
You can use other modifiers to:
throttle or debounce event listeners
ignore events that are bubbled up from descendant
elements
attach passive listeners
You can listen to custom events. For example, if you wanted to
listen for the htmx:after-request event you could write
x-on:htmx:after-request="doSomething()".
Reactivity and Templating
We hope you’ll agree that the AlpineJS version of the counter widget
is better, in general, than the VanillaJS implementation, which was
either somewhat hacky or spread out over multiple files.
A big part of the power of AlpineJS is that it supports a notion of
“reactive” variables, allowing you to bind the count of the
div element to a variable that both the output
and the button can reference, and properly updating all the
dependencies when a mutation occurs. Alpine allows for much more
elaborate data bindings than we have demonstrated here, and it is an
excellent general purpose client-side scripting library.
Alpine.js in Action:
A Bulk Action Toolbar
Let’s implement a feature in Contact.app with Alpine. As it stands
currently, Contact.app has a “Delete Selected Contacts” button at the
very bottom of the page. This button has a long name, is not easy to
find and takes up a lot of room. If we wanted to add additional “bulk”
actions, this wouldn’t scale well visually.
In this section, we’ll replace this single button with a toolbar.
Furthermore, the toolbar will only appear when the user starts selecting
contacts. Finally, it will show how many contacts are selected and let
you select all contacts in one go.
The first thing we will need to add is an x-data
attribute, to hold the state that we will use to determine if the
toolbar is visible or not. We will need to place this on an ancestor
element of both the toolbar that we are going to add, as well as the
checkboxes, which will be updating the state when they are checked and
unchecked. The best option given our current HTML is to place the
attribute on the form element that surrounds the contacts
table. We will declare a property, selected, which will be
an array that holds the selected contact ids, based on the checkboxes
that are selected.
Here is what our form tag will look like:
<form x-data="{ selected: [] }"><1>
This form wraps around the contacts table.
Next, at the top of the contacts table, we are going to add a
template tag. A template tag is not rendered by a
browser, by default, so you might be surprised that we are using it.
However, by adding an Alpine x-if attribute, we can tell
Alpine: if a condition is true, show the HTML within this template.
Recall that we want to show the toolbar if and only if one or more
contacts are selected. But we know that we will have the ids of the
selected contacts in the selected property. Therefore, we
can check the length of that array to see if there are any
selected contacts, quite easily:
<template x-if="selected.length > 0"><1><div class="box info tool-bar"><slot x-text="selected.length"></slot> contacts selected<button type="button" class="bad bg color border">Delete</button><2><hr aria-orientation="vertical"><button type="button">Cancel</button><2></div></template>
Show this HTML if there are 1 or more selected contacts.
We will implement these buttons in just a moment.
The next step is to ensure that toggling a checkbox for a given
contact adds (or removes) a given contact’s id from the
selected property. To do this, we will need to use a new
Alpine attribute, x-model. The x-model
attribute allows you to bind a given element to some underlying
data, or its “model.”
In this case, we want to bind the value of the checkbox inputs to the
selected property. This is how we do this:
The x-model attribute binds the value
of this input to the selected property
Now, when a checkbox is checked or unchecked, the
selected array will be updated with the given row’s contact
id. Furthermore, mutations we make to the selected array
will similarly be reflected in the checkboxes” state. This is known as a
two-way binding.
With this code written, we can make the toolbar appear and disappear,
based on whether contact checkboxes are selected.
Very slick.
Before we move on, you may have noticed our code here includes some
“class=” references. These are for css styling, and are not part of
Alpine.js. We’ve included them only as a reminder that the menu bar
we’re building will require css to work well. The classes in the code
above refer to a minimal css library called Missing.css. If you use
other css libraries, such as Bootstrap, Tailwind, Bulma, Pico.css, etc.,
your styling code will be different.
Implementing actions
Now that we have the mechanics of showing and hiding the toolbar,
let’s look at how to implement the buttons within the toolbar.
Let’s first implement the “Clear” button, because it is quite easy.
All we need to do is, when the button is clicked, clear out the
selected array. Because of the two-way binding that Alpine
provides, this will uncheck all the selected contacts (and then hide the
toolbar)!
The “Delete” button, however, will be a bit more complicated. It will
need to do two things: first it will confirm if the user indeed intends
to delete the contacts selected. Then, if the user confirms the action,
it will use the htmx JavaScript API to issue a DELETE
request.
Confirm the user wishes to delete the selected number of
contacts.
Issue a DELETE using the htmx JavaScript
API.
Note that we are using the short-circuiting behavior of the
&& operator in JavaScript to avoid the call to
htmx.ajax() if the confirm() call returns
false.
The htmx.ajax() function is just a way to access the
normal, HTML-driven hypermedia exchange that htmx’s HTML attributes give
you directly from JavaScript.
Looking at how we call htmx.ajax, we first pass in that
we want to issue a DELETE to /contacts. We
then pass in two additional pieces of information: source
and target. The source property is the element
from which htmx will collect data to include in the request. We set this
to $root, which is a special symbol in Alpine that will be
the element that has the x-data attribute declared on it.
In this case, it will be the form containing all of our contacts. The
target, or where the response HTML will be placed, is just
the entire document’s body, since the DELETE handler
returns a whole page when it completes.
Note that we are using Alpine here in a Hypermedia-Driven Application
compatible manner. We could have issued an AJAX request
directly from Alpine and perhaps updated an x-data property
depending on the results of that request. But, instead, we delegated to
htmx’s JavaScript API, which made a hypermedia exchange with
the server.
This is the key to scripting in a hypermedia-friendly manner within a
Hypermedia-Driven Application.
So, with all of this in place, we now have a much improved experience
for performing bulk actions on contacts: less visual clutter and the
toolbar can be extended with more options without creating bloat in the
main interface of our app.
_hyperscript
The final scripting technology we are going to look at is a bit
further afield: _hyperscript. The
authors of this book initially created _hyperscript as a sibling project
to htmx. We felt that JavaScript wasn’t event-oriented enough, which
made adding small scripting enhancements to htmx applications
cumbersome.
While the previous two examples are JavaScript-oriented, _hyperscript
has a completely different syntax than JavaScript, based on an older
language called HyperTalk. HyperTalk was the scripting language for a
technology called HyperCard, an old hypermedia system available on early
Macintosh Computers.
The most noticeable thing about _hyperscript is that it resembles
English prose more than it resembles other programming languages.
Like Alpine, _hyperscript is a modern jQuery replacement. Also like
Alpine, _hyperscript allows you to write your scripting inline, in
HTML.
Unlike Alpine, however, _hyperscript is not reactive. It
instead focuses on making DOM manipulations in response to events easy
to write and easy to read. It has built-in language constructs for many
DOM operations, preventing you from needing to navigate the
sometimes-verbose JavaScript DOM APIs.
We will give a small taste of what scripting in the _hyperscript
language is like, so you can pursue the language in more depth later if
you find it interesting.
Like htmx and AlpineJS, _hyperscript can be installed via a CDN or
from npm (package name hyperscript.org):
_hyperscript uses the _ (underscore) attribute for
putting scripting on DOM elements. You may also use the
script or data-script attributes, depending on
your HTML validation needs.
Let’s look at how to implement the simple counter component we have
been looking at using _hyperscript. We will place an output
element and a button inside of a div. To
implement the counter, we will need to add a small bit of _hyperscript
to the button. On a click, the button should increment the text of the
previous output tag.
As you’ll see, that last sentence is close to the actual _hyperscript
code:
<div class="counter"><output>0</output><button _="on click increment the textContent of the previous <output/>"><1> Increment</button></div>
The _hyperscript code added inline to the button.
Let’s go through each component of this script:
on click is an event listener, telling the button to
listen for a click event and then executing the remaining
code.
increment is a “command” in _hyperscript that
“increments” things, similar to the ++ operator in
JavaScript.
the doesn’t have any semantic meaning in
_hyperscript, but can be used to make scripts more readable.
textContent of is one form of property
access in _hyperscript. You are probably familiar with the
JavaScript syntax a.b, meaning “Get the property
b on object a. _hyperscript supports this
syntax, but also supports the forms b of a and
a’s b. Which one you use should depend on which one is most
readable.
previous is an expression in _hyperscript that finds
the previous element in the DOM that matches some condition.
<output /> is a query literal, which
is a CSS selector wrapped between < and
/>.
In this code, the previous keyword (and the accompanying
next keyword) is an example of how _hyperscript makes DOM
operations easier: there is no such native functionality to be found in
the standard DOM API, and implementing this in VanillaJS is trickier
than you might think!
So, you can see, _hyperscript is very expressive, particularly when
it comes to DOM manipulations. This makes it easier to embed scripts
directly in HTML: since the scripting language is more powerful, scripts
written in it tend to be shorter and easier to read.
Natural Language Programming?
Seasoned programmers may be suspicious of _hyperscript: There have
been many “natural language programming” (NLP) projects that target
non-programmers and beginner programmers, assuming that being able to
read code in their “natural language” will give them the ability to
write it as well. This has led to some badly written and structured code
and has failed to live up to the (often over the top) hype.
_hyperscript is not an NLP programming language. Yes, its
syntax is inspired in many places by the speech patterns of web
developers. But _hyperscript’s readability is achieved not through
complex heuristics or fuzzy NLP processing, but rather through judicious
use of common parsing tricks, coupled with a culture of readability.
As you can see in the above example, with the use of a query
reference, <output/>, _hyperscript does not shy
away from using DOM-specific, non-natural language when appropriate.
_hyperscript in
Action: A Keyboard Shortcut
While the counter demo is a good way to compare various approaches to
scripting, the rubber meets the road when you try to actually implement
a useful feature with an approach. For _hyperscript, let’s add a
keyboard shortcut to Contact.app: when a user hits Alt+S in our app, we
will focus the search field.
Since our keyboard shortcut focuses the search input, let’s put the
code for it on that search input, satisfying locality.
We will add an event listener using the on keydown
syntax, which will fire whenever a keydown occurs. Further, we can use
an event filter syntax in _hyperscript using square brackets
after the event. In the square brackets we can place a filter
expression that will filter out keydown events we
aren’t interested in. In our case, we only want to consider events where
the Alt key is held down and where the “S” key is being pressed. We can
create a boolean expression that inspects the altKey
property (to see if it is true) and the code
property (to see if it is "KeyS") of the event to achieve
this.
So far our _hyperscript looks like this:
on keydown[altKey and code is 'KeyS'] ...
A start on our keyboard shortcut
Now, by default, _hyperscript will listen for a given event on
the element where it is declared. So, with the script we have, we
would only get keydown events if the search box is already
focused. That’s not what we want! We want to have this key work
globally, no matter which element has focus.
Not a problem! We can listen for the keyDown event
elsewhere by using a from clause in our event handler. In
this case we want to listen for the keyDown from the
window, and our code ends up looking, naturally, like this:
on keydown[altKey and code is 'KeyS'] from window ...
Listening globally
Using the from clause, we can attach the listener to the
window while, at the same time, keeping the code on the element it
logically relates to.
Now that we’ve picked out the event we want to use to focus the
search box, let’s implement the actual focusing by calling the standard
.focus() method.
Here is the entire script, embedded in HTML:
<input id="search" name="q" type="search" placeholder="Search Contacts" _="on keydown[altKey and code is 'KeyS'] from the window focus() me"><1>
Our final script
“me” refers to the element that the script is written
on.
Given all the functionality, this is surprisingly terse, and, as an
English-like programming language, pretty easy to read.
Why a New Programming
Language?
This is all well and good, but you may be thinking “An entirely new
scripting language? That seems excessive.” And, at some level, you are
right: JavaScript is a decent scripting language, is very well optimized
and is widely understood in web development. On the other hand, by
creating an entirely new front end scripting language, we had the
freedom to address some problems that we saw generating ugly and verbose
code in JavaScript:
Async transparency
In _hyperscript, asynchronous functions (i.e., functions that return
Promise instances) can be invoked as if they were
synchronous. Changing a function from sync to async does not break
any _hyperscript code that calls it. This is achieved by checking for a
Promise when evaluating any expression, and suspending the running
script if one exists (only the current event handler is suspended and
the main thread is not blocked). JavaScript, instead, requires either
the explicit use of callbacks or the use of explicit
async annotations (which can’t be mixed with synchronous
code).
Array property access
In _hyperscript, accessing a property on an array (other than
length or a number) will return an array of the values of
property on each member of that array, making array property access act
like a flat-map operation. jQuery has a similar feature, but only for
its own data structure.
Native CSS Syntax
In _hyperscript, you can use things like CSS class and ID literals,
or CSS query literals, directly in the language, rather than needing to
call out to a wordy DOM API, as you do in JavaScript.
Deep Event Support
Working with events in _hyperscript is far more pleasant than working
with them in JavaScript, with native support for responding to and
sending events, as well as for common event-handling patterns such as
“debouncing” or rate limiting events. _hyperscript also provides
declarative mechanisms for synchronizing events within a given element
and across multiple elements.
Again we wish to stress that, in this example, we are not stepping
outside the lines of a Hypermedia-Driven Application: we are only adding
frontend, client-side functionality with our scripting. We are not
creating and managing a large amount of state outside of the DOM itself,
or communicating with the server in a non-hypermedia exchange.
Additionally, since _hyperscript embeds so well in HTML, it keeps the
focus on the hypermedia, rather than on the scripting
logic.
It may not fit all scripting styles or needs, but _hyperscript can
provide an excellent scripting experience for Hypermedia-Driven
Applications. It is a small and obscure programming language worth a
look to understand what it is trying to achieve.
Using Off-the-Shelf
Components
That concludes our look at three different options for your
scripting infrastructure, that is, the code that you write to
enhance your Hypermedia-Driven Application. However, there is another
major area to consider when discussing client side scripting: “off the
shelf” components. That is, JavaScript libraries that other people have
created that offer some sort of functionality, such as showing modal
dialogs.
Components have become very popular in the web development world,
with libraries like DataTables
providing rich user experiences with very little JavaScript code on the
part of a user. Unfortunately, if these libraries aren’t integrated well
into a website, they can begin to make an application feel “patched
together.” Furthermore, some libraries go beyond simple DOM
manipulation, and require that you integrate with a server endpoint,
almost invariably with a JSON data API. This means you are no longer
building a Hypermedia-Driven Application, simply because a particular
widget demands something different. A shame!
Web Components
Web Components is the collective name of a few standards; Custom
Elements and Shadow DOM, and <template> and
<slot>.
All of these standards bring useful capabilities to the table.
<template> elements remove their contents from the
document, while still parsing them as HTML (unlike comments) and making
them accessible to JavaScript. Custom Elements let us initialize and
tear down behaviors when elements are added or removed, which would
previously require manual work or MutationObservers. Shadow DOM lets us
encapsulate elements, leaving the “light” (non-shadow) DOM clean.
However, trying to reap these benefits is often frustrating. Some
difficulties are simply growing pains of new standards (like the
accessibility problems of Shadow DOM) that are actively being worked on.
Others are the result of Web Components trying to be too many things at
the same time:
An extension mechanism for HTML. To this end, each custom element
is a tag we add to the language.
A lifecycle mechanism for behaviors. Methods like
createdCallback, connectedCallback, etc. allow
behavior to be added to elements without needing to be manually invoked
when those elements are added.
A unit of encapsulation. Shadow DOM insulates elements from their
surroundings.
The result is that if you want any one of these things, the others
come along for the ride. If you want to attach some behaviors to some
elements using lifecycle callbacks, you need to create a new tag, which
means you can’t have multiple behaviors on one element, and you isolate
elements you add from elements already in the page, which is a problem
if they need to have ARIA relationships.
When should we use Web Components? A good rule of thumb is to ask
yourself: “Could this reasonably be a built-in HTML element?” For
example, a code editor is a good candidate, since HTML already has
<textarea> and contenteditable elements.
In addition, a fully-featured code editor will have many child elements
that won’t provide much information anyway. We can use features like Shadow
DOM to encapsulate these elements2. We can create a custom
element, <code-area>, that we can drop into our
page whenever we want.
Integration Options
The best JavaScript libraries to work with when you are building a
Hypermedia-Driven Application are ones that:
Mutate the DOM but don’t communicate with a server over
JSON
Respect HTML norms (e.g., using input elements to
store values)
Trigger many custom events as the library updates things
The last point, triggering many custom events (over the alternative
of using lots of methods and callbacks) is especially important, as
these custom events can be dispatched or listened to without additional
glue code written in a scripting language.
Let’s take a look at two different approaches to scripting, one using
JavaScript call backs, and one using events.
To make things concrete, let’s implement a better confirmation dialog
for the DELETE button we created in Alpine in the previous
section. In the original example we used the confirm()
function built in to JavaScript, which shows a pretty bare-bones system
confirmation dialog. We will replace this function with a popular
JavaScript library, SweetAlert2, that shows a much nicer looking
confirmation dialog. Unlike the confirm() function, which
blocks and returns a boolean (true if the user confirmed,
false otherwise), SweetAlert2 returns a
Promise object, which is a JavaScript mechanism for hooking
in a callback once an asynchronous action (such as waiting for a user to
confirm or deny an action) completes.
Integrating using callbacks
With SweetAlert2 installed as a library, you have access to the
Swal object, which has a fire() function on it
to trigger showing an alert. You can pass in arguments to the
fire() method to configure exactly what the buttons on the
confirmation dialog look like, what the title of the dialog is, and so
forth. We won’t get into these details too much, but you will see what a
dialog looks like in a bit.
So, given we have installed the SweetAlert2 library, we can swap it
in place of the confirm() function call. We then need to
restructure the code to pass a callback to the
then() method on the Promise that
Swal.fire() returns. A deep dive into Promises is beyond
the scope of this chapter, but suffice to say that this callback will be
called when a user confirms or denies the action. If the user confirmed
the action, then the result.isConfirmed property will be
true.
Given all that, our updated code will look like this:
And now, when this button is clicked, we get a nice looking dialog in
our web application ([fig-swal-screenshot]) — much nicer than the system
confirmation dialog. Still, this feels a little wrong. This is a lot of
code to write just to trigger a slightly nicer confirm(),
isn’t it? And the htmx JavaScript code we are using here feels awkward.
It would be more natural to move the htmx out to attributes on the
button, as we have been doing, and then trigger the request via
events.
A SweetAlert dialog box
So let’s take a different approach and see how that looks.
Integrating using events
To clean this code up, we will pull the Swal.fire() code
out to a custom JavaScript function we will create called
sweetConfirm(). sweetConfirm() will take the
dialog options that are passed into the fire() method, as
well as the element that is confirming an action. The big difference
here is that the new sweetConfirm() function, rather than
calling some htmx directly, will instead trigger a
confirmed event on the button when the user confirms they
wish to delete.
If the user confirmed the action, trigger a
confirmed event.
With this method available, we can now tighten up our delete button
quite a bit. We can remove all the SweetAlert2 code that we had in the
@click Alpine attribute, and simply call this new
sweetConfirm() method, passing in the arguments
$el, which is the Alpine syntax for getting “the current
element” that the script is on, and then the exact configuration we want
for our dialog.
If the user confirms the action, a confirmed event will
be triggered on the button. This means that we can go back to using our
trusty htmx attributes! Namely, we can move DELETE to an
hx-delete attribute, and we can use hx-target
to target the body. And then, and here is the crucial step, we can use
the confirmed event that is triggered in the
sweetConfirm() function, to trigger the request, but adding
an hx-trigger for it.
We pass the button in to the function, so an event can be
triggered on it.
We pass through the SweetAlert2 configuration
information.
As you can see, this event-based code is much cleaner and certainly
more “HTML-ish.” The key to this cleaner implementation is that our new
sweetConfirm() function fires an event that htmx is able to
listen for.
This is why a rich event model is important to look for when choosing
a library to work with, both with htmx and with Hypermedia-Driven
Applications in general.
Unfortunately, due to the prevalence and dominance of the
JavaScript-first mindset today, many libraries are like SweetAlert2:
they expect you to pass a callback in the first style. In these cases
you can use the technique we have demonstrated here, wrapping the
library in a function that triggers events in a callback, to make the
library more hypermedia and htmx-friendly.
Pragmatic Scripting
In case of conflict, consider users over authors over implementors
over specifiers over theoretical purity.
W3C, HTML Design Principles § 3.2 Priority of Constituencies
We have looked at several tools and techniques for scripting in a
Hypermedia-Driven Application. How should you pick between them? The sad
truth is that there will never be a single, always correct answer to
this question.
Are you committed to vanilla JavaScript-only, perhaps due to company
policy? Well, you can use vanilla JavaScript effectively to script your
Hypermedia-Driven Application.
Do you have more leeway and like the look of Alpine.js? That’s a
great way to add more structured, localized JavaScript to your
application, and offers some nice reactive features as well.
Are you a bit more bold in your technical choices? Maybe _hyperscript
is worth a look. (We certainly think so.)
Sometimes you might even consider picking two (or more) of these
approaches within an application. Each has its own strengths and
weaknesses, and all of them are relatively small and self-contained, so
picking the right tool for the job at hand might be the best
approach.
In general, we encourage a pragmatic approach to scripting:
whatever feels right is probably right (or, at least, right
enough) for you. Rather than being concerned about which
particular approach is taken for your scripting, we would focus on these
more general concerns:
Avoid communicating with the server via JSON data APIs.
Avoid storing large amounts of state outside of the DOM.
Favor using events, rather than hard-coded callbacks or method
calls.
And even on these topics, sometimes a web developer has to do what a
web developer has to do. If the perfect widget for your application
exists but uses a JSON data API? That’s OK.
Just don’t make it a habit.
HTML Notes: HTML is for Applications
A prevalent meme among developers suggests that HTML was designed for
“documents” and is unsuitable for “applications.” In reality, hypermedia
is not only a sophisticated, modern architecture for applications, but
it can allow us to do away with this artificial app/document split for
good.
When I say Hypertext, I mean the simultaneous presentation of
information and controls such that the information becomes the
affordance through which the user obtains choices and selects
actions.
HTML allows documents to contain rich multimedia including images,
audio, video, JavaScript programs, vector graphics and (with some help)
3D environments. More importantly, however, it allows interactive
controls to be embedded within these documents, allowing the information
itself to be the app through which it is accessed.
Consider: Is it not mind-boggling that a single application — which
works on all types of computers and OSs — can let you read news, place
video calls, compose documents, enter virtual worlds, and do almost any
other everyday computing task?
Unfortunately, it is the interactive capabilities of HTML that is its
least developed aspect. For reasons unknown to us, while HTML made it to
version 5 and became a Living Standard, accreting many game-changing
features on the way, the data interactions in it are still mainly
restricted to links and forms. It’s up to developers to extend HTML, and
we want to do so in a way that doesn’t abstract over its simplicity with
an imitation of classical “native” toolkits.
Software was not supposed to use native
toolkits
Years of windows UI libraries yet
no real-world use found for going lower
level than the Web
Wanted a window anyway for a laugh? We had a tool for that: It
was called “Electron”
“yes I would love to write 4 different copies of the same UI” - Statements
dreamed up by the Utterly Deranged
Leah Clark, @leah@tilde.zone
Rendering here refers to HTML generation. Framework
support for server-side rendering is not needed in a HDA because
generating HTML on the server is the default.↩︎
Beware that Shadow DOM is a newer web platform feature
that’s still in development at the time of writing. In particular, there
are some accessibility bugs that may occur when elements inside and
outside the shadow root interact.↩︎
So far we have been focusing on using hypermedia to build
Hypermedia-Driven Applications. In doing so we are following and taking
advantage of the native network architecture of the web, and building a
RESTful system, in the original sense of that term.
However, today, we should acknowledge that many web applications are
often not built using this approach. Instead, they use a Single
Page Application front end library such as React to build their
application, and they interact with the server via a JSON API. This JSON
API almost never uses hypermedia concepts. Rather JSON APIs tend to be
Data APIs, that is, an API that simply returns structured
domain data to the client without any hypermedia control information.
The client itself must know how to interpret the JSON Data: what end
points are associated with the data, how certain fields should be
interpreted, and so on.
Now, believe it or not, we have been creating an API for
Contact.app.
This may sound confusing to you: an API? We have just been creating a
web application, with handlers that just return HTML.
How is that an API?
It turns out that Contact.app is, indeed, providing an API. It just
happens to be a hypermedia API that a hypermedia
client, that is, a browser, understands. We are building an API for
the browser to interact with over HTTP, and, thanks to the magic of HTML
and hypermedia, the browser doesn’t need to know anything about our
hypermedia API beyond an entry point URL: all the actions and display
information comes, self-contained, within the HTML responses.
Building RESTful web applications like this is so natural and simple
that you might not think of it as an API at all, but we assure you, it
is.
Hypermedia APIs & JSON Data
APIs
So, we have a hypermedia API for Contact.app. Should we include a
Data API for Contact.app as well?
Sure! The existence of a hypermedia API in no way means that
you can’t also have a Data API. In fact, this is a common
situation in traditional web applications: there is the “web
application” that is entered through that entry point URL, say
https://mywebapp.example.com/. And there is also a
separate JSON API that is accessible through another URL,
perhaps https://api.mywebapp.example.com/v1.
This is a perfectly reasonable way to split up the hypermedia
interface to your application and the Data API you provide to other,
non-hypermedia clients.
Why would you want to include a Data API along with a hypermedia API?
Well, because non-hypermedia clients might also want to
interact with your application as well.
For example:
Perhaps you have a mobile application that isn’t built using
Hyperview. That application will need to interact with your server
somehow, and using the existing HTML API would almost certainly be a
poor fit! You want programmatic access to your system via a Data API,
and JSON is a natural choice for this.
Perhaps you have an automated script that needs to interact with
the system on a regular basis. For example, maybe we have a bulk-import
job that runs nightly, and needs to import/sync thousands of contacts.
While it would be possible to script this against the HTML API, it would
also be annoying: parsing HTML in scripts is error prone and tedious. It
would be better to have a simple JSON API for this use case.
Perhaps there are 3rd party clients who wish to integrate with
your system’s data in some way. Maybe a partner wants to synchronize
data nightly. As with the bulk-import example, this isn’t a great use
case for an HTML-based API, and it would make more sense to provide
something more amenable to scripting.
For all of these use cases, a JSON Data API makes sense: in each case
the API is not being consumed by a hypermedia client, so presenting an
HTML-based hypermedia API would be inefficient and complicated for the
client to deal with. A simple JSON Data API fits the bill for what we
want and, as always, we recommend using the right tool for the job.
“What!?! You Want Me To Parse HTML!?!”
A confusion we often run into in online discussions when we advocate
a hypermedia approach to building web applications is that people think
we mean that they should parse the HTML responses from the server, and
then dump the data into their SPA framework or mobile applications.
This is, of course, silly.
What we mean, instead, is that you should consider using a hypermedia
API with a hypermedia client, like the browser, interpreting
the hypermedia response itself and presenting it to the user. A
hypermedia API can’t simply be welded on top of an existing SPA
approach. It requires a sophisticated hypermedia client such as the
browser to be consumed effectively.
If you are writing code to tease apart your hypermedia only to then
treat as data to feed into a client-side model, you are probably doing
it wrong.
Differences
Between Hypermedia APIs & Data APIs
Let’s accept for a moment that we are going to have a Data
API for our application, in addition to our hypermedia API. At this
point, some developers may be wondering: why have both? Why not have a
single API, the JSON Data API, and have multiple clients use this one
API to communicate with it?
Isn’t it redundant to have both types of APIs for our
application?
This is a reasonable point: we do advocate having multiple APIs to
your web application if necessary and, yes, this may lead to some
redundancy in code. However, there are distinct advantages to both sorts
of APIs and, even more so, distinct requirements for both sorts of
APIs.
By supporting both of these types of APIs separately you can get the
strengths of both, while keeping their varying styles of code and
infrastructure needs cleanly split out.
Let’s contrast the needs of JSON APIs with Hypermedia APIs:
JSON API Needs
Hypermedia API
It must remain stable over time: you cannot change the API
willy-nilly or you risk breaking clients that use the API and expect
certain end points to behave in certain ways.
There is no need to remain stable over time: all URLs are
discovered via HTML responses, so you can be much more aggressive in
changing the shape of a hypermedia API.
It must be versioned: related to the first point, when you do
make a major change, you need to version the API so that clients that
are using the old API continue to work.
Versioning is not an issue, another strength of the hypermedia
approach.
It should be rate limited: since data APIs are often used by
other clients, not just your own internal web application, requests
should be rate limited, often by user, in order to avoid a single client
overloading the system.
Rate limiting probably isn’t as important beyond the prevention
of Distributed Denial of Service (DDoS) attacks.
It should be a general API: since the API is for all
clients, not just for your web application, you should avoid specialized
end points that are driven by your own application needs. Instead, the
API should be general and expressive enough to satisfy as many potential
client needs as possible.
The API can be very specific to your application needs:
since it is designed only for your particular web application, and since
the API is discovered through hypermedia, you can add and remove highly
tuned end points for specific features or optimization needs in your
application.
Authentication for these sorts of API is typically token based,
which we will discuss in more detail later.
Authentication is typically managed through a session cookie
established by a login page.
These two different types of APIs have different strengths and needs,
so it makes sense to use both. The hypermedia approach can be used for
your web application, allowing you to specialize the API for the “shape”
of your application. The Data API approach can be used for other,
non-hypermedia clients like mobile, integration partners, etc.
Note that by splitting these two APIs apart, you reduce the pressure
to constantly change a general Data API to address application needs.
Your Data API can focus on remaining stable and reliable, rather than
requiring a new version with every added feature.
This is the key advantage of splitting your Data API from your
Hypermedia API.
JSON Data APIs vs JSON “REST” APIs
Unfortunately, today, for historical reasons, what we are calling
JSON Data APIs are often referred to as “REST APIs” in the industry.
This is ironic, because, by any reasonable reading of Roy Fielding’s
work defining what REST means, the vast majority of JSON APIs are
not RESTful. Not even close.
I am getting frustrated by the number of people calling any
HTTP-based interface a REST API. Today’s example is the SocialSite REST
API. That is RPC. It screams RPC. There is so much coupling on display
that it should be given an X rating.
What needs to be done to make the REST architectural style clear on
the notion that hypertext is a constraint? In other words, if the engine
of application state (and hence the API) is not being driven by
hypertext, then it cannot be RESTful and cannot be a REST API. Period.
Is there some broken manual somewhere that needs to be fixed?
Roy Fielding,
https://roy.gbiv.com/untangled/2008/rest-apis-must-be-hypertext-driven
The story of how “REST API” came to mean “JSON APIs” in the industry
is a long and sordid one, and beyond the scope of this book. However, if
you are interested, you can refer to an essay by one of the authors of
this book entitled “How Did REST Come To Mean The Opposite of REST?” on
the htmx
website.
In this book we use the term “Data API” to describe these JSON APIs,
while acknowledging that many people in the industry will continue to
call them “REST APIs” for the foreseeable future.
Adding a JSON Data API
To Contact.app
Alright, so how are we going to add a JSON Data API to our
application? One approach, popularized by the Ruby on Rails web
framework, is to use the same URL endpoints as your hypermedia
application, but use the HTTP Accept header to determine if
the client wants a JSON representation or an HTML representation. The
HTTP Accept header allows a client to specify what sort of
Multipurpose Internet Mail Extensions (MIME) types, that is file types,
it wants back from the server: JSON, HTML, text and so on.
So, if the client wanted a JSON representation of all contacts, they
might issue a GET request that looks like this:
Accept: application/json

GET /contacts
A request for a JSON representation of all
contacts
If we adopted this pattern then our request handler for
/contacts/ would need to be updated to inspect this header
and, depending on the value, return a JSON rather than HTML
representation for the contacts. Ruby on Rails has support for this
pattern baked into the framework, making it very easy to switch on the
requested MIME type.
Unfortunately, our experience with this pattern has not been great,
for reasons that should be clear given the differences we outlined
between Data and hypermedia APIs: they have different needs and often
take on very different “shapes”, and trying to pound them into the same
set of URLs ends up creating a lot of tension in the application
code.
Given the different needs of the two APIs and our experience managing
multiple APIs like this, we think separating the two, and, therefore,
breaking the JSON Data API out to its own set of URLs is the right
choice. This will allow us to evolve the two APIs separately from one
another, and give us room to improve each independently, in a manner
consistent with their own individual strengths.
Picking a Root URL For Our
API
Given that we are going to split our JSON Data API routes out from
our regular hypermedia routes, where should we place them? One important
consideration here is that we want to make sure that we can version our
API cleanly in some way, regardless of the pattern we choose.
Looking around, a lot of places use a subdomain for their APIs,
something like https://api.mywebapp.example.com and, in
fact, often encode versioning in the subdomain:
https://v1.api.mywebapp.example.com.
While this makes sense for large companies, it seems like a bit of
overkill for our modest little Contact.app. Rather than using
subdomains, which are a pain for local development, we will use
sub-paths within the existing application:
We will use /api as the root for our Data API
functionality
We will use /api/v1 as the entry point for version 1
of our Data API
If and when we decide to bump the API version, we can move to
/api/v2 and so on.
This approach isn’t perfect, of course, but it will work for our
simple application and can be adapted to a subdomain approach or various
other methods at a later point, when our Contact.app has taken over the
internet and we can afford a large team of API developers. :)
Our First JSON Endpoint: Listing All Contacts
Let’s add our first Data API endpoint. It will handle an HTTP
GET request to /api/v1/contacts, and return a
JSON list of all contacts in the system. In some ways it will look quite
a bit like our initial code for the hypermedia route
/contacts: we will load all the contacts from the contacts
database and then render some text as a response.
We are also going to take advantage of a nice feature of Flask: if
you simply return an object from a handler, it will serialize (that is,
convert) that object into a JSON response. This makes it very easy to
build simple JSON APIs in flask!
@app.route("/api/v1/contacts", methods=["GET"]) <1>def json_contacts(): contacts_set = Contact.all() contacts_dicts = [c.__dict__ for c in contacts_set] <2>return {"contacts": contacts_dicts} <3>
A JSON data API to return all contacts
JSON API gets its own path, starting with
/api.
Convert the contacts array into an array of simple dictionary
(map) objects.
Return a dictionary that contains a contacts
property of all the contacts.
This Python code might look a little foreign to you if you are not a
Python developer, but all we are doing is converting our contacts into
an array of simple name/value pairs and returning that array in an
enclosing object as the contacts property. This object will
be serialized into a JSON response automatically by Flask.
With this in place, if we make an HTTP GET request to
/api/v1/contacts, we will see a response that looks
something like this:
So, you can see, we now have a way to get a relatively simple JSON
representation of our contacts via an HTTP request. Not perfect, but
it’s a good start. It’s certainly good enough to write some basic
automated scripts against. For example, you could use this Data API
to:
Move your contacts to another system on a nightly basis
Back your contacts up to a local file
Automate an email blast to your contacts
Having this small JSON Data API opens up a lot of automation
possibilities that would be messier to achieve with our existing
hypermedia API.
Adding Contacts
Let’s move on to the next piece of functionality: the ability to add
a new contact. Once again, our code is going to look similar in some
ways to the code that we wrote for our normal web application. However,
here we are also going to see the JSON API and the hypermedia API for
our web application begin to obviously diverge.
In the web application, we needed a separate path,
/contacts/new to host the HTML form for creating a new
contact. In the web application we made the decision to issue a
POST to that same path to keep things consistent.
In the case of the JSON API, there is no such path needed: the JSON
API “just is”: it doesn’t need to provide any hypermedia representation
for creating a new contact. You simply know where to issue a
POST to create a contact — likely through some
documentation provided about the API — and that’s it.
Because of that fact, we can put the “create” handler on the same
path as the “list” handler: /api/v1/contacts, but have it
respond only to HTTP POST requests.
The code here is relatively straightforward: populate a new contact
with the information from the POST request, attempt to save
it, and — if it is not successful — show error messages. Here is the
code:
This handler is on the same path as the first one for our JSON
API, but handles POST requests.
We create a new Contact based on values submitted with the
request.
We attempt to save the contact and, if successful, render it as a
JSON object.
If the save is not successful, we render an object showing the
errors, with a response code of 400 (Bad Request).
In some ways this is similar to our contacts_new()
handler from our web application; we are creating the contact and
attempting to save it. In other ways it is very different:
There is no redirection happening here on a successful creation,
because we are not dealing with a hypermedia client like the
browser.
In the case of a bad request, we simply return an error response
code, 400 (Bad Request). This is in contrast with the web
application, where we re-render the form with error messages in
it.
These sorts of differences, over time, build up and make the idea of
keeping your JSON and hypermedia APIs on the same set of URLs less and
less appealing.
Viewing Contact Details
Next, let’s make it possible for a JSON API client to download the
details for a single contact. We will naturally use an HTTP
GET for this functionality and will follow the convention
we established for our regular web application, and put the path at
/api/v1/contacts/<contact id>. So, for example, if
you want to see the details of the contact with the id 42,
you would issue an HTTP GET to
/api/v1/contacts/42.
Add a new GET route at the path we want to use for
viewing contact details
Look the contact up via the id passed in through the
path
Convert the contact to a dictionary, so it can be rendered as
JSON response
Nothing too complicated: we look the contact up by the ID provided in
the path to the controller. We then render it as JSON. You have to
appreciate the simplicity of this code!
Next, let’s add updating and deleting a contact as well.
Updating & Deleting
Contacts
As with the create contact API endpoint, because there is no HTML UI
to produce for them, we can reuse the
/api/v1/contacts/<contact id> path. We will use the
PUT HTTP method for updating a contact and the
DELETE method for deleting one.
Our update code is going to look nearly identical to the create
handler, except that, rather than creating a new contact, we will look
up the contact by ID and update its fields. In this sense we are just
combining the code of the create handler and the detail view
handler.
We handle PUT requests to the URL for a given
contact.
Look the contact up via the id passed in through the
path.
We update the contact’s data from the values included in the
request.
From here on the logic is identical to the
json_contacts_create() handler.
Once again, thanks to the built-in functionality in Flask, simple to
implement.
Let’s look at deleting a contact now. This turns out to be even
simpler: as with the update handler we are going to look up the contact
by id, and then, well, delete it. At that point we can return a simple
JSON object indicating success.
We handle DELETE requests to the URL for a given
contact.
Look the contact up and invoke the delete() method
on it.
Return a simple JSON object indicating that the contact was
successfully deleted.
And, with that, we have our simple little JSON Data API to live
alongside our regular web application, nicely separated out from the
main web application, so it can evolve separately as needed.
Additional Data API
Considerations
Now, we would have a lot more to do if we wanted to make this a
production ready JSON API. At minimum we would need to add:
Rate limiting, important for any public-facing Data API to avoid
abusive clients.
An authentication mechanism. (We don’t have one for our web
application either!)
Support for pagination of our contact data.
Several small items, such as rendering a proper
404 (Not Found) response if someone makes a request with a
contact id that doesn’t exist.
These topics are beyond the scope of this book, but we’d like to
focus on one in particular, authentication, in order to show the
difference between our hypermedia and JSON API. In order to secure our
application we need to add authentication, some mechanism for
determining who a request is coming from, and also
authorization, determining if they have the right to perform
the request.
We will set authorization aside for now and consider only
authentication.
Authentication in web applications
In the HTML web application world, authentication has traditionally
been done via a login page that asks a user for their username (often
their email) and a password. This password is then checked against a
database of (hashed) passwords to establish that the user is who they
say they are. If the password is correct, then a session cookie
is established, indicating who the user is. This cookie is then sent
with every request that the user makes to the web application, allowing
the application to know which user is making a given request.
HTTP Cookies
HTTP Cookies are kind of a strange feature of HTTP. In some ways they
violate the goal of remaining stateless, a major component of the
RESTful architecture: a server will often use a session cookie as an
index into state kept on the server “on the side”, such as a cache of
the last action performed by the user.
Nonetheless, cookies have proven extremely useful and so people tend
not to complain about this aspect of them too much (We are not sure what
our other options would be here!) An interesting example of pragmatism
gone (relatively) right in web development.
In comparison with the standard web application approach to
authentication, a JSON API will typically use some sort of token
based authentication: an authentication token will be established
via a mechanism like OAuth, and that authentication token will then be
passed, often as an HTTP Header, with every request that a client
makes.
At a high level this is similar to what happens in normal web
application authentication: a token is established somehow and then that
token is part of every request. However, in practice, the mechanics tend
to be wildly different:
Cookies are part of the HTTP specification and can be easily
set by an HTTP Server.
JSON Authentication tokens, in contrast, often require elaborate
exchange mechanics like OAuth to be established.
These differing mechanics for establishing authentication are yet
another good reason for splitting up our JSON and hypermedia APIs.
The “Shape” of Our Two APIs
When we were building out our API, we noted that in many cases the
JSON API didn’t require as many end points as our hypermedia API did: we
didn’t need a /contacts/new handler, for example, to
provide a hypermedia representation for creating contacts.
Another aspect of our hypermedia API to consider was the performance
improvement we made: we pulled the total contact count out to a separate
endpoint and implemented the “Lazy Load” pattern, to improve the
perceived performance of our application.
Now, if we had both our hypermedia and JSON API sharing the same
paths, would we want to publish this API as a JSON endpoint as well?
Maybe, but maybe not. This was a pretty specific need for our web
application, and, absent a request from a user of our JSON API, it
doesn’t make sense to include it for JSON consumers.
And what if, by some miracle, the performance issues with
Contact.count() that we were addressing with the Lazy Load
pattern goes away? Well, in our Hypermedia-Driven Application we can
simply revert to the old code and include the count directly in the
request to /contacts. We can remove the
contacts/count endpoint and all the logic associated with
it. Because of the uniform interface of hypermedia, the system will
continue to work just fine.
But what if we had tied our JSON API and hypermedia API together, and
published /contacts/count as a supported end point for our
JSON API? In that case we couldn’t simply remove the endpoint: a
(non-hypermedia) client might be relying on it.
Once again you can see the flexibility of the hypermedia approach and
why separating your JSON API out from your hypermedia API lets you take
maximum advantage of that flexibility.
The Model View
Controller (MVC) Paradigm
One thing you may have noticed about the handlers for our JSON API is
that they are relatively simple and regular. Most of the hard work of
updating data and so forth is done within the contact model itself: the
handlers act as simple connectors that provide a go-between the HTTP
requests and the model.
This is the ideal controller of the Model-View-Controller (MVC)
paradigm that was so popular in the early web: a controller should be
“thin”, with the model containing the majority of the logic in the
system.
The Model View Controller pattern
The Model View Controller design pattern is a classic architectural
pattern in software development, and was a major influence in early web
development. It is no longer emphasized as heavily, as web development
has split into frontend and backend camps, but most web developers are
still familiar with the idea.
Traditionally, the MVC pattern mapped into web development like
so:
Model - A collection of “domain” classes that implement all the
logic and rules for the particular domain your application is designed
for. The model typically provides “resources” that are then presented to
clients as HTML “representations.”
View - Typically views would be some sort of client-side
templating system, and would render the aforementioned HTML
representation for a given Model instance.
Controller - The controller’s job is to take HTTP requests,
convert them into sensible requests to the Model and forward those
requests on to the appropriate Model objects. It then passes the HTML
representation back to the client as an HTTP response.
Thin controllers make it easy to split your JSON and hypermedia APIs
out, because all the important logic lives in the domain model that is
shared by both. This allows you to evolve both separately, while still
keeping logic in sync with one another.
With properly built “thin” controllers and “fat” models, keeping two
separate APIs both in sync and yet still evolving separately is not as
difficult or as crazy as it might sound.
HTML Notes: Microformats
Microformats is a standard
for embedding machine-readable structured data in HTML. It uses classes
to mark certain elements as containing information to be extracted, with
conventions for extracting common properties like name, URL and photo
without classes. By adding these classes into the HTML representation of
an object, we allow the properties of the object to be recovered from
the HTML. For example, this simple HTML:
<a class="h-card" href="https://john.example"><img src="john.jpg" alt=""> John Doe</a>
can be parsed into this JSON-like structure by a microformats
parser:
Using a variety of properties and nested objects, we could mark up
every bit of information about a contact, for example, in a
machine-readable way.
As explained in the above chapter, trying to use the same mechanism
for human and machine interaction is not a good idea. Your human-facing
and machine-facing interfaces may end up being limited by each other. If
you want to expose domain-specific data and actions to users and
developers, a JSON API is a great option.
However, microformats are way easier to adopt. A protocol or standard
that requires websites to implement a JSON API has a high technical
barrier. In comparison, any website can be augmented with microformats
simply by adding a few classes. Other HTML-embedded data formats like
microdata, Open Graph are similarly easy to adopt. This makes
microformats useful for cross-website (dare we say web-scale)
systems like the IndieWeb, which uses
it pervasively.
You may be forgiven for thinking the hypermedia architecture is
synonymous with the web, web browsers, and HTML. No doubt, the web is
the largest hypermedia system, and web browsers are the most popular
hypermedia client. The dominance of the web in discussions about
hypermedia make it easy to forget that hypermedia is a general concept,
and can be applied to all types of platforms and applications. In this
chapter, we will see the hypermedia architecture applied to a non-web
platform: native mobile applications.
Mobile as a platform has different constraints than the web. It
requires different trade-offs and design decisions. Nonetheless, the
concepts of hypermedia, HATEOAS, and REST can be directly applied to
build delightful mobile applications.
In this chapter we will cover shortcomings with the current state of
mobile app development, and how a hypermedia architecture can address
these problems. We will then look at a path toward hypermedia on mobile:
Hyperview, a mobile app framework that uses the hypermedia architecture.
We’ll conclude with an overview of HXML, the hypermedia format used by
Hyperview.
The State of Mobile App
Development
Before we can discuss how to apply hypermedia to mobile platforms, we
need to understand how native mobile apps are commonly built. I’m using
the word “native” to refer to code written against an SDK provided by
the phone’s operating system (typically Android or iOS). This code is
packaged into an executable binary, and uploaded & approved through
app stores controlled by Google and Apple. When users install or update
an app, they’re downloading this executable and running the code
directly on their device’s OS. In this way, mobile apps have a lot in
common with old-school desktop apps for Mac, Windows, or Linux. There is
one important difference between PC desktop apps of yesteryear and
today’s mobile apps. These days, almost all mobile apps are “networked”.
By networked, we mean the app needs to read and write data over the
Internet to deliver its core functionality. In other words, a networked
mobile app needs to implement the client-server architecture.
When implementing the client-server architecture, the developer needs
to make a decision: Should the app be designed as a thin client or thick
client? The current mobile ecosystems strongly push developers towards a
thick-client approach. Why? Remember, Android and iOS require that a
native mobile app be packaged and distributed as an executable binary.
There’s no way around it. Since the developer needs to write code to
package into an executable, it seems logical to implement some of the
app’s logic in that code. The code may as well initiate HTTP calls to
the server to retrieve data, and then render that data using the
platform’s UI libraries. Thus, developers are naturally led into a
thick-client pattern that looks something like this:
The client contains code to make API requests to the server, and
code to translate those responses to UI updates
The server implements an HTTP API that speaks JSON, and knows
little about the state of the client
Just like with SPAs on the web, this architecture has a big downside:
the app’s logic gets spread across the client and server. Sometimes,
this means that logic gets duplicated (like to validate form data).
Other times, the client and server each implement disjoint parts of the
app’s overall logic. To understand what the app does, a developer needs
to trace interactions between two very different codebases.
There’s another downside that affects mobile apps more than SPAs: API
churn. Remember, the app stores control how your app gets distributed
and updated. Users can even control if and when they get updated
versions of your app. As a mobile developer, you can’t assume that every
user will be on the latest version of your app. Your frontend code gets
fragmented across many versions, and now your backend needs to support
all of them.
Hypermedia for Mobile Apps
We’ve seen that the hypermedia architecture can address the
shortcomings of SPAs on the web. But can hypermedia work for mobile apps
as well? The answer is yes!
Just like on the web, we can use hypermedia formats on mobile and let
it serve as the engine of application state. All of the logic is
controlled from the backend, rather than being spread between two
codebases. Hypermedia architecture also solves the annoying problem of
API churn on mobile apps. Since the backend serves a hypermedia response
containing both data and actions, there’s no way for the data and UI to
get out of sync. No more worries about backwards compatibility or
maintaining multiple API versions.
So how can you use hypermedia for your mobile app? There are two
approaches employing hypermedia to build & ship native mobile apps
today:
Web views, which wraps the trusty web platform in a mobile app
shell
Hyperview, a new hypermedia system we designed specifically for
mobile apps
Web Views
The simplest way to use hypermedia architecture on mobile is by
leveraging web technologies. Both Android and iOS SDKs provide “web
views”: chromeless web browsers that can be embedded in native apps.
Tools like Apache Cordova make it easy to take the URL of a website, and
spit out native iOS and Android apps based on web views. If you already
have a responsive web app, you can get a “native” mobile HDA for free.
Sounds too good to be true, right?
Of course, there is a fundamental limitation with this approach. The
web platform and mobile platforms have different capabilities and UX
conventions. HTML doesn’t natively support common UI patterns of mobile
apps. One of the biggest differences is around how each platform handles
navigation. On the web, navigation is page-based, with one page
replacing another and the browser providing back/forward buttons to
navigate the page history. On mobile, navigation is more complex, and
tuned for the physicality of gesture-based interactions.
To drill down, screens slide on top of each other, forming stacks
of screens.
Tab bars at the top or bottom of the app allow switching between
various stacks of screens.
Modals slide up from the bottom of the app, covering the other
stacks and tab bar.
Unlike with web pages, all of these screens are still present in
memory, rendered and updating based on app state.
The navigation architecture is a major difference between how mobile
and web apps function. But it’s not the only one. Many other UX patterns
are present in mobile apps, but are not natively supported on the
web:
pull-to-refresh to refresh content in a screen
horizontal swipe on UI elements to reveal actions
sectioned lists with sticky headers
While these interactions are not natively supported by web browsers,
they can be simulated with JS libraries. Of course, these libraries will
never have the same feel and performance as native gestures. And using
them usually requires embracing a JS-heavy SPA architecture like React.
This puts us back at square 1! To avoid using the typical thick-client
architecture of native mobile apps, we turned to a web view. The web
view allows us to use good-old hypermedia-based HTML. But to get the
desired look & feel of a mobile app, we end up building a SPA in JS,
losing the benefits of Hypermedia in the process.
To build a mobile HDA that acts and feels like a native app, HTML
isn’t going to cut it. We need a format designed to represent the
interactions and patterns of native mobile apps. That’s exactly what
Hyperview does.
Hyperview
Hyperview is an open-source hypermedia system that provides:
A hypermedia format for defining mobile apps called HXML
A hypermedia client for HXML that works on iOS and
Android
Extension points in HXML and the client to customize the
framework for a given app
The format
HXML was designed to feel familiar to web developers, used to working
with HTML. Thus the choice of XML for the base format. In addition to
familiar ergonomics, XML is compatible with server-side rendering
libraries. For example, Jinja2 is perfectly suited as a templating
library to render HXML. The familiarity of XML and the ease of
integration on the backend make it simple to adopt in both new and
existing codebases. Take a look at a “Hello World” app written in HXML.
The syntax should be familiar to anyone who’s worked with HTML:
But HXML is not just a straight port of HTML with differently named
tags. In previous chapters, we’ve seen how htmx enhances HTML with a
handful of new attributes. These additions maintain the declarative
nature of HTML, while giving developers the power to create rich web
apps. In HXML, the concepts of htmx are built into the spec.
Specifically, HXML is not limited to “click a link” and “submit a form”
interactions like basic HTML. It supports a range of triggers and
actions for modifying the content on a screen. These interactions are
bundled together in a powerful concept of “behaviors.” Developers can
even define new behavior actions to add new capabilities to their app,
without the need for scripting. We will learn more about behaviors later
in this chapter.
The client
Hyperview provides an open-source HXML client library written in
React Native. With a little bit of configuration and a few steps on the
command line, this library compiles into native app binaries for iOS or
Android. Users install the app on their device via an app store. On
launch, the app makes an HTTP request to the configured URL, and renders
the HXML response as the first screen.
It may seem a little strange that developing a HDA using Hyperview
requires a single-purpose client binary. After all, we don’t ask users
to first download and install a binary to view a web app. No, users just
enter a URL in the address bar of a general-purpose web browser. A
single HTML client renders apps from any HTML server ([fig-1clientmanyserver]).
It is theoretically possible to build an equivalent general-purpose
“Hyperview browser.” This HXML client would render apps from any HXML
server, and users would enter a URL to specify the app they want to use.
But iOS and Android are built around the concept of single-purpose apps.
Users expect to find and install apps from an app store, and launch them
from the home screen of their device. Hyperview embraces this
app-centric paradigm of today’s popular mobile platforms. That means
that the HXML client (app binary) renders its UI from a single
pre-configured HXML server ([fig-1client1server]).
Luckily, developers do not need to write a HXML client from scratch;
the open-source client library does 99% of the work. And as we will see
in the next section, there are major benefits to controlling both the
client and server in a HDA.
Extensibility
To understand the benefits of Hyperview’s architecture, we need to
first discuss the drawbacks of the web architecture. On the web, any web
browser can render HTML from any web server. This level of compatibility
can only happen with well-defined standards such as HTML5. But defining
and evolving standards is a laborious process. For example, the W3C took
over 7 years to go from first draft to recommendation on the HTML5 spec.
It’s not surprising, given the level of thoughtfulness that needs to go
into a change that impacts so many people. But it means that progress
happens slowly. As a web developer, you may need to wait years for
browsers to gain widespread support for the feature you need.
So what are the benefits of Hyperview’s architecture? In a Hyperview
app, your mobile app only renders HXML from your
server. You don’t need to worry about compatibility between your server
and other mobile apps, or between your mobile app and other servers.
There is no standards body to consult. If you want to add a blink
feature to your mobile app, go ahead and implement a
<blink> element in the client, and start returning
<blink> elements in the HXML responses from your
server. In fact, the Hyperview client library was built with this type
of extensibility in mind. There are extension points for custom UI
elements and custom behavior actions. We expect and encourage developers
to use these extensions to make HXML more expressive and customized to
their app’s functionality.
And by extending the HXML format and client itself, there’s no need
for Hyperview to include a scripting layer in HXML. Features that
require client-side logic get “built-in” to the client binary. HXML
responses remain pure, with UI and interactions represented in
declarative XML.
Which Hypermedia
Architecture Should You Use?
We’ve discussed two approaches for creating mobile apps using
hypermedia systems:
create a backend that returns HTML, and serve it in a mobile app
through a web view
create a backend that returns HXML, and serve it in a mobile app
with the Hyperview client
I purposefully described the two approaches in a way to highlight
their similarities. After all, they are both based on hypermedia
systems, just with different formats and clients. Both approaches solve
the fundamental issues with traditional, SPA-like mobile app
development:
The backend controls the full state of the app.
Our app’s logic is all in one place.
The app always runs the latest version, there’s no API churn to
worry about.
So which approach should you use for a mobile HDA? Based on our
experience building both types of apps, we believe the Hyperview
approach results in a better user experience. The web-view will always
feel out-of-place on iOS and Android; there’s just no good way to
replicate the patterns of navigation and interaction that mobile users
expect. Hyperview was created specifically to address the limitations of
thick-client and web view approaches. After the initial investment to
learn Hyperview, you’ll get all of the benefits of the Hypermedia
architecture, without the downsides of a degraded user experience.
Of course, if you already have a simple, mobile-friendly web app,
then using a web-view approach is sensible. You will certainly save time
from not having to serve your app as HXML in addition to HTML. But as we
will show at the end of this chapter, it doesn’t take a lot of work to
convert an existing Hypermedia-driven web app into a Hyperview mobile
app. But before we get there, we need to introduce the concepts of
elements and behaviors in Hyperview. Then, we’ll re-build our contacts
app in Hyperview.
When Shouldn’t You Use Hypermedia to Build a Mobile
App?
Hypermedia is not always the right choice to build a mobile app. Just
like on the web, apps that require highly dynamic UIs (such as a
spreadsheet application) are better implemented with client-side code.
Additionally, some apps need to function while fully offline. Since HDAs
require a server to render UI, offline-first mobile apps are not a good
fit for this architecture. However, just like on the web, developers can
use a hybrid approach to build their mobile app. The highly dynamic
screens can be built with complex client-side logic, while the less
dynamic screens can be built with web views or Hyperview. In this way,
developers can spend their complexity budget on the core of the
application, and keep the simple screens simple.
Introduction to HXML
Hello World!
HXML was designed to feel natural to web developers coming from HTML.
Let’s take a closer look at the “Hello World” app defined in HXML:
The element representing the top header of the screen
A wrapper element around the content shown on the screen
The text content shown on the screen
Nothing too strange here, right? Just like HTML, the syntax defines a
tree of elements using start tags (<screen>) and end
tags (</screen>). Elements can contain other elements
(<view>) or text (Hello World!).
Elements can also be empty, represented with an empty tag
(<styles />). However, you’ll notice that the names
of the HXML element are different from those in HTML. Let’s take a
closer look at each of those elements to understand what they do.
<doc> is the root of the HXML app. Think of it as
equivalent to the <html> element in HTML. Note that
the <doc> element contains an attribute
xmlns="https://hyperview.org/hyperview". This defines the
default namespace for the doc. Namespaces are a feature of XML that
allow one doc to contain elements defined by different developers. To
prevent conflicts when two developers use the same name for their
element, each developer defines a unique namespace. We will talk more
about namespaces when we discuss custom elements & behaviors later
in this chapter. For now, it’s enough to know that elements in a HXML
doc without an explicit namespace are considered to be part of the
https://hyperview.org/hyperview namespace.
<screen> represents the UI that gets rendered on a
single screen of a mobile app. It’s possible for one
<doc> to contain multiple <screen>
elements, but we won’t get into that now. Typically, a
<screen> element will contain elements that define
the content and styling of the screen.
<styles> defines the styles of the UI on the
screen. We won’t get too much into styling in Hyperview in this chapter.
Suffice it to say, unlike HTML, Hyperview does not use a separate
language (CSS) to define styles. Instead, styling rules such as colors,
spacing, layout, and fonts are defined in HXML. These rules are then
explicitly referenced by UI elements, much like using classes in
CSS.
<body> defines the actual UI of the screen. The
body includes all text, images, buttons, forms, etc that will be shown
to the user. This is equivalent to the <body> element
in HTML.
<header> defines the header of the screen.
Typically in mobile apps, the header includes some navigation (like a
back button), and the title of the screen. It’s useful to define the
header separately from the rest of the body. Some mobile OSes will use a
different transition for the header than the rest of the screen
content.
<view> is the basic building block for layouts and
structure within the screen’s body. Think of it like a
<div> in HTML. Note that unlike HTML
<div> elements, a <view> cannot
directly contain text.
<text> elements are the only way to render text in
the UI. In this example, “Hello World” is contained within a
<text> element.
That’s all there is to define a basic “Hello World” app in HXML. Of
course, this isn’t very exciting. Let’s cover some other built-in
display elements.
UI Elements
Lists
A very common pattern in mobile apps is to scroll through a list of
items. The physical properties of a phone screen (long & vertical)
and the intuitive gesture of swiping a thumb up & down makes this a
good choice for many screens.
HXML has dedicated elements for representing lists and items.
<list> <1> <item key="item1"> <2> <text>My first item</text> <3> </item> <item key="item2"> <text>My second item</text> </item></list>
List element
Element representing a list
Element representing an item in the list, with a unique
key
The content of the item in the list.
Lists are represented with two new elements. The
<list> wraps all of the items in the list. It can be
styled like a generic <view> (width, height, etc). A
<list> element only contains
<item> elements. Of course, these represent each
unique item in the list. Note that <item> is required
to have a key attribute, which is unique among all items in
the list.
You might be asking, “Why do we need a custom syntax for lists of
items? Can’t we just use a bunch of <view>
elements?”. Yes, for lists with a small number of items, using nested
<views> will work quite well. However, often the
number of items in a list can be long enough to require optimizations to
support smooth scrolling interactions. Consider browsing a feed of posts
in a social media app. As you keep scrolling through the feed, it’s not
unusual for the app to show hundreds if not thousands of posts. At any
time, you can flick your finger to scroll to almost any part of the
feed. Mobile devices tend to be memory-constrained. Keeping the
fully-rendered list of items in memory could consume more resources than
available. That’s why both iOS and Android provide APIs for optimized
list UIs. These APIs know which part of the list is currently on-screen.
To save memory, they clear out the non-visible list items, and recycle
the item UI objects to conserve memory. By using explicit
<list> and <item> elements in
HXML, the Hyperview client knows to use these optimized list APIs to
make your app more performant.
It’s also worth mentioning that HXML supports section lists. Section
lists are useful for building list-based UIs, where the items in the
list can be grouped for the user’s convenience. For example, a UI
showing a restaurant menu could group the offerings by dish type:
Element for the title of the section, rendering the text
“Appetizers”
An item representing an appetizer
A section for entree offerings
You’ll notice a couple of differences between
<list> and <section-list>. The
section list element only contains <section>
elements, representing a group of items. A section can contain a
<section-title> element. This is used to render some
UI that acts as the header of the section. This header is “sticky”,
meaning it stays on screen while scrolling through items that belong to
the corresponding section. Finally, <item> elements
act the same as in the regular list, but can only appear within a
<section>.
Images
Showing images in Hyperview is pretty similar to HTML, but there are
a few differences.
<image source="/profiles/1.jpg" style="avatar" />
Image element
The source attribute specifies how to load the image.
Like in HTML, the source can be an absolute or relative URL.
Additionally, the source can be an encoded data URI, for example
data:image/png;base64,iVBORw. However, the source can also
be a “local” URL, referring to an image that is bundled as an asset in
the mobile app. The local URL is prefixed with ./:
<image source="./logo.png" style="logo" />
Image element, pointing to local source
Using Local URLs is an optimization. Since the images are on the
mobile device, they don’t require a network request and will appear
quickly. However, bundling the image with the mobile app binary
increases the binary size. Using local images is a good trade-off for
images that are frequently accessed but rarely change. Good examples
include the app logo, or common button icons.
The other thing to note is the presence of the style
attribute on the <image> element. In HXML, images are
required to have a style that has rules for the image’s
width and height. This is different from HTML,
where <img> elements do not need to explicitly set a
width and height. web browsers will re-flow the content of a web page
once the image is fetched and the dimensions are known. While re-flowing
content is a reasonable behavior for web-based documents, users do not
expect mobile apps to re-flow as content loads. To maintain a static
layout, HXML requires the dimensions to be known before the image
loads.
Inputs
There’s a lot to cover about inputs in Hyperview. Since this is meant
to be an introduction and not an exhaustive resource, I’ll highlight
just a few types of inputs. Let’s start with an example of the simplest
type of input, a text field.
The name used when serializing data from this input
The style applied to the UI element
The current value set in the field
A placeholder to display when the value is empty
This element should feel familiar to anyone who’s created a text
field in HTML. One difference is that most inputs in HTML use the
<input> element with a type attribute,
eg <input type="text">. In Hyperview, each input has
a unique name, in this case <text-field>. By using
different names, we can use more expressive XML to represent the
input.
For example, let’s consider a case where we want to render a UI that
lets the user select one among several options. In HTML, we would use a
radio button input, something like
<input type="radio" name="choice" value="option1" />.
Each choice is represented as a unique input element. This never struck
me as ideal. Most of the time, radio buttons are grouped together to
affect the same name. The HTML approach leads to a lot of boilerplate
(duplication of type="radio" and name="choice"
for each choice). Also, unlike radio buttons on desktop, mobile OSes
don’t provide a strong standard UI for selecting one option. Most mobile
apps use richer, custom UIs for these interactions. So in HXML, we
implement this UI using an element called
<select-single>:
Element representing an input where a single choice is selected.
The name of the selection is defined once here.
Element representing one of the choices. The choice value is
defined here.
The UI of the selection. In this example, we use text, but we can
use any UI elements.
The <select-single> element is the parent of the
input for selecting one choice out of many. This element contains the
name attribute used when serializing the selected choice.
<option> elements within
<select-single> represent the available choices. Note
that each <option> element has a value
attribute. When pressed, this will be the selected value of the input.
The <option> element can contain any other UI
elements within it. This means that we’re not hampered by rendering the
input as a list of radio buttons with labels. We can render the options
as radios, tags, images, or anything else that would be intuitive for
our interface. HXML styling supports modifiers for pressed and selected
states, letting us customize the UI to highlight the selected
option.
Describing all features of inputs in HXML would take an entire
chapter. Instead, I’ll summarize a few other input elements and their
features.
- <select-multiple> works like
<select-single>, but it supports toggling multiple
options on & off. This replaces checkbox inputs in HTML. - The
<switch> element renders an on/off switch that is
common in mobile UIs - The <date-field> element
supports entering in specific dates, and comes with a wide range of
customizations for formatting, settings ranges, etc.
Two more things to mention about inputs. First is the
<form> element. The <form> element
is used to group together inputs for serialization. When a user takes an
action that triggers a backend request, the Hyperview client will
serialize all inputs in the surrounding <form> and
include them in the request. This is true for both GET and
POST requests. We will cover this in more detail when
talking about behaviors later in this chapter. Also later in this
chapter, I’ll talk about support for custom elements in HXML. With
custom elements, you can also create your own input elements. Custom
input elements allow you to build incredible powerful interactions with
simple XML syntax that integrates well with the rest of HXML.
Styling
So far, we haven’t mentioned how to apply styling to all of the HXML
elements. We’ve seen from the Hello World app that each
<screen> can contain a <styles>
element. Let’s re-visit the Hello World app and fill out the
<styles> element.
Element encapsulating all of the styling for the screen
Example of a definition of a style for “body”
Applying the “body” style to a UI element
Example of applying multiple styles (h1 and info) to an
element
You’ll note that in HXML, styling is part of the XML format, rather
than using a separate language like CSS. However, we can draw some
parallels between CSS rules and the <style> element.
A CSS rule consists of a selector and declarations. In the current
version of HXML, the only available selector is a name, indicated by the
id attribute. The rest of the attributes on the
<style> element are declarations, consisting of
properties and property values.
UI elements within the <screen> can reference the
<style> rules by adding the style names to their
style attribute. Note the <text> element
around “Hello World!” references two styles: h1 and
info. The corresponding styles are merged together in the
order they appear on the element. It’s worth noting that styling
properties are similar to those in CSS (color, margins/padding, borders,
etc). Currently, the only available layout engine is based on
flexbox.
Style rules can get quite verbose. For the sake of brevity, we won’t
include the <styles> element in the rest of the
examples in this chapter unless necessary.
Custom elements
The core UI elements that ship with Hyperview are quite basic. Most
mobile apps require richer elements to deliver a great user experience.
Luckily, HXML can easily accommodate custom elements in its syntax. This
is because HXML is really just XML, aka “Extensible Markup Language”.
Extensibility is already built into the format! Developers are free to
define new elements and attributes to represent custom elements.
Let’s see this in action with a concrete example. Assume that we want
to add a map element to our Hello World app. We want the map to display
a defined area, and one or more markers at specific coordinates in that
area. Let’s translate these requirements into XML:
An <area> element will represent the area
displayed by the map. To specify the area, the element will include
attributes for latitude and longitude for the
center of the area, and a latitude-delta and
longitude-delta indicating the +/- display area around the
center.
A <marker> element will represent a marker in
the area. The coordinates of the marker will be defined by
latitude and longitude attributes on the
marker.
Using these custom XML elements, an instance of the map in our app
might look like this:
Custom element representing the area rendered by the map
Custom element representing a marker rendered at specific
coordinates on the map
The syntax feels right at home among the core HXML elements. However,
there’s a potential problem. “area” and “marker” are pretty generic
names. I could see <area> and
<marker> elements being used by a customization to
render charts & graphs. If our app renders both maps and charts, the
HXML markup would be ambiguous. What should the client render when it
sees <area> or <marker>?
This is where XML namespaces come in. XML namespaces eliminate
ambiguity and collisions between elements and attributes used to
represent different things. Remember that the <doc>
element declares that https://hyperview.org/hyperview is
the default namespace for the entire document. Since no other elements
define namespaces, every element in the example above is part of the
https://hyperview.org/hyperview namespace.
Let’s define a new namespace for our map elements. Since this
namespace will not be the default for the document, we also need to
assign the namespace to a prefix we will add to our elements:
This new attribute declares that the map: prefix is
associated with the namespace “https://mycompany.com/hyperview-map”.
This namespace could be anything, but remember the goal is to use
something unique that won’t have collisions. Using your company/app
domain is a good way to guarantee uniqueness. Now that we have a
namespace and prefix, we need to use it for our elements:
Adding the namespace to the “marker” self-closing tag
Adding the namespace to the “area” end tag
That’s it! If we introduced a custom charting library with “area” and
“marker” elements, we would create a unique namespace for those elements
as well. Within the HXML doc, we could easily disambiguate
<map:area> from <chart:area>.
At this point you might be wondering, “how does the Hyperview client
know to render a map when my doc includes <map:area>?” It’s true,
so far we only defined the custom element format, but we haven’t
implemented the element as a feature in our app. We will get into the
details of implementing custom elements in the next chapter.
Behaviors
As discussed in earlier chapters, HTML supports two basic types of
interactions:
Clicking a hyperlink: the client will make a GET request and
render the response as a new web page.
Submitting a form: the client will (typically) make a POST
request with the serialized content of the form, and render the response
as a new web page.
Clicking hyperlinks and submitting forms is enough to build simple
web applications. But relying on just these two interactions limits our
ability to build richer UIs. What if we want something to happen when
the user mouses over a certain element, or perhaps when they scroll some
content into the viewport? We can’t do that with basic HTML.
Additionally, both clicks and form submits result in loading a full new
web page. What if we only want to update a small part of the current
page? This is a very common scenario in rich web applications, where
users expect to fetch and update content without navigating to a new
page.
So with basic HTML, interactions (clicks and submits) are limited and
tightly coupled to a single action (loading a new page). Of course,
using JavaScript, we can extend HTML and add some new syntax to support
our desired interactions. Htmx does exactly that with a new set of
attributes:
Interactions can be added to any element, not just links and
forms.
The interaction can be triggered via a click, submit, mouseover,
or any other JavaScript event.
The actions resulting from the trigger can modify the current
page, not just request a new page.
By decoupling elements, triggers, and actions, htmx allows us to
build rich Hypermedia-driven applications in a way that feels very
compatible with HTML syntax and server-side web development.
HXML takes the idea of defining interactions via triggers &
actions and builds them into the spec. We call these interactions
“behaviors.” We use a special <behavior> element to
define them. Here’s an example of a simple behavior that pushes a new
mobile screen onto the navigation stack:
The element encapsulating an interaction on the parent
<text> element.
The trigger that will execute the interaction, in this case
pressing the <text> element.
The action that will execute when triggered, in this case pushing
a new screen onto the current stack.
The href to load on the new screen.
Let’s break down what’s happening in this example. First, we have a
<text> element with the content “Press me!”. We’ve
shown <text> elements before in examples of HXML, so
this is nothing new. But now, the <text> element
contains a new child element, <behavior>. This
<behavior> element defines an interaction on the
parent <text> element. It contains two attributes
that are required for any behavior:
trigger: defines the user action that triggers the
behavior
action: defines what happens when triggered
In this example, the trigger is set to
press, meaning this interaction will happen when the user
presses the <text> element. The action
attribute is set to push. push is an action
that will push a new screen onto the navigation stack. Finally,
Hyperview needs to know what content to load on the newly pushed screen.
This is where the href attribute comes in. Notice we don’t
need to define the full URL. Much like in HTML, the href
can be an absolute or relative URL.
So that’s a first example of behaviors in HXML. You may be thinking
this syntax seems quite verbose. Indeed, pressing elements to navigate
to a new screen is one of the most common interactions in a mobile app.
It would be nice to have a simpler syntax for the common case. Luckily,
trigger and action attributes have default
values of press and push, respectively.
Therefore, they can be omitted to clean up the syntax:
When pressed, this behavior will open a new screen with the given
URL.
This markup for the <behavior> will produce the
same interaction as the earlier example. With the default attributes,
the <behavior> element looks similar to an anchor
<a> in HTML. But the full syntax achieves our goals
of decoupling elements, triggers, and actions:
Behaviors can be added to any element, they are not limited to
links and forms.
Behaviors can specify an explicit trigger, not just
clicks or form submits.
Behaviors can specify an explicit action, not just a
request for a new page.
Extra attributes like href provide more context for
the action.
Additionally, using a dedicated <behavior> element
means a single element can define multiple behaviors. This lets us
execute several actions from the same trigger. Or, we can execute
different actions for different triggers on the same element. We will
show examples of the power of multiple behaviors at the end of this
chapter. First we need to show the variety of supported actions and
triggers.
Actions
Behavior actions in Hyperview fall into four general categories:
Navigation actions, which load new screens and move between
them
Update actions, which modify the HXML of the current
screen
System actions, which interact with OS-level
capabilities.
Custom actions, which can execute any code you add to the
client.
Navigation actions
We’ve already seen the simplest type of action, push. We
classify push as a “navigation action”, since it’s related
to navigating screens in the mobile app. Pushing a screen onto the
navigation stack is just one of several navigation actions supported in
Hyperview. Users also need to be able to go back to previous screens,
open and close modals, switch between tabs, or jump to arbitrary
screens. Each of these types of navigation is supported through a
different value for the action attribute:
push: Push a new screen into the current navigation
stack. This looks like a screen sliding in from the right, on top of the
current screen.
new: Open a new navigation stack as a modal. This
looks like a screen sliding in from the bottom, on top of the current
screen.
back: This is a complement to the push
action. It pops the current screen off of the navigation stack (sliding
it to the right).
close: This is a complement to the new
action. It closes the current navigation stack (sliding it
down).
reload: Similar to a browser’s “refresh” button,
this will re-request the content of the current screen.
navigate: This action will attempt to find a screen
with the given href already loaded in the app. If the
screen exists, the app will jump to that screen. If it doesn’t exist, it
will act the same as push.
push, new, and navigate all
load a new screen. Thus, they require an href attribute so
that Hyperview knows what content to request for the new screen.
back and close do not load new screens, and
thus do not require the href attribute. reload
is an interesting case. By default, it will use the URL of the screen
when re-requesting the content for the screen. However, if you want to
replace the screen with a different one, you can provide an
href attribute with reload on the behavior
element.
Let’s look at an example “widgets” app that uses several navigation
actions on one screen:
Reloads the content of the screen, showing new widgets from the
backend
Pushes a new screen with details for a specific widget
Most screens in your app will need a way for the user to backtrack to
the previous screen. This is usually done with a button in the header
that uses either a “back” or “close” action, depending on how the screen
was opened. In this example, we’re assuming the widgets screen was
pushed onto the navigation stack, so the “back” action is appropriate.
The header contains a second button that allows the user to enter data
for a new widget. Pressing this button will open a modal with a “New
Widget” screen. Since this “New Widget” screen will open as a modal, it
will need a corresponding “close” action to dismiss itself and show our
“widgets” screen again. Finally, to see more details about a specific
widget, each <item> element contains a behavior with
a “push” action. This action will push a “Widget Detail” screen onto the
current navigation stack. Like in the “Widgets” screen, “Widget Detail”
will need a button in the header that uses the “back” action to let the
user backtrack.
On the web, the browser handles basic navigation needs such as going
back/forward, reloading the current page, or jumping to a bookmark. iOS
and Android don’t provide this sort of universal navigation for native
mobile apps. It’s on the app developers to handle this themselves.
Navigation actions in HXML provide an easy but powerful way for
developers to build an architecture that makes sense for their app.
Update actions
Behavior actions are not just limited to navigating between screens.
They can also be used to change the content on the current screen. We
call these “update actions”. Much like navigation actions, update
actions make a request to the backend. However, the response is not an
entire HXML document, but a fragment of HXML. This fragment is added to
the HXML of the current screen, resulting in an update to the UI. The
action attribute of the <behavior>
determines how the fragment gets incorporated into the HXML. We also
need to introduce a new target attribute on
<behavior> to define where the fragment gets
incorporated in the existing doc. The target attribute is
an ID reference to an existing element on the screen.
Hyperview currently supports these update actions, representing
different ways to incorporate the fragment into the screen:
replace: replaces the entire target element with the
fragment
replace-inner: replaces the children of the target
element with the fragment
append: adds the fragment after the last child of
the target element
prepend: adds the fragment before the first child of
the target element.
Let’s look at some examples to make this more concrete. For these
examples, let’s assume our backend accepts GET requests to
/fragment, and the response is a fragment of HXML that
looks like <text>My fragment</text>.
Replaces the child elements of area2 with fetched
fragment
Appends the fetched fragment to area3
Prepends the fetched fragment to area4
In this example, we have a screen with four buttons corresponding to
the four update actions: replace,
replace-inner, append, prepend.
Below each button, there’s a corresponding <view>
containing some text. Note that the id of each view matches
the target on the behaviors of the corresponding
button.
When the user presses the first button, the Hyperview client makes a
request for /fragment. Next, it looks for the target, ie
the element with id “area1”. Finally, it replaces the
<view id="area1"> element with the fetched fragment,
<text>My fragment</text>. The existing view and
text contained in that view will be replaced. To the user, it will look
like “Existing content” was changed to “My fragment”. In the HXML, the
element <view id="area1"> will also be gone.
The second button behaves in a similar way to the first one. However,
the replace-inner action does not remove the target element
from the screen, it only replaces the children. This means the resulting
markup will look like
<view id="area2"><text>My fragment</text></view>.
The third and fourth buttons do not remove any content from the
screen. Instead, the fragment will be added either after (in the case of
append) or before (prepend) the children of
the target element.
For completeness, let’s look at the state of the screen after a user
presses all four buttons:
Fragment completely replaced the target using
replace action
Fragment replaced the children of the target using
replace-inner action
Fragment added as last child of the target using
append action
fragment added as the first child of the target using
prepend action
The examples above show actions making GET requests to
the backend. But these actions can also make POST requests
by setting verb="post" on the <behavior>
element. For both GET and POST requests, the
data from the parent <form> element will be
serialized and included in the request. For GET requests,
the content will be URL-encoded and added as query params. For
POST requests, the content will be form-URL encoded and set
on the request body. Since they support POST and form data,
update actions are often used to send data to the backend.
So far, our example of update actions require getting new content
from the backend and adding it to the screen. But sometimes we just want
to change the state of existing elements. The most common state to
change for an element is its visibility. Hyperview has
hide, show, and toggle actions
that do just that. Like the other update actions, hide,
show, and toggle use the target
attribute to apply the action to an element on the current screen.
Toggles the visibility of the element with id “area”.
The element targeted by the actions.
In this example, the three buttons labeled “Hide”, “Show”, and
“Toggle” will modify the display state of the <view>
with ID “area”. Pressing “Hide” multiple times will have no affect once
the view is hidden. Likewise, pressing “Show” multiple times will have
no affect once the view is showing. Pressing “Toggle” will keep flipping
the visibility status of the element between showing and hidden.
Hyperview comes with other actions that modify the existing HXML. We
won’t cover them in detail, but I’ll mention them briefly here:
set-value: this action can set the value of an input
element such as <text-field>,
<switch>, <select-single>,
etc.
select-all and unselect-all work with
the <select-multiple> element to select/deselect all
options.
System actions
Some standard Hyperview actions don’t interact with the HXML at all.
Instead, they expose functionality provided by the mobile OS. For
example, both Android and iOS support a system-level “Share” UI. This UI
allows sharing URLs and messages from one app to another app. Hyperview
has a share action to support this interaction. It involves
a custom namespace, and share-specific attributes.
<behavior xmlns:share="https://instawork.com/hyperview-share"<1> trigger="press" action="share" <2> share:url="https://www.instawork.com" <3> share:message="Check out this website!" <4>/>
System share action
Defines the namespace for the share action.
The action of this behavior will bring up the share
sheet.
URL to be shared.
Message to be shared.
We’ve seen XML namespaces when talking about custom elements. Here,
we are using a namespace for the url and
message attributes on the <behavior>.
These attribute names are generic and likely used by other components
and behaviors, so the namespace ensures there will be no ambiguity. When
pressed, the “share” action will trigger. The values of the
url and message attributes will be passed to
the system Share UI. From there, the user will be able to share the URL
& message via SMS, email, or other communication apps.
The share action shows how a behavior action can use
custom attributes to pass along extra data needed for the interactions.
But some actions require even more structured data. This can be provided
via child elements on the <behavior>. Hyperview uses
this to implement the alert action. The alert
action shows a customized system-level dialog box. This dialog needs
configuration for a title and message, but also for customized buttons.
Each button needs to then trigger another behavior when pressed. This
level of configuration cannot be done with just attributes, so we use
custom child elements to represent the behavior of each button.
<behavior xmlns:alert="https://hyperview.org/hyperview-alert"<1> trigger="press" action="alert" <2> alert:title="Continue to next screen?" <3> alert:message= "Are you sure you want to navigate to the next screen?" <4>> <alert:option alert:label="Continue"> <5> <behavior action="push" href="/next" /> <6> </alert:option> <alert:option alert:label="Cancel" /> <7></behavior>
System alert action
Defines the namespace for the alert action.
The action of this behavior will bring up a system dialog
box.
Title of the dialog box.
Content of the dialog box.
A “continue” option in the dialog box
When “continue” is pressed, push a new screen onto the navigation
stack.
A “cancel” option that dismisses the dialog box.
Like the share behavior, alert uses a
namespace to define some attributes and elements. The
<behavior> element itself contains the
title and message attributes for the dialog
box. The button options for the dialog are defined using a new
<option> element nested in the
<behavior>. Notice that each
<option> element has a label, and then optionally
contains a <behavior> itself! This structure of the
HXML allows the system dialog to trigger any interaction that can be
defined as a <behavior>. In the example above,
pressing the “Continue” button will open a new screen. But we could just
as easily trigger an update action to change the current screen. We
could even open a share sheet, or a second dialog box. But please don’t
do that in a real app! With great power comes great responsibility.
Custom actions
You can build a lot of mobile UIs with Hyperview’s standard
navigation, update, and system actions. But the standard set may not
cover all interactions you will need for your mobile app. Luckily, the
action system is extensible. In the same way you can add custom elements
to Hyperview, you can also add custom behavior actions. Custom actions
have a similar syntax to the share and alert
actions, using namespaces for attributes that pass along extra data.
Custom actions also have full access to the HXML of the current screen,
so they can modify the state or add/remove elements from the current
screen. In the next chapter, we will create a custom behavior action to
enhance our mobile contacts app.
Triggers
We’ve already seen the simplest type of trigger, a press
on an element. Hyperview supports many other common triggers used in
mobile apps.
Long-press
Closely related to a press is a long-press. A behavior with
trigger="longPress" will trigger when the user presses and
holds on the element. “Long-press” interactions are often used for
shortcuts and power features. Sometimes, elements will support different
actions for both a press and longPress. This
is done using multiple <behavior> elements on the
same UI element.
In this example, a normal press will open a new screen and request
content from /next-screen. However, a long press will open
a new screen with content from /secret-screen. This is a
contrived example for the sake of brevity. A better UX would be for the
long-press to bring up a contextual menu of shortcuts and advanced
options. This could be achieved by using action="alert" and
opening a system dialog box with the shortcuts.
Load
Sometimes we want an action to trigger as soon as the screen loads.
trigger="load" does exactly this. One use case is to
quickly load a shell of the screen, and then fill in the main content on
the screen with a second update action.
Behavior that immediately fires off a request for /content to
replace the container
Loading UI that appears until the content is fetched and
replaced.
In this example, We load a screen with a heading (“My app”) but no
content. Instead, we show a <view> with ID
“container” and some “Loading…” text. As soon as this screen loads, the
behavior with trigger=load fires off the
replace action. It requests content from the
/content path and replaces the container view with the
response.
Visible
Unlike load, the visible trigger will only
execute the behavior when the element with the behavior is scrolled into
the viewport on the mobile device. The visible action is
commonly used to implement an infinite-scroll interaction on a
<list> of <item> elements. The
last item in the list includes a behavior with
trigger="visible". The append action will
fetch the next page of items and append them to the list.
Refresh
This trigger captures a “pull to refresh” action on
<list> and <view> items. This
interaction is associated with fetching up-to-date content from the
backend. Thus, it’s typically paired with an update or reload action to
show the latest data on the screen.
When the view is pulled down to refresh, reload the
screen.
Note that adding a behavior with trigger="refresh" to a
<view> or <list> will add the
pull-to-refresh interaction to the element, including showing a spinner
as the element is pulled down.
Focus, blur, and change
These triggers are related to interactions with input elements. Thus,
they will only trigger behaviors attached to elements like
<text-field>. focus and
blur will trigger when the user focuses and blurs the input
element, respectively. change will trigger when the value
of the input element changes, like when the user types a letter in a
text field. These triggers are often used with behaviors that need to
perform some server-side validation on the form fields. For example,
when the user types in a username and then blurs the field, a behavior
could trigger on blur to make a request to the backend and
check for uniqueness of the username. If the entered username is not
unique, the response could include an error message letting the user
know they need to pick a different username.
Using multiple behaviors
Most of the examples shown above attach a single
<behavior> to an element. But there’s no such
limitation in Hyperview; elements can define multiple behaviors. We
already saw an example where a single element had different actions
triggered on press and longPress. But we can
also trigger multiple actions on the same trigger.
In this admittedly contrived example, we want to hide two elements on
the screen when pressing the “Hide” button. The two elements are far
apart in the HXML, and cannot be hidden by hiding a common ancestor
element. But, we can trigger two behaviors at the same time, each one
executing a “hide” action but targeting different elements.
Hyperview processes behaviors in the order they appear in the markup.
In this case, the element with ID “area1” will be hidden first, followed
by the element with ID “area2”. Since “hide” is an instantaneous action
(ie, it doesn’t make an HTTP request), both elements will appear to hide
simultaneously. But what if we triggered two actions that depend on
responses from HTTP requests (like “replace-inner“)? In that case, each
individual action is processed as soon as Hyperview receives the HTTP
response. Depending on network latency, the two actions could take
effect in any order, and they are not guaranteed to be applied
simultaneously.
We’ve seen elements with multiple behaviors and different triggers.
And we’ve seen elements with multiple behaviors with the same trigger.
These concepts can be mixed together too. It’s not unusual for a
production Hyperview app to contain several behaviors, some triggering
together and others triggering on different interactions. Using multiple
behaviors with custom actions keeps HXML declarative, without
sacrificing functionality.
Summary
We’re covering a lot of new concepts here, and this introduction to
HXML just scratches the surface. To learn more about HXML, we recommend
consulting the official reference
documentation. For now, we hope you come away with a few key
takeaways.
First, HXML looks and feels similar to HTML. Web developers
comfortable with server-side rendering frameworks can use the same
techniques to write HXML. In addition to basic UI elements
(<view>, <text>,
<image>), HXML specifies elements to implement
mobile-specific UIs. This includes layout patterns
(<screen>, <list>,
<section-list>) and input elements
(<switch>, <select-single>,
<select-multiple>).
Second, interactions in HXML are defined using behaviors. Inspired by
htmx, <behavior> elements decouple user interactions
(triggers) from the resulting actions. There are three broad categories
of behavior actions:
Navigation actions (push, back) enable
navigating between the screens of a mobile app
Update actions (replace, append) enable
updating a screen with new fragments of HXML requested from the
server.
System actions (alert, share) enable
interacting with system-level functionality on iOS and Android.
Finally, HXML itself was designed for customization. Developers can
define custom elements and custom behavior actions to expand the
possible user interactions with their apps.
Hypermedia, for Mobile
There is a strong case for Hypermedia-Driven Applications on mobile.
Mobile app platforms push developers towards a thick-client
architecture. But apps that use a thick client suffer from the same
problems as SPAs on the web. Using the hypermedia architecture for
mobile apps can solve these problems.
Hyperview, based on a new format called HXML, offers a path here. It
provides an open-source mobile thin client to render HXML. And HXML
opens a toolkit of elements and patterns that correspond to mobile UIs.
Developers can evolve Hyperview to suit their apps” requirements, while
fully embracing the hypermedia architecture. That’s a win.
Yes, hypermedia can work for mobile apps, too. In the next two
chapters we’ll show how by turning the Contact.app web application into
a native mobile app using Hyperview.
Hypermedia Notes: Maximize Your Server-Side
Strengths
In the Hyperview sections of the book, since we aren’t using HTML, we
are going to make broader observations on hypermedia rather than offer
HTML-specific advice and thoughts.
A big advantage of the hypermedia-driven approach is that it makes
the server-side environment far more important when building your web
application. Rather than simply producing JSON, your back end is an
integral component in the user experience of your hypermedia
application.
Because of this, it makes sense to look deeply into the functionality
available there. Many older web frameworks, for example, have incredibly
deep functionality available around producing HTML. Features like
server-side caching can make the difference between an incredibly snappy
web application and a sluggish user experience.
Take time to learn all the tools available to you.
A good rule of thumb is to shoot to have server responses in your
hypermedia-driven application take less than 100ms to complete, and
mature server-side frameworks have tools to help make this happen.
Server-side environments often have extremely mature mechanisms for
factoring (or organizing) your code properly. The Model/View/Controller
pattern is well-developed in most environments, and tools like modules,
packages, etc. provide an excellent way to organize your code.
Whereas today’s SPA and mobile user interfaces are typically
organized via components, hypermedia-driven applications are typically
organized via template inclusion, where the server-side templates are
broken up according to the hypermedia-rendering needs of the
application, and then included in one another as needed. This tends to
lead to fewer, chunkier files than you would find in a component-based
application.
Another technology to look for are Template Fragments, which allow
you to render only part of a template file. This can reduce even further
the number of template files required for your server-side
application.
A related tip is to take advantage of direct access to the data
store. When an application is built using a thick client approach, the
data store typically lives behind a data API (e.g. JSON). This level of
indirection often prevents front end developers from being able to take
full advantage of the tools available in the data store. GraphQL, for
example, can help address this issue, but comes with security-related
issues that do not appear to be well understood by many developers.
When you produce your hypermedia on the server side, on the other
hand, the developer creating that hypermedia can have full access to the
data store and take advantage of, for example, joins and aggregation
functions in SQL stores.
This puts far more expressive power directly in the hands of the
developer producing the final hypermedia. Because your hypermedia API
can be structured around your UI needs, you can tune each endpoint to
issue as few data store requests as possible.
A good rule of thumb is that every request to your server should
shoot to have three or fewer data-store accesses. If you follow this
rule of thumb, your hypermedia-driven application should be extremely
snappy.
Earlier chapters in this book explained the benefits of building apps
using the hypermedia architecture. These benefits were demonstrated by
building a robust Contacts web application. Then, Chapter 11 argued that
hypermedia concepts can and should be applied to platforms other than
the web. We introduced Hyperview as an example of a hypermedia format
and client specifically designed for building mobile apps. But you may
still be wondering: what is it like to create a fully-featured,
production-ready mobile app using Hyperview? Do we have to learn a whole
new language and framework? In this chapter, we will show Hyperview in
action by porting the Contacts web app to a native mobile app. You will
see that many web development techniques (and indeed, much of the code)
are completely identical when developing with Hyperview. How is that
possible?
Our Contacts web app was built with the principle of HATEOAS
(Hypermedia as the Engine of Application State). All of the app’s
features (retrieving, searching, editing, and creating contacts) are
implemented in the backend (the Contacts Python class). Our
mobile app, built with Hyperview, also leverages HATEOAS and relies on
the backend for all of the app’s logic. That means the
Contacts Python class can power our mobile app the same way
it powers the web app, without any changes required.
The client-server communication in the web app happens using
HTTP. The HTTP server for our web app is written using the Flask
framework. Hyperview also uses HTTP for client-server communication. So
we can re-use the Flask routes and views from the web app for the mobile
app as well.
The web app uses HTML for its hypermedia format, and Hyperview
uses HXML. HTML and HXML are different formats, but the base syntax is
similar (nested tags with attributes). This means we can use the same
templating library (Jinja) for HTML and HXML. Additionally, many of the
concepts of htmx are built into HXML. We can directly port web app
features implemented with htmx (search, infinite loading) to
HXML.
Essentially, we can re-use almost everything from the web app
backend, but we will need to replace the HTML templates with HXML
templates. Most of the sections in this chapter will assume we have the
web contacts app running locally and listening on port 5000. Ready?
Let’s create new HXML templates for our mobile app’s UI.
Creating a mobile app
To get started with HXML, there’s one pesky requirement: the
Hyperview client. When developing web applications, you only need to
worry about the server because the client (web browser) is universally
available. There’s no equivalent Hyperview client installed on every
mobile device. Instead, we will create our own Hyperview client,
customized to only talk to our server. This client can be packaged up
into an Android or iOS mobile app, and distributed through the
respective app stores.
Luckily, we don’t need to start from scratch to implement a Hyperview
client. The Hyperview code repository comes with a demo backend and a
demo client built using Expo. We will use this demo client but point it
to our contacts app backend as a starting point.
Start the Expo server to run the mobile app in the iOS
simulator.
After running yarn start, you will be presented with a
prompt asking you to open the mobile app using an Android emulator or
iOS simulator. Select an option based on which developer SDK you have
installed. (The screenshots in this chapter will be taken from the iOS
simulator.) With any luck, you will see the Expo mobile app installed in
the simulator. The mobile app will automatically launch and show a
screen saying “Network request failed.” That’s because by default, this
app is configured to make a request to http://0.0.0.0:8085/index.xml,
but our backend is listening on port 5000. To fix this, we can make a
simple configuration change in the demo/src/constants.js
file:
We’re not up and running yet. With our Hyperview client now pointing
to the right endpoint, we see a different error, a “ParseError.” That’s
because the backend is responding to requests with HTML content, but the
Hyperview client expects an XML response (specifically, HXML). So it’s
time to turn our attention to our Flask backend. We will go through the
Flask views, and replace the HTML templates with HXML templates.
Specifically, let’s support the following features in our mobile
app:
A searchable list of contacts
Viewing the details of a contact
Editing a contact
Deleting a contact
Adding a new contact
Zero Client-Configuration in Hypermedia
Applications
For many mobile apps that use the Hyperview client, configuring this
entry point URL is the only on-device code you need to write to deliver
a full-featured app. Think of the entry point URL as the address you
type into a web browser to open a web app. Except in Hyperview, there is
no address bar, and the browser is hard-coded to only open one URL. This
URL will load the first screen when a user launches the app. Every other
action the user can take will be declared in the HXML of that first
screen. This minimal configuration is one of the benefits of the
Hypermedia-driven architecture.
Of course, you may want to write more on-device code to support more
features in your mobile app. We will demonstrate how to do that later in
this chapter, in the section called “Extending the Client.”
A Searchable List of
Contacts
We will start building our Hyperview app with the entry point screen,
the list of contacts. For the initial version of this screen, let’s
support the following features from the web app:
display a scrollable list of contacts
“search-as-you-type” field above the list
“infinite-scroll” to load more contacts as the user scrolls
through
Additionally, we will add a “pull-to-refresh” interaction on the
list, since users expect this from list UIs in mobile apps.
If you recall, all of the pages in the Contacts web app extended a
common base template, layout.html. We need a similar base
template for the screens of the mobile app. This base template will
contain the style rules of our UI, and a basic structure common to all
screens. Let’s call it layout.xml.
The header section of the template, with a default
title.
The content section of the template, to be provided by other
templates.
We’re using the HXML tags and attributes covered in the previous
chapter. This template sets up a basic screen layout using
<doc>, <screen>,
<body>, <header>, and
<view> tags. Note that the HXML syntax plays well
with the Jinja templating library. Here, we’re using Jinja’s blocks to
define two sections (header and content) that
will hold the unique content of a screen. With our base template
completed, we can create a template specifically for the contacts list
screen.
Create a search form that will issue an HTTP GET to
/contacts
The list of contacts, using a Jinja include
tag.
This template extends the base layout.xml, and overrides
the content block with a <form>. At
first, it might seem strange that the form wraps both the
<text-field> and the <list>
elements. But remember: in Hyperview, the form data gets included in any
request originating from a child element. We will soon add interactions
to the list (pull to refresh) that will require the form data. Note the
use of a Jinja include tag to render the HXML for the rows
of contacts in the list (hv/rows.xml). Just like in the
HTML templates, we can use the include to break up our HXML
into smaller pieces. It also allows the server to respond with just the
rows.xml template for interactions like searching, infinite
scroll, and pull-to-refresh.
An HXML element that groups a set of <item>
elements in a common ancestor.
Iterate over the contacts that were passed in to the
template.
Render an <item> for each contact, showing the
name, phone number, or email.
In the web app, each row in the list showed the contact’s name, phone
number, and email address. But in a mobile app, we have less
real-estate. It would be hard to cram all this information into one
line. Instead, the row just shows the contact’s first and last name, and
falls back to phone or email if the name is not set. To render the row,
we again make use of Jinja template syntax to render dynamic text with
data passed to the template.
We now have templates for the base layout, the contacts screen, and
the contact rows. But we still have to update the Flask views to use
these templates. Let’s take a look at the contacts() view
in its current form, written for the web app:
This view supports fetching a set of contacts based on two query
params, q and page. It also decides whether to
render the full page (index.html) or just the contact rows
(rows.html) based on the HX-Trigger header.
This presents a minor problem. The HX-Trigger header is set
by the htmx library; there’s no equivalent feature in Hyperview.
Moreover, there are multiple scenarios in Hyperview that require us to
respond with just the contact rows:
searching
pull-to-refresh
loading the next page of contacts
Since we can’t depend on a header like HX-Trigger, we
need a different way to detect if the client needs the full screen or
just the rows in the response. We can do this by introducing a new query
param, rows_only. When this param has the value
true, the view will respond to the request by rendering the
rows.xml template. Otherwise, it will respond with the
index.xml template:
Render the appropriate HXML template based on
rows_only.
There’s one more change we have to make. Flask assumes that most
views will respond with HTML. So Flask defaults the
Content-Type response header to a value of
text/html. But the Hyperview client expects to receive HXML
content, indicated by a Content-Type response header with
value application/vnd.hyperview+xml. The client will reject
responses with a different content type. To fix this, we need to
explicitly set the Content-Type response header in our
Flask views. We will do this by introducing a new helper function,
render_to_response():
Renders the given template with the supplied arguments and
keyword arguments.
Create an explicit response object with the rendered
template.
Sets the response Content-Type header to
XML.
As you can see, this helper function uses
render_template() under the hood.
render_template() returns a string. This helper function
uses that string to create an explicit Response object. The
response object has a headers attribute, allowing us to set
and change the response headers. Specifically,
render_to_response() sets Content-Type to
application/vnd.hyperview+xml so that the Hyperview client
recognizes the content. This helper is a drop-in replacement for
render_template in our views. So all we need to do is
update the last line of the contacts() function.
With these changes to the contacts() view, we can
finally see the fruits of our labor. After restarting the backend and
refreshing the screen in our mobile app, we can see the contacts
screen!
Contacts Screen
Searching Contacts
So far, we have a mobile app that displays a screen with a list of
contacts. But our UI doesn’t support any interactions. Typing a query in
the search field doesn’t filter the list of contacts. Let’s add a
behavior to the search field to implement a search-as-you-type
interaction. This requires expanding <text-field> to
add a <behavior> element.
This behavior will trigger when the value of the text field
changes.
When the behavior triggers, the action will replace the content
inside the target element.
The target of the action is the element with ID
contacts-list.
The replacement content will be fetched from this URL
path.
The replacement content will be fetched with the GET
HTTP method.
The first thing you’ll notice is that we changed the text field from
using a self-closing tag (<text-field />) to using
opening and closing tags
(<text-field>…</text-field>). This allows us to
add a child <behavior> element to define an
interaction.
The trigger="change" attribute tells Hyperview that a
change to the value of the text field will trigger an action. Any time
the user edits the content of the text field by adding or deleting
characters, an action will trigger.
The remaining attributes on the <behavior> element
define the action. action="replace-inner" means the action
will update content on the screen, by replacing the HXML content of an
element with new content. For replace-inner to do its
thing, we need to know two things: the current element on the screen
that will be targeted by the action, and the content that will used for
the replacement. target="contacts-list" tells us the ID of
the current element. Note that we set id="contacts-list" on
the <list> element in index.xml. So when
the user enters a search query into the text field, Hyperview will
replace the content of <list> (a bunch of
<item> elements) with new content
(<item> elements that match the search query)
received in the relative href response. The domain here is inferred from
the domain used to fetch the screen. Note that href
includes our rows_only query param; we want the response to
only include the rows and not the entire screen.
Searching for Contacts
That’s all it takes to add search-as-you-type functionality to our
mobile app! As the user types a search query, the client will make
requests to the backend and replace the list with the search results.
You may be wondering, how does the backend know the query to use? The
href attribute in the behavior does not include the
q param expected by our backend. But remember, in
index.xml, we wrapped the <text-field>
and <list> elements with a <form>
element. The <form> element defines a group of inputs
that will be serialized and included in any HTTP requests triggered by
its child elements. In this case, the <form> element
surrounds the search behavior and the text field. So the value of the
<text-field> will be included in our HTTP request for
the search results. Since we are making a GET request, the
name and value of the text field will be serialized as a query param.
Any existing query params on the href will be preserved.
This means the actual HTTP request to our backend looks like
GET /contacts?rows_only=true&q=Car. Our backend already
supports the q param for searching, so the response will
include rows that match the string “Car.”
Infinite scroll
If the user has hundreds or thousands of contacts, loading them all
at once may result in poor app performance. That’s why most mobile apps
with long lists implement an interaction known as “infinite scroll.” The
app loads a fixed number of initial items in the list, let’s say 100
items. If the user scrolls to the bottom of the list, they see a spinner
indicating more content is loading. Once the content is available, the
spinner is replaced with the next page of 100 items. These items are
appended to the list, they don’t replace the first set of items. So the
list now contains 200 items. If the user scrolls to the bottom of the
list again, they will see another spinner, and the app will load the
next set of content. Infinite scroll improves app performance in two
ways:
The initial request for 100 items will be processed quickly, with
predictable latency.
Subsequent requests can also be fast and predictable.
If the user doesn’t scroll to the bottom of the list, the app
won’t have to make subsequent requests.
Our Flask backend already supports pagination on the
/contacts endpoint via the page query param.
We just need to modify our HXML templates to make use of this parameter.
To do this, let’s edit rows.xml to add a new
<item> below the Jinja for-loop:
Include an extra <item> in the list to show
the spinner.
The item behavior triggers when visible in the viewport.
When triggered, the behavior will replace an element on the
screen.
The element to be replaced is the item itself (ID
load-more).
Replace the item with the next page of content.
The spinner element.
If the current list of contacts passed to the template is empty, we
can assume there’s no more contacts to fetch from the backend. So we use
a Jinja conditional to only include this new <item>
if the list of contacts is non-empty. This new <item>
element gets an ID and a behavior. The behavior defines the infinite
scroll interaction.
Up until now, we’ve seen trigger values of
change and refresh. But to implement infinite
scroll, we need a way to trigger the action when the user scrolls to the
bottom of the list. The visible trigger can be used for
this exact purpose. It will trigger the action when the element with the
behavior is visible in the device viewport. In this case, the new
<item> element is the last item in the list, so the
action will trigger when the user scrolls down far enough for the item
to enter the viewport. As soon as the item is visible, the action will
make an HTTP GET request, and replace the loading
<item> element with the response content.
Note that our href must include the rows_only=true query
param, so that our response will only include HXML for the contact
items, and not the entire screen. Also, we’re passing the
page query param, incrementing the current page number to
ensure we load the next page.
What happens when there’s more than one page of items? The initial
screen will include the first 100 items, plus the “load-more” item at
the bottom. When the user scrolls to the bottom of the screen, Hyperview
will request the second page of items (&page=2), and
replace the “load-more” item with the new items. But this second page of
items will include a new “load-more” item. So once the user scrolls
through all of the items from the second page, Hyperview will again
request more items (&page=3). And once again, the
“load-more” item will be replaced with the new items. This will continue
until all of the items will be loaded on the screen. At that point,
there will be no more contacts to return, the response will not include
another “load-more” item, and our pagination is over.
Pull-to-refresh
Pull-to-refresh is a common interaction in mobile apps, especially on
screens featuring dynamic content. It works like this: At the top of a
scrolling view, the user pulls the scrolling content downwards with a
swipe-down gesture. This reveals a spinner “below” the content. Pulling
the content down sufficiently far will trigger a refresh. While the
content refreshes, the spinner remains visible on screen, indicating to
the user that the action is still taking place. Once the content is
refreshed, the content retracts back up to its default position, hiding
the spinner and letting the user know that the interaction is done.
Pull-to-refresh
This pattern is so common and useful that it’s built in to Hyperview
via the refresh action. Let’s add pull-to-refresh to our
list of contacts to see it in action.
This behavior will trigger when the user does a “pull-to-refresh”
gesture.
When the behavior triggers, this action will replace the content
inside the target element.
The target of the action is the <list> element
itself.
The replacement content will be fetched from this URL
path.
The replacement content will be fetched with the GET
HTTP method.
You’ll notice something unusual in the snippet above: rather than
adding a <behavior> element to the
<list>, we added the behavior attributes directly to
the <list> element. This is a shorthand notation
that’s sometimes useful for specifying single behaviors on an element.
It is equivalent to adding a <behavior> element to
the <list> with the same attributes.
So why did we use the shorthand syntax here? It has to do with the
action, replace-inner. Remember, this action replaces all
child elements of the target with the new content. This includes
<behavior> elements too! Let’s say our
<list> did contain a <behavior>.
If the user did a search or pull-to-refresh, we would replace the
content of <list> with the content from
rows.xml. The <behavior> would no longer
be defined on the <list>, and subsequent attempts to
pull-to-refresh would not work. By defining the behavior as attributes
of <list>, the behavior will persist even when
replacing the items in the list. Generally, we prefer to use explicit
<behavior> elements in HXML. It makes it easier to
define multiple behaviors, and to move the behavior around while
refactoring. But the shorthand syntax is good to apply in situations
like this.
Viewing The Details Of A
Contact
Now that our contacts list screen is in good shape, we can start
adding other screens to our app. The natural next step is to create a
details screen, which appears when the user taps an item in the contacts
list. Let’s update the template that renders the contact
<item> elements, and add a behavior to show the
details screen.
Behavior to push the contact details screen onto the stack when
pressed.
Our Flask backend already has a route for serving the contact details
at /contacts/<contact_id>. In our template, we use a
Jinja variable to dynamically generate the URL path for the current
contact in the for-loop. We also used the “push” action to show the
details by pushing a new screen onto the stack. If you reload the app,
you can now tap any contact in the list, and Hyperview will open the new
screen. However, the new screen will show an error message. That’s
because our backend is still returning HTML in the response, and the
Hyperview client expects HXML. Let’s update the backend to respond with
HXML and the proper headers.
Generate an XML response from a new template file.
Just like the contacts() view,
contacts_view() uses render_to_response() to
set the Content-Type header on the response. We’re also
generating the response from a new HXML template, which we can create
now:
Override the header block of the layout template to
include a “Back” button.
Behavior to navigate to the previous screen when
pressed.
Override the content block to show the full details
of the selected contact.
The contacts detail screen extends the base layout.xml
template, just like we did in index.xml. This time, we’re
overriding content in both the header block and
content block. Overriding the header block lets us add a
“Back” button with a behavior. When pressed, the Hyperview client will
unwind the navigation stack and return the user to the contacts
list.
Note that triggering this behavior is not the only way to navigate
back. The Hyperview client respects navigation conventions on different
platforms. On iOS, users can also navigate to the previous screen by
swiping right from the left edge of the device. On Android, users can
also navigate to the previous screen by pressing the hardware back
button. We don’t need to specify anything extra in the HXML to get these
interactions.
Contact Details Screen
With just a few simple changes, we’ve gone from a single-screen app
to a multi-screen app. Note that we didn’t need to change anything in
the actual mobile app code to support our new screen. This is a big
deal. In traditional mobile app development, adding screens can be a
significant task. Developers need to create the new screen, insert it
into the appropriate place of the navigation hierarchy, and write code
to open the new screen from existing screens. In Hyperview, we just
added a behavior with action="push".
Editing a Contact
So far, our app lets us browse a list of contacts, and view details
of a specific contact. Wouldn’t it be nice to update the name, phone
number, or email of a contact? Let’s add UI to edit contacts as our next
enhancement.
First we have to figure out how we want to display the editing UI. We
could push a new editing screen onto the stack, the same way we pushed
the contact details screen. But that’s not the best design from a
user-experience perspective. Pushing new screens makes sense when
drilling down into data, like going from a list to a single item. But
editing is not a “drill-down” interaction, it’s a mode switch between
viewing and editing. So instead of pushing a new screen, let’s replace
the current screen with the editing UI. That means we need to add a
button and behavior that use the reload action. This button
can be added to the header of the contact details screen.
Behavior to reload the current screen with the edit screen when
pressed.
Once again, we’re reusing an existing Flask route
(/contacts/<contact_id>/edit) for the edit UI, and
filling in the contact ID using data passed to the Jinja template. We
also need to update the contacts_edit_get() view to return
an XML response based on an HXML template (hv/edit.xml).
We’ll skip the code sample because the needed changes are identical to
what we applied to contacts_view() in the previous section.
Instead, let’s focus on the template for the edit screen.
Button to submit the form data and update the input fields
container.
Since the edit screen needs to send data to the backend, we wrap the
entire content section in a <form> element. This
ensures the form field data will be included in the HTTP requests to our
backend. Within the <form> element, our UI is divided
into two sections: the form fields, and the Save button. The actual form
fields are defined in a separate template (form_fields.xml)
and added to the edit screen using a Jinja include tag.
Text input holding the current value for the contact’s first
name.
Text element that could display errors from the contact
model.
Another text field, this time for the contact’s last
name.
We omitted the code for the contact’s phone number and email address,
because they follow the same pattern as the first and last name. Each
contact field has its own <text-field>, and a
<text> element below it to display possible errors.
The <text-field> has two important attributes:
name defines the name to use when serializing the
text-field’s value into form data for HTTP requests. We are using the
same names as the web app from previous chapters
(first_name, last_name, phone,
email). That way, we don’t need to make changes in our
backend to parse the form data.
value defines the pre-filled data in the text field.
Since we are editing an existing contact, it makes sense to pre-fill the
text field with the current name, phone, or email.
You might be wondering, why did we choose to define the form fields
in a separate template (form_fields.xml)? To understand
that decision, we need to first discuss the “Save” button. When pressed,
the Hyperview client will make an HTTP POST request to
contacts/<contact_id>/edit, with form data serialized
from the <text-field> inputs. The HXML response will
replace the contents of form field container (ID
form-fields). But what should that response be? That
depends on the validity of the form data:
If the data is invalid (e.g., duplicate email address), our UI
will remain in the editing mode and show error messages on the invalid
fields. This allows the user to correct the errors and try saving
again.
If the data is valid, our backend will persist the edits, and our
UI will switch back to a display mode (the contact details UI).
So our backend needs to distinguish between a valid and invalid edit.
To support these two scenarios, let’s make some changes to the existing
contacts_edit_post() view in the Flask app.
Update the contact object from the request’s form data.
Attempt to persist the updates. This returns False
for invalid data.
On success, render the form fields template, and pass a
saved flag to the template
On failure, render the form fields template. Error messages are
present on the contact object.
This view already contains conditional logic based on whether the
contact model save() succeeds. If save()
fails, we render the form_fields.xml template.
contact.errors will contain error messages for the invalid
fields, which will be rendered into the
<text style="edit-field-error"> elements. If
save() succeeds, we will also render the
form_fields.xml template. But this time, the template will
get a saved flag, indicating success. We will update the
template to use this flag to implement our desired UI: switching the UI
back to display mode.
<view style="edit-group"> {% if saved %} <1> <behavior trigger="load"<2> action="reload" <3> href="/contacts/{{contact.id}}" <4> /> {% endif %} <view style="edit-field"> <text-field name="first_name" placeholder="First name" value="{{ contact.first }}" /> <text style="edit-field-error">{{ contact.errors.first }}</text> </view><!-- same markup for the other fields --></view>
hv/form_fields.xml
Only include this behavior after successfully saving a
contact.
Trigger the behavior immediately.
The behavior will reload the entire screen.
The screen will be reloaded with the contact details
screen.
The Jinja template conditional ensures that our behavior only renders
on successful saves, and not when the screen first opens (or the user
submits invalid data). On success, the template includes a behavior that
triggers immediately thanks to trigger="load". The action
reloads the current screen with the Contact Details screen (from the
/contacts/<contact_id> route).
The result? When the user hits “Save”, our backend persists the new
contact data, and the screen switches back to the Details screen. Since
the app will make a new HTTP request to get the contact details, it’s
guaranteed to show the freshly saved edits.
Why Not Redirect?
You may remember the web app version of this code behaved a little
differently. On a successful save, the view returned
redirect("/contacts/" + str(contact_id)). This HTTP
redirect would tell the web browser to navigate to the contact details
page.
This approach is not supported in Hyperview. Why? A web app’s
navigation stack is simple: a linear sequence of pages, with only one
active page at a time. Navigation in a mobile app is considerably more
complex. Mobile apps use a nested hierarchy of navigation stacks,
modals, and tabs. All screens in this hierarchy are active, and may be
displayed instantly in response to user actions. In this world, how
would the Hyperview client interpret an HTTP redirect? Should it reload
the current screen, push a new one, or navigate to a screen in the stack
with the same URL?
Instead of making a choice that would be suboptimal for many
scenarios, Hyperview takes a different approach. Server-controlled
redirects are not possible, but the backend can render navigation
behaviors into the HXML. This is what we do to switch from the Edit UI
to the Details UI in the code above. Think of these as client-side
redirects, or better yet client-side navigations.
We now have a working Edit UI in our contacts app. Users can enter
the Edit mode by pressing a button on the contact details screen. In the
Edit mode, they can update the contact’s data and save it to the
backend. If the backend rejects the edits as invalid, the app stays in
Edit mode and shows the validation errors. If the backend accepts and
persists the edits, the app will switch back to the details mode,
showing the updated contact data.
Let’s add one more enhancement to the Edit UI. It would be nice to
let the user switch away from the Edit mode without needing to save the
contact. This is typically done by providing a “Cancel” action. We can
add this as a new button below the “Save” button.
The screen will be reloaded with the contact details
screen.
This is the same technique we used to switch from the edit UI to the
details UI upon successfully editing the contact. But pressing “Cancel”
will update the UI faster than pressing “Save.” On save, the app will
first make a POST request to save the data, and then a
GET request for the details screen. Cancelling skips the
POST, and immediately makes the GET
request.
Contact Edit Screen
Updating the Contacts List
At this point, we can claim to have fully implemented the Edit UI.
But there’s a problem. In fact, if we stopped here, users may even
consider the app to be buggy! Why? It has to do with syncing the app
state across multiple screens. Let’s walk through this series of
interactions:
Launch the app to the Contacts List.
Press on the contact “Joe Blow” to load his Contact
Details.
Press Edit to switch to the edit mode, and change the contact’s
first name to “Joseph.”
Press Save to switch back to viewing mode. The contact’s name is
now “Joseph Blow.”
Hit the back button to return to the Contacts List.
Did you catch the issue? Our Contacts list is still showing the same
list of names as when we launched the app. The contact we just renamed
to “Joseph” is still showing up in the list as “Joe.” This is a general
problem in hypermedia applications. The client does not have a notion of
shared data across different parts of the UI. Updates in one part of the
app will not automatically update other parts of the app.
Luckily, there’s a solution to this problem in Hyperview: events.
Events are built into the behavior system, and allow lightweight
communication between different parts of the UI.
Event Behaviors
Events are a client-side feature of Hyperview. In Client-Side Scripting,
we discussed events while working with HTML, _hyperscript and the DOM.
DOM Elements will dispatch events as a result of user interactions.
Scripts can listen for these events, and respond to them by running
arbitrary JavaScript code.
Events in Hyperview are a good deal simpler, but they don’t require
any scripting and can be defined declaratively in the HXML. This is done
through the behavior system. Events require adding a new behavior
attribute, action type, and trigger type:
event-name: This attribute of
<behavior> defines the name of the event that will
either be dispatched or listened for.
action="dispatch-event": When triggered, this
behavior will dispatch an event with the name defined by the
event-name attribute. This event is dispatched globally
across the entire Hyperview app.
trigger="on-event": This behavior will trigger if
another behavior in the app dispatches an event matching the
event-name attribute.
If a <behavior> element uses
action="dispatch-event" or trigger="on-event",
it must also define an event-name. Note that multiple
behaviors can dispatch an event with the same name. Likewise, multiple
behaviors can trigger on the same event name.
Pressing an element containing this behavior will toggle the
visibility of an element with the ID “container”. But what if the
element we want to toggle is on a different screen? The “toggle” action
and target ID lookup only work on the current screen, so this solution
wouldn’t work. The solution is to create two behaviors, one on each
screen, communicating via events:
Pressing an element containing the first behavior (on Screen A) will
dispatch an event with the name “button-pressed”. The second behavior
(on Screen B) will trigger on an event with this name, and toggle the
visibility of an element with ID “container”.
Events have plenty of uses, but the most common is to inform
different screens about backend state changes that require the UI to be
re-fetched.
We now know enough about Hyperview’s event system to solve the bug in
our app. When the user saves a change to a contact, we need to dispatch
an event from the Details screen. And the Contacts screen needs to
listen to that event, and reload itself to reflect the edits. Since the
form_fields.xml template already gets the
saved flag when the backend successfully saves a contact,
it’s a good place to dispatch the event:
Trigger the behavior for dispatched events with the name
“contact-updated”.
When triggered, replace the contents of the
<list> element with rows from the backend.
Any time the user edits a contact, the Contacts List screen will
update to reflect the edits. The addition of these two
<behavior> elements fixes the bug: the Contacts List
screen will correctly show “Joseph Blow” in the list. Note that we
intentionally added the new behavior inside the
<form> element. The ensures the triggered request
will preserve any search query.
To show what we mean, let’s revisit the set of steps that
demonstrated the buggy behavior. Assume that before pressing on “Joe
Blow,” the user had searched the contacts by typing “Joe” in the search
field. When the user later updates the contact to “Joseph Blow”, our
template dispatches the “contact-updated” event, which triggers the
replace-inner behavior on the contact list screen. Due to
the <form> element, the search query “Joe” will be
serialized with the request:
GET /contacts?rows_only=true&q=Joe. Since the name
“Joseph” doesn’t match the query “Joe”, the contact we edited will not
appear in the list (until the user clears out the query). Our app’s
state remains consistent across our backend and all active screens.
Events introduce a level of abstraction to behaviors. So far, we’ve
seen that editing a contact will cause the list of contacts to refresh.
But the list of contacts should also refresh after other actions, such
as deleting a contact or adding a new contact. As long as our HXML
responses for deletion or creation include a behavior to dispatch a
contact-updated event, then we will get the desired refresh
behavior on the contacts list screen.
The screen doesn’t care what causes the contact-updated
event to be dispatched. It just knows what it needs to do when it
happens.
Deleting a Contact
Speaking of deleting a contact, this is a good next feature to
implement. We will let users delete a contact from the Edit UI. So let’s
add a new button to edit.xml.
When pressed, append HXML to a container on the screen.
The HXML will be fetched by making a
POST /contacts/<contact_id>/delete request.
The HXML for the Delete button is pretty similar to the Save button,
but there are a few subtle differences. Remember, pressing the Save
button results in one of two expected outcomes: failing and showing
validation errors on the form, or succeeding and switching to the
contact details screen. To support the first outcome (failing and
showing validation errors), the save behavior replaces the contents of
the <view id="form-fields"> container with a
re-rendered version of form_fields.xml. Therefore, using
the replace-inner action makes sense.
Deletion does not involve a validation step, so there’s only one
expected outcome: successfully deleting the contact. When deletion
succeeds, the contact no longer exists. It doesn’t make sense to show
the edit UI or contact details for a non-existent contact. Instead, our
app will navigate back to the previous screen (the contacts list). Our
response will only include behaviors that trigger immediately, there’s
no UI to change. Therefore, using the append action will
preserve the current UI while Hyperview runs the actions.
On load, dispatch the contact-updated event to
update the contact lists screen.
Navigate back to the contacts list screen.
Note that in addition to behavior to navigate back, this template
also includes a behavior to dispatch the contact-updated
event. In the previous chapter section, we added a behavior to
index.xml to refresh the list when that event is
dispatched. By dispatching the event after a deletion, we will make sure
the deleted contact gets removed from the list.
Once again, we’ll skip over the changes to the Flask backend. Suffice
it to say, we will need to update the contacts_delete()
view to respond with the hv/deleted.xml template. And we
need to update the route to support POST in addition to
DELETE, since the Hyperview client only understands
GET and POST.
We now have a fully functioning deletion feature! But it’s not the
most user-friendly: it takes one accidental tap to permanently delete a
contact. For destructive actions like deleting a contact, it’s always a
good idea to ask the user for confirmation.
We can add a confirmation to the delete behavior by using the
alert system action described in the previous chapter. As
you recall, the alert action will show a system dialog box
with buttons that can trigger other behaviors. All we have to do is wrap
the delete <behavior> in a behavior that uses
action="alert".
Pressing “Delete” triggers an action to show the system dialog
with the given title and message.
The first pressable option in the system dialog.
Pressing the first option will trigger contact deletion.
The second pressable option has no behavior, so it only closes
the dialog.
Unlike before, pressing the delete button will not have an immediate
effect. Instead, the user will be presented with the dialog box and
asked to confirm or cancel. Our core deletion behavior didn’t change, we
just chained it from another behavior.
Delete Contact confirmation
Adding a New Contact
Adding a new contact is the last feature we want to support in our
mobile app. And luckily, it’s also the easiest. We can reuse the
concepts (and even some templates) from features we’ve already
implemented. In particular, adding a new contact is very similar to
editing an existing contact. Both features need to:
Show a form to collect information about the contact.
Have a way to save the entered information.
Show validation errors on the form.
Persist the contact when there are no validation errors.
Since the functionality is so similar, we’ll summarize the changes
here without showing the code.
Update index.xml.
Override the header block to add a new “Add”
button.
Include a behavior in the button. When pressed, push a new screen
as a modal by using action="new", and request the screen
content from /contacts/new.
Create a template hv/new.xml.
Override the header block to include a button that closes the
modal, using action="close".
Include the hv/form_fields.xml template to render
empty form fields
Add a “Add Contact” button below the form fields.
Include a behavior in the button. When pressed, make a
POST request to /contacts/new, and use
action="replace-inner" to update the form fields.
Update the Flask view.
Change contacts_new_get() to use
render_to_response() with the hv/new.xml
template.
Change contacts_new() to use
render_to_response() with the
hv/form_fields.xml template. Pass saved=True
when rendering the template after successfully persisting the new
contact.
Add Contact modal
By reusing form_fields.xml for both editing and adding a
contact, we get to reuse some code and ensure the two features have a
consistent UI. Also, our “Add Contact” screen will benefit from the
“saved” logic that’s already a part of form_fields.xml.
After successfully adding a new contact, the screen will dispatch the
contact-updated event, which will refresh the contacts list
and show the newly added contact. The screen will reload itself to show
the Contact Details.
Deploying the App
With the completion of the contact creation UI, we have a fully
implemented mobile app. It supports searching a list of contacts,
viewing the details of a contact, editing and deleting a contact, and
adding a new contact. But so far, we’ve been developing the app using a
simulator on our desktop computer. How can we see it running on a mobile
device? And how can we get it into the hands of our users?
To see the app running on a physical device, let’s take advantage of
the Expo platform’s app preview functionality.
Download the Expo Go app on an Android or iOS device.
Restart the Flask app, binding to an interface accessible on your
network. This might look something like
flask run --host 192.168.7.229, where the host is your
computer’s IP address on the network.
Update the Hyperview client code so that
ENTRY_POINT_URL (in demo/src/constants.js)
points to the IP and port that the Flask server is bound to.
After running yarn start in the Hyperview demo app,
you will see a QR code printed in the console, with instructions on how
to scan it on Android and iOS.
Once you scan the QR code, the full app will run on the device. As
you interact with the app, you will see HTTP requests made to the Flask
server. You can even use the physical device during development. Any
time you make a change in the HXML, just reload the screen to see the UI
updates.
So we have the app running on a physical device, but it’s still not
production ready. To get the app into the hands of our users, there’s a
few things we need to do:
Deploy our backend in production. We need to use a
production-grade web server like Gunicorn instead of the Flask
development server. And we should run our app on a machine reachable on
the Internet, most likely using a cloud provider like AWS or
Heroku.
Create standalone binary apps. By following the instructions from
the Expo project, we can create a .ipa or .apk
file, for the iOS and Android platforms. Remember to update
ENTRY_POINT_URL in the Hyperview client to point to the
production backend.
Submit our binaries to the iOS App Store or Google Play Store,
and wait for app approval.
Once the app is approved, congratulations! Our mobile app can be
downloaded by Android and iOS users. And here’s the best part: Because
our app uses the hypermedia architecture, we can add features to our app
by simply updating the backend. The UI and interactions are completely
specified with the HXML generated from server-side templates. Want to
add a new section to a screen? Just update an existing HXML template.
Want to add a new type of screen to the app? Create a new route, view,
and HXML template. Then, add a behavior to an existing screen that will
open the new screen. To push these changes to your users, you just need
to re-deploy the backend. Our app knows how to interpret HXML, and
that’s enough for it to understand how to handle the new features.
One Backend, Multiple
Hypermedia formats
To create a mobile app using the hypermedia architecture, we started
with the web-based contacts app and made a few changes, primarily
replacing HTML templates with HXML templates. But in the process of
porting the backend to serve our mobile app, we lost the web application
functionality. Indeed, if you tried to visit
http://0.0.0.0:5000 in a web browser, you would see a
jumble of text and XML markup. That’s because web browsers don’t know
how to render plain XML, and they certainly don’t know how to interpret
the tags and attributes of HXML to render an app. It’s a shame, because
the Flask code for the web application and mobile app are nearly
identical. The database and model logic are shared, and most of the
views are unchanged as well.
At this point you’re surely wondering: is it possible to use the same
backend to serve both a web application and mobile app? The answer is
yes! In fact, this is one of the benefits of using a hypermedia
architecture across multiple platforms. We don’t need to port any
client-side logic from one platform to another, we just need to respond
to requests with the appropriate Hypermedia format. To do this, we will
utilize content negotiation built into HTTP.
What is Content Negotiation?
Imagine a German speaker and Japanese speaker both visit
https://google.com in their web browser. They will see the
Google home page localized in German and Japanese, respectively. How
does Google know to return a different version of the homepage based on
the user’s preferred language? The answer lies in the REST architecture,
and how it separates the concepts of resources and representations.
In the REST architecture, the Google homepage is considered to be a
single “resource,” represented by a unique URL. However, that single
resource can have multiple “representations.” Representations are
variations on how the content of the resource is presented to the
client. The German and Japanese versions of the Google homepage are two
representations of the same resource. To determine the best
representation of a resource to return, HTTP clients and servers engage
in a process called “content negotiation.” It works like this:
Clients specify the preferred representation through
Accept-* request headers.
The server tries to match the preferred representation as best it
can, and communicates back the chosen representation using
Content-*.
In the Google homepage example, the German speaker uses a browser
that is set to prefer content localized for German. Every HTTP request
made by the web browser will include a header
Accept-Language: de-DE. The server sees the request header,
and it will return a response localized for German (if it can). The HTTP
response will include a Content-Language: de-DE header to
inform the client of the language of the response content.
Language is just one factor for resource representation. More
importantly for us, resources can be represented using different content
types, such as HTML or HXML. Content negotiation over content type is
done using the Accept request header and
Content-Type response header. Web browsers set
text/html as the preferred content type in the
Accept header. The Hyperview client sets
application/vnd.hyperview+xml as the preferred content
type. This gives our backend a way to distinguish requests coming from a
web browser or Hyperview client, and serve the appropriate content to
each.
There are two main approaches to content negotiation: fine-grained
and global.
Approach 1: Template
Switching
When we ported the Contacts app from the web to mobile, we kept all
of the Flask views but made some minor changes. Specifically, we
introduced a new function render_to_response() and called
it in the return statement of each view. Here’s the function again to
refresh your memory:
render_to_response() renders a template with the given
context, and turns it into a Flask response object with the appropriate
Hyperview Content-Type header. Obviously, the
implementation is highly-specific to serving our Hyperview mobile app.
But we can modify the function to do content negotiation based on the
request’s Accept header:
Function signature takes two templates, one for HTML and one for
HXML.
Determine whether the client wants HTML or HXML.
Select the template based on the best match for the
client.
Set the Content-Type header based on the best match
for the client.
Flask’s request object exposes an accept_mimetypes
property to help with content negotiation. We pass our two content MIME
types to request.accept_mimetypes.best_match() and get back
the MIME type that works for our client. Based on the best matching MIME
type, we choose to either render an HTML template or HXML template. We
also make sure to set the Content-Type header to the
appropriate MIME type. The only difference in our Flask views is that we
need to provide both an HTML and HXML template:
Template switching between an HTML and HXML template, based on
the client.
After updating all of the Flask views to support both templates, our
backend will support both web browsers and our mobile app! This
technique works well for the Contacts app because the screens in the
mobile app map directly to pages of the web application. Each app has a
dedicated page (or screen) for listing contacts, showing and editing
details, and creating a new contact. This meant the Flask views could be
kept as-is without major changes.
But what if we wanted to re-imagine the Contacts app UI for our
mobile app? Perhaps we want the mobile app to use a single screen, with
rows that expanded in-line to support viewing and editing the
information? In situations where the UI diverges between platforms,
Template Switching becomes cumbersome or impossible. We need a different
approach to have one backend serve both hypermedia formats.
Approach 2: The Redirect
Fork
If you recall, the Contacts web app has an index view,
routed from the root path /:
When someone requests to the root path of the web application, Flask
redirects them to the /contacts path. This redirect also
works in our Hyperview mobile app. The Hyperview client’s
ENTRY_POINT_URL points to
http://0.0.0.0:5000/, and the server redirects it to
http://0.0.0.0:5000/contacts. But there’s no law that says
we need to redirect to the same path in our web application and mobile
app. What if we used the Accept header to redirect to
decide on the redirect path?
If the client wants HXML, redirect them to
/mobile/contacts.
If the client wants HTML, redirect them to
/web/contacts.
The entry point is a fork in the road: if the client wants HTML, we
redirect them to one path. If the client wants HXML, we redirect them to
a different path. These redirects would be handled by different Flask
views:
@app.route("/mobile/contacts")def mobile_contacts():# Render an HXML response@app.route("/web/contacts")def web_contacts():# Render an HTML response
app.py
The mobile_contacts() view would render an HXML template
with a list of contacts. Tapping a contact item would open a screen
requested from /mobile/contacts/1, handled by a view
mobile_contacts_view. After the initial fork, all
subsequent requests from our mobile app go to paths prefixed with
/mobile/, and get handled by mobile-specific Flask views.
Likewise, all subsequent requests from the web app go to paths prefixed
with /web/, and get handled by web-specific Flask views.
(Note that in practice, we would want to separate the web and mobile
views into separate parts of our codebase: web_app.py and
mobile_app.py. We may also choose not to prefix the web
paths with /web/, if we want more elegant URLs displayed in
the browser’s address bar.)
You may be thinking that the Redirect Fork leads to a lot of code
duplication. After all, we need to write double the number of views: one
set for the web application, and one set for the mobile app. That is
true, which is why the Redirect Fork is only preferred if the two
platforms require a disjointed set of view logic. If the apps are
similar on both platforms, Template Switching will save a lot of time
and keep the apps consistent. Even if we need to use the Redirect Fork,
the bulk of the logic in our models can be shared by both sets of
views.
In practice, you may start out using Template Switching, but then
realize you need to implement a fork for platform-specific features. In
fact, we’re already doing that in the Contacts app. When porting the app
from web to mobile, we didn’t bring over certain features like archiving
functionality. The dynamic archive UI is a power feature that wouldn’t
make sense on a mobile device. Since our HXML templates don’t expose any
entry points to the Archive functionality, we can treat it as “web-only”
and not worry about supporting it in Hyperview.
Contact.app, in Hyperview
We’ve covered a lot of ground in this chapter. Take a breath and take
stock of how far we’ve come: we ported the core functionality of the
Contact.app web application to mobile. And we did it by re-using much of
our Flask backend and while sticking with Jinja templating. We again saw
the utility of events for connecting different aspects of an
application.
We’re not done yet. In the next chapter we’ll implement custom
behaviors and UI elements to finish our mobile Contact.app.
Hypermedia Notes: API Endpoints
Unlike a JSON API, the hypermedia API you produce for your
hypermedia-driven application should feature endpoints specialized for
your particular application’s UI needs.
Because hypermedia APIs are not designed to be consumed by
general-purpose clients you can set aside the pressure to keep them
generalized and produce the content specifically needed for your
application. Your endpoints should be optimized to support your
particular applications UI/UX needs, not for a general-purpose
data-access model for your domain model.
A related tip is that, when you have a hypermedia-based API, you can
aggressively refactor your API in a way that is heavily discouraged when
writing JSON API-based SPAs or mobile clients. Because hypermedia-based
applications use Hypermedia As The Engine Of Application State, you are
able and, in fact, encouraged, to change the shape of them as your
application developers and as use cases change.
A great strength of the hypermedia approach is that you can
completely rework your API to adapt to new needs over time without
needing to version the API or even document it. Take advantage of
it!
In the previous chapter, we created a fully-featured native mobile
version of our Contacts app. Aside from customizing the entry point URL,
we didn’t need to touch any code that runs on the mobile device. We
defined our mobile app’s UI and logic completely in the backend code,
using Flask and HXML templates. This is possible because the standard
Hyperview client supports all of the basic features by mobile apps.
But the standard Hyperview client can’t do everything out of the box.
As app developers, we want apps to have unique touches like custom UIs
or deep integration with platform capabilities. To support these needs,
the Hyperview client was designed to be extended with custom behavior
actions and UI elements. In this section, we will enhance our mobile app
with examples of both.
Before diving in, let’s take a quick look at the tech stack we’ll be
using. The Hyperview client is written in React Native, a popular
cross-platform framework for creating mobile apps. It uses the same
component-based API as React. This means developers familiar with
JavaScript and React can quickly pick up React Native. React Native has
a healthy ecosystem of open-source libraries. We’ll be leveraging these
libraries to create our custom extensions to the Hyperview client.
Adding Phone Calls and Email
Let’s start with the most obvious feature missing from our Contacts
app: phone calls. Mobile devices can make phone calls. The contacts in
our app have phone numbers. Shouldn’t our app support calling those
phone numbers? And while we’re at it, our app should also support
e-mailing the contacts.
On the web, calling phone numbers is supported with the
tel: URI scheme, and e-mails are supported with the
mailto: URI scheme:
When clicked, prompt the user to call the given phone
number
When clicked, open an e-mail client with the given address
populated in the to: field.
The Hyperview client doesn’t support the tel: and
mailto: URI schemes. But we can add these capabilities to
the client with custom behavior actions. Remember that behaviors are
interactions defined in HXML. Behaviors have triggers (“press”,
“refresh”) and actions (“update”, “share”). The values of “action” are
not limited to the set that comes in the Hyperview library. So let’s
define two new actions, “open-phone” and “open-email”.
Define an alias for an XML namespace used by our new
attributes.
When pressed, prompt the user to call the given phone
number.
When pressed, open an e-mail client with the given address
populated in the to: field.
Notice we defined the actual phone number and email address using
separate attributes. In HTML, the scheme and data are crammed into the
href attribute. HXML’s <behavior>
elements give more options for representing the data. We chose to use
attributes, but we could have represented the phone number or email
using child elements. We’re also using a namespace to avoid potential
future conflicts with other client extensions.
So far so good, but how does the Hyperview client know how to
interpret open-phone and open-email, and how
to reference the phone-number and
email-address attributes? This is where we finally need to
write some JavaScript.
First, we’re going to add a 3rd-party library
(react-native-communications) to our demo app. This library
provides a simple API that interacts with OS-level functionality for
calls and emails.
cd hyperview/demoyarn add react-native-communications <1>yarn start <2>
Add dependency on
react-native-communications
Re-start the mobile app
Next, we’ll create a new file, phone.js, that will
implement the code associated with the open-phone
action:
Import the function we need from the 3rd party library.
The name of the action.
The callback that runs when the action triggers.
Get the phone number from the <behavior>
element.
Pass the phone number to the function from the 3rd party
library.
Custom actions are defined as a JavaScript object with two keys:
action and callback. This is how the Hyperview
client associates a custom action in the HXML with our custom code. The
callback value is a function that takes a single parameter,
behaviorElement. This parameter is an XML DOM
representation of the <behavior> element that
triggered the action. That means we can call methods on it like
getAttribute, or access attributes like
childNodes. In this case, we use
getAttributeNS to read the phone number from the
phone-number attribute on the <behavior>
element. If the phone number is defined on the element, we can call the
phonecall() function provided by the
react-native-communications library.
There’s one more thing to do before we can use our custom action:
register the action with the Hyperview client. The Hyperview client is
represented as a React Native component called Hyperview.
This component takes a prop called behaviors, which is an
array of custom action objects like our “open-phone” action. Let’s pass
our “open-phone” implementation to the Hyperview component
in our demo app.
Pass the custom actions to the Hyperview component,
as a prop called behaviors.
Under the hood, the Hyperview component is responsible
for taking HXML and turning it into mobile UI elements. It also handles
triggering behavior actions based on user interactions.
By passing the “open-phone” action to Hyperview, we can now use it as
a value for the action attribute on
<behavior> elements. In fact, let’s do that now by
updating the show.xml template in our Flask app:
Add a behavior to the phone number section that triggers on
“press.”
Trigger the new “open-phone” action.
Set the attribute expected by the “open-phone” action.
Same idea, with a different action (“open-email”).
We’ll skip over the implementation of the second custom action,
“open-email.” As you can guess, this action will open a system-level
email composer to let the user send an email to their contact. The
implementation of “open-email” is almost identical to “open-phone.” The
react-native-communications library exposes a function
called email(), so we just wrap it and pass arguments to it
in the same way.
We now have a complete example of extending the client with custom
behavior actions. We chose a new name for our actions (“open-phone” and
“open-email“), and mapped those names to functions. The functions take
<behavior> elements and can run any arbitrary React
Native code. We wrapped an existing 3rd party library, and read
attributes set on the <behavior> element to pass data
to the library. After re-starting our demo app, our client has new
capabilities we can immediately utilize by referencing the actions from
our HXML templates.
Adding Messages
The phone and email actions added in the previous section are
examples of “system actions.” System actions trigger some UI or
capability provided by the device’s OS. But custom actions are not
limited to interacting with OS-level APIs. Remember, the callbacks that
implement actions can run arbitrary code, including code that renders
our own UI elements. This next custom action example will do just that:
render a custom confirmation message UI element.
If you recall, our Contacts web app shows messages upon successful
actions, such as deleting or creating a contact. These messages are
generated in the Flask backend using the flash() function,
called from the views. Then the base layout.html template
renders the messages into the final web page.
{% for message in get_flashed_messages() %}
<div class="flash">{{ message }}</div>
{% endfor %}
Snippet templates/layout.html
Our Flask app still includes the calls to flash(), but
the Hyperview app is not accessing the flashed message to display to the
user. Let’s add that support now.
We could just show the messages using a similar technique to the web
app: loop through the messages and render some <text>
elements in layout.xml. This approach has a major downside:
the rendered messages would be tied to a specific screen. If that screen
was hidden by a navigation action, the message would be hidden too. What
we really want is for our message UI to display “above” all of the
screens in the navigation stack. That way, the message would remain
visible (fading away after a few seconds), even if the stack of screens
changes below. To display some UI outside of the
<screen> elements, we’re going to need to extend the
Hyperview client with a new custom action, show-message.
This is another opportunity to use an open-source library,
react-native-root-toast. Let’s add this library to our demo
app.
cd hyperview/demoyarn add react-native-root-toast <1>yarn start <2>
Add dependency on react-native-root-toast
Re-start the mobile app
Now, we can write the code to implement the message UI as a custom
action.
This code looks very similar to the implementation of
open-phone. Both callbacks follow a similar pattern: read
namespaced attributes from the <behavior> element,
and pass those values to a 3rd party library. For simplicity, we’re
hard-coding options to show the message at the top of the screen, fading
out after 2 seconds. But react-native-root-toast exposes
many options for positioning, timing of animations, colors, and more. We
could specify these options using extra attributes on
behaviorElement to make the action more configurable. For
our purposes, we will just stick to a bare-bones implementation.
Now we need to register our custom action with the
<Hyperview> component, by passing it to the
behaviors prop.
Pass the action to the Hyperview component, as a
prop called behaviors.
All that’s left to do is trigger the show-message action
from our HXML. There are three user actions that result in showing a
message:
Creating a new contact
Updating an existing contact
Deleting a contact
The first two actions are implemented in our app using the same HXML
template, form_fields.xml. Upon successfully creating or
updating a contact, this template will reload the screen and trigger an
event, using behaviors that trigger on “load”. The deletion action also
uses behaviors that trigger on “load”, defined in the
deleted.xml template. So both form_fields.xml
and deleted.xml need to be modified to also show messages
on load. Since the actual behaviors will be the same in both templates,
let’s create a shared template to reuse the HXML.
{% for message in get_flashed_messages() %} <behavior<1> xmlns:message="https://hypermedia.systems/hyperview/message" trigger="load" <2> action="show-message" <3> message:text="{{ message }}" <4> />{% endfor %}
hv/templates/messages.xml
Define a behavior for each message to display.
Trigger this behavior as soon as the element loads.
Trigger the new “show-message” action.
The “show-message” action will display the flashed message in its
UI.
Like in layout.html of the web app, we loop through all
of the flashed messages and render some markup for each message.
However, in the web app, the message was directly rendered into the web
page. In the Hyperview app, each message is displayed using a behavior
that triggers our custom UI. Now we just need to include this template
in form_fields.xml:
In both form_fields.xml and deleted.xml,
multiple behaviors get triggered on “load.” In deleted.xml,
we immediately navigate back to the previous screen. In
form_fields.xml, we immediately reload the current screen
to show the Contact details. If we rendered our message UI elements
directly in the screen, the user would barely see them before the screen
disappeared or reloaded. By using a custom action, the message UI
remains visible even while the screens change beneath them.
Message shown during back navigation
Swipe Gesture on Contacts
To add communication capabilities and the message UI, we extended the
client with custom behavior actions. But the Hyperview client can also
be extended with custom UI components that render on the screen. Custom
components are implemented as React Native components. That means
anything that’s possible in React Native can be done in Hyperview as
well! Custom components open up endless possibilities to build rich
mobile apps with the Hypermedia architecture.
To illustrate the possibilities, we will extend the Hyperview client
in our mobile app to add a “swipeable row” component. How does it work?
The “swipeable row” component supports a horizontal swiping gesture. As
the user swipes this component from right to left, the component will
slide over, revealing a series of action buttons. Each action button
will be able to trigger standard Hyperview behaviors when pressed. We
will use this custom component in our Contacts List screen. Each contact
item will be a “swipeable row”, and the actions will give quick access
to edit and delete actions for the contact.
Swipeable contact item
Designing The Component
Rather than implementing the swipe gesture from scratch, we will once
again use an open-source third-party library:
react-native-swipeable.
cd hyperview/demoyarn add react-native-swipeable <1>yarn start <2>
Add dependency on react-native-swipeable.
Re-start the mobile app.
This library provides a React Native component called
Swipeable. It can render any React Native components as its
main content (the part that can be swiped). It also takes an array of
React Native components as a prop to render as the action buttons.
When designing a custom component, we like to define the HXML of the
component before writing the code. This way, we can make sure the markup
is expressive but succinct, and will work with the underlying
library.
For the swipeable row, we need a way to represent the entire
component, the main content, and one of many buttons.
<swipe:row xmlns:swipe="https://hypermedia.systems/hyperview/swipeable"> <1> <swipe:main> <2><!-- main content shown here --> </swipe:main> <swipe:button> <3><!-- first button that appears when swiping --> </swipe:button> <swipe:button> <4><!-- second button that appears when swiping --> </swipe:button></swipe:row>
Parent element encapsulating the entire swipeable row, with
custom namespace.
The main content of the swipeable row, can hold any
HXML.
The first button that appears when swiping, can hold any
HXML.
The second button that appears when swiping, can hold any
HXML.
This structure clearly separates the main content from the buttons.
It also supports one, two, or more buttons. Buttons appear in the order
of definition, making it easy to swap the order.
This design covers everything we need to implement a swipeable row
for our contacts list. But it’s also generic enough to be reusable. The
previous markup contains nothing specific to the contact name, editing
the contact, or deleting the contact. If later we add another list
screen to our app, we can use this component to make the items in that
list swipeable.
Implementing The Component
Now that we know the HXML structure of our custom component, we can
write the code to implement it. What does that code look like? Hyperview
components are written as React Native components. These React Native
components are mapped to a unique XML namespace and tag name. When the
Hyperview client encounters that namespace and tag name in the HXML, it
delegates rendering of the HXML element to the matching React Native
component. As part of delegation, the Hyperview Client passes several
props to the React Native component:
element: The XML DOM element that maps to the React
Native component.
stylesheets: The styles defined in the
<screen>.
onUpdate: The function to call when the component
triggers a behavior.
option: Miscellaneous settings used by the Hyperview
client.
Our swipeable row component is a container with slots to render
arbitrary main content and buttons. That means it needs to delegate back
to the Hyperview client to render those parts of the UI. This is done
with a public function exposed by the Hyperview client,
Hyperview.renderChildren().
Now that we know how custom Hyperview components are implemented,
let’s write the code for our swipeable row.
Function that returns an array of React Native components for
each <button> element.
Delegate to the Hyperview client to render each button.
Pass the buttons and main content to the third-party
library.
Delegate to the Hyperview client to render the main
content.
The SwipeableRow class implements a React Native
component. At the top of the class, we set a static
namespaceURI property and localName property.
These properties map the React Native component to a unique namespace
and tag name pair in the HXML. This is how the Hyperview client knows to
delegate to SwipeableRow when encountering custom elements
in the HXML. At the bottom of the class, you’ll see a
render() method. render() gets called by React
Native to return the rendered component. Since React Native is built on
the principle of composition, render() typically returns a
composition of other React Native components. In this case, we return
the Swipeable component (provided by the
react-native-swipeable library), composed with React Native
components for the buttons and main content. The React Native components
for the buttons and main content are created using a similar
process:
Find the specific child elements (<button> or
<main>).
Turn those elements into React Native components using
Hyperview.renderChildren().
Set the components as children or props of
Swipeable.
Rendering delegation between the client and the custom
components
This code may be hard to follow if you’ve never worked with React or
React Native. That’s OK. The important takeaway is: we can write code to
translate arbitrary HXML into React Native components. The structure of
the HXML (both attributes and elements) can be used to represent
multiple facets of the UI (in this case, the buttons and main content).
Finally, the code can delegate rendering of child components back to the
Hyperview client.
The result: this swipeable row component is completely generic. The
actual structure and styling and interactions of the main content and
buttons can be defined in the HXML. Creating a generic component means
we can reuse it across multiple screens for different purposes. If we
add more custom components or new behavior actions in the future, they
will work with our swipeable row implementation.
The last thing to do is register this new component with the
Hyperview client. The process is similar to registering custom actions.
Custom components are passed as a separate components prop
to the Hyperview component.
Added <swipe:row> ancestor element, with
namespace alias for swipe.
Added <swipe:main> element to define the main
content.
Wrapped the existing <behavior> and
<text> elements in a
<view>.
Previously, the contact-item style was set on the
<item> element. That made sense when the
<item> element was the container for the main content
of the list item. Now that the main content is a child of
<swipe:main>, we need to introduce a new
<view> where we apply the styles.
If we reload our backend and mobile app, you won’t experience any
changes on the Contacts List screen yet. Without any action buttons
defined, there’s nothing to reveal when swiping a row. Let’s add two
buttons to the swipeable row.
Now if we use our mobile app, we can see the swipeable row in action!
As you swipe the contact item, the “Edit” and “Delete” buttons reveal
themselves. But they don’t do anything yet. We need to add some
behaviors to these buttons. The “Edit” button is straight-forward:
pressing it should open the contact details screen in edit mode.
When pressed, push a new screen with the Edit Contact
UI.
The “Delete” button is a bit more complicated. There’s no screen to
open for deletion, so what should happen when the user presses this
button? Perhaps we use the same interaction as the “Delete” button on
the Edit Contact screen. That interaction brings up a system dialog,
asking the user to confirm the deletion. If the user confirms, the
Hyperview client makes a POST request to
/contacts/<contact_id>/delete, and appends the
response to the screen. The response triggers a few behaviors
immediately to reload the contacts list and show a message. This
interaction will work for our action button as well:
When pressed, open a system dialog box asking the user to confirm
the action.
If confirmed, make a POST request to the deletion endpoint, and
append the response to the enclosing <item>.
Now when we press “Delete,” we get the confirmation dialog as
expected. After pressing confirm, the backend response triggers
behaviors that show a confirmation message and reload the list of
contacts. The item for the deleted contact disappears from the list.
Delete from swipe button
Notice that the action buttons are able to support any type of
behavior action, from push to alert. If we
wanted to, we could have the action buttons trigger our custom actions,
like open-phone and open-email. Custom
components and actions can be mixed freely with the standard components
and actions that come standard with the Hyperview framework. This makes
the extensions to the Hyperview client feel like first-class
features.
In fact, we’ll let you in on a secret. Within the Hyperview client,
standard components and actions are implemented the same way as custom
components and actions! The rendering code does not treat
<view> differently from
<swipe:row>. The behavior code does not treat
alert differently from open-phone. They are
both implemented using the same techniques described in this section.
Standard components and actions are just the ones that are universally
needed by all mobile apps. But they are just the starting point.
Most mobile apps will require some extensions to the Hyperview client
to deliver a great user experience. Extensions evolve the client from
being a generic “Hyperview client,” to being a purpose-built client for
your app. And importantly, this evolution preserves the Hypermedia,
server-driven architecture and all of its benefits.
Mobile Hypermedia-Driven
Applications
That concludes our build of mobile Contact.app. Step back from the
code details and consider the broader pattern:
The core logic of the app resides on the server.
Server-rendered templates power both the web and mobile
apps.
Platform customizations are done through scripting on the web,
and client customization on mobile.
The Hypermedia-Driven Application architecture allowed for
significant code reuse and a manageable tech stack. Ongoing app updates
and maintenance for both web and mobile can be done at the same
time.
Yes, there is a story for Hypermedia-Driven Applications on
mobile.
Hypermedia Notes: Good-Enough UX and Islands of
Interactivity
A problem many SPA and native mobile developers face when coming to
the HDA approach is that they look at their current application and
imagine implementing it exactly using hypermedia. While htmx and
Hyperview significantly improve the user experience available via the
hypermedia-driven approach, there are still times when it won’t be easy
to pull off a particular user experience.
As we saw in Chapter 2, Roy Fielding noted this tradeoff with respect
to the web’s RESTful network architecture, where “information is
transferred in a standardized form rather than one which is specific to
an application’s needs.”
Accepting a slightly less efficient and interactive solution to a
particular UX can save you a tremendous amount of complexity when
building your applications.
Do not let the perfect be the enemy of the good. Many advantages are
to be gained by accepting a slightly less sophisticated user experience
in some cases, and tools like htmx and Hyperview make that compromise
much more palatable when they are used properly.
We hope to have convinced you that hypermedia, rather than being a
“legacy” technology or a technology only appropriate for “documents” of
links, text and pictures, is, in fact, a powerful technology for
building applications. In this book you have seen how to build
sophisticated user interfaces — for both the web, with htmx, and for
mobile applications, using Hyperview — using hypermedia as a core
underlying application technology.
Many web developers view the links and forms of “plain” HTML as
bygone tools from a less sophisticated age. And, in some ways, they are
right: there were definite usability issues with the original web.
However, there are now JavaScript libraries that extend HTML by
addressing its core limitations.
Htmx, for example, allowed us to:
Make any element capable of issuing an HTTP request
Make any event capable of triggering an HTTP event
Use all the available types of HTTP methods
Target any element in the DOM for replacement
With that, we were able to build user interfaces for Contact.app that
many developers would assume require a significant amount of client-side
JavaScript, and we did it using hypermedia concepts.
The Hypermedia-Driven Application approach is not right for every
application. For many applications, though, the increased flexibility
and simplicity of hypermedia can be a huge benefit. Even if your
application wouldn’t benefit from this approach, it is worthwhile to
understand the approach, its strengths and weaknesses, and how
it differs from the approach you are taking. The original web grew
faster than any distributed system in history; web developers should
know how to tap the power of the underlying technologies that made that
growth possible.
Pausing, and Reflecting
The JavaScript community and, by extension, the web development
community is famously chaotic, with new frameworks and technologies
emerging monthly, and sometimes even weekly. It can be
exhausting to keep up with the latest and greatest technologies, and, at
the same time, terrifying that we won’t keep up with them and
be left behind in our career.
This is not a fear without foundation: there are many senior software
engineers that have seen their careers peter out because they picked a
technology to specialize in that, fairly or not, did not thrive. The web
development world tends to be young, with many companies favoring young
developers over older developers who “haven’t kept up.”
We shouldn’t sugar-coat these realities of our industry. On the other
hand, we also shouldn’t ignore the downside that these realities create.
It creates a high-pressure environment where everyone is watching for
“the new new” thing, that is, for the latest and greatest technology
that is going to change everything. It creates pressure to
claim that your technology is going to change everything. It
tends to favor sophistication over simplicity. People
are scared to ask “Is this too complex?” because it sounds an awful lot
like “I’m not smart enough to understand this.”
The software industry tends, especially in web development, to lean
far more towards innovating, rather than understanding existing
technologies and building on them or within them. We tend to look ahead
for new, genius solutions, rather than looking to established ideas.
This is understandable: the technology world is necessarily a
forward-looking industry.
On the other hand — as we saw with Roy Fielding’s formulation of REST
— some early architects of the web had some great ideas which have been
overlooked. We are old enough to have seen hypermedia come and go as the
“new new” idea. It was a little shocking to us to see powerful ideas
like REST discarded so cavalierly by the industry. Fortunately, the
concepts are still sitting there, waiting to be rediscovered and
reinvigorated. The original, RESTful architecture of the web, when
looked at with fresh eyes, can address many of the problems that today’s
web developers are facing.
Perhaps, following Mark Twain’s advice, it is time to pause and
reflect. Perhaps, for a few quiet moments, we can put the endless swirl
of the “new new” aside, look back on where the web came from, and
learn.